使用 Actions 和 Shortcuts
如何在你的 Flutter 應用程式中使用 Actions 和 Shortcuts。
本頁說明如何將實體鍵盤事件綁定到使用者介面中的 actions。舉例來說,如果你想在應用程式中定義鍵盤快捷鍵,這篇文章將適合你。
概覽
#對於一個 GUI 應用程式來說,若要執行任何操作,都必須有 actions:使用者希望告訴應用程式去_做_某些事情。Actions 通常是直接執行操作的簡單函式(例如設定值或儲存檔案)。然而,在較大型的應用程式中,情況會更為複雜:觸發 action 的程式碼與 action 本身的程式碼可能需要分開放在不同的位置。快捷鍵(key bindings)可能需要在完全不了解它們所觸發 actions 的層級進行定義。
這正是 Flutter 的 actions 和 shortcuts 系統發揮作用的地方。它允許開發者定義 actions 來完成與其綁定的 intents。在這個脈絡下,intent 是使用者想要執行的通用操作,而
Intent 類別實例則在 Flutter 中代表這些使用者意圖。Intent
可以是通用的,能在不同情境下由不同的 actions 完成。Action
可以是簡單的回呼(callback)(如 CallbackAction
的情境),也可以是更複雜、整合整個 undo/redo 架構(例如)或其他邏輯的實作。
Shortcuts 是透過按下一個按鍵或組合鍵來啟動的鍵盤綁定。這些按鍵組合會與其綁定的 intent 一起存放在一個表格中。當
Shortcuts 元件 (Widget) 呼叫它們時,會將對應的 intent 傳送給 actions 子系統來執行。
為了說明 actions 和 shortcuts 的概念,本文將建立一個簡單的應用程式,讓使用者可以透過按鈕和快捷鍵,在文字欄位(text field)中選取並複製文字。
為什麼要將 Actions 與 Intents 分離?
#你可能會想:為什麼不直接將按鍵組合對應到 action?為什麼還需要 intents?這是因為將按鍵對應定義(通常在較高層級)與 action 定義(通常在較低層級)分離,有助於職責分離;同時,也能讓單一按鍵組合對應到應用程式中預期的操作,並能根據目前焦點情境自動適應由哪個 action 來實現該操作。
舉例來說,Flutter 有一個 ActivateIntent 元件 (Widget),它會將每種類型的控制項對應到其對應版本的 ActivateAction(並執行啟動控制項的程式碼)。這段程式碼通常需要相當私有的存取權限來完成其工作。如果沒有
Intent 所提供的這層額外間接層,則必須將 actions 的定義提升到 Shortcuts 元件 (Widget) 實例能看到的位置,這會導致 shortcuts 必須知道過多關於要呼叫哪個 action 的細節,甚至需要存取或提供本來不需要的狀態。這樣的設計讓你的程式碼可以將這兩個職責分離,彼此更為獨立。
Intents 可以用來設定 action,使同一個 action 能服務多種用途。例如 DirectionalFocusIntent,它會帶入一個移動焦點的方向,讓 DirectionalFocusAction
知道要將焦點移動到哪個方向。但請注意:不要在 Intent 中傳遞會影響所有 Action 呼叫的狀態;這類狀態應該傳遞給 Action
的建構子本身,讓 Intent 不需要知道太多細節。
為什麼不用 callbacks?
#
你也可能會想:為什麼不用 callback 來取代 Action 物件?主要原因是 actions 可以透過實作 isEnabled 來決定自己是否啟用。此外,將鍵盤綁定與其實作分開放在不同位置,往往也更有彈性。
如果你只需要 callback,而不需要 Actions 和 Shortcuts 所帶來的彈性,可以使用 CallbackShortcuts
元件 (Widget):
@override
Widget build(BuildContext context) {
  return CallbackShortcuts(
    bindings: <ShortcutActivator, VoidCallback>{
      const SingleActivator(LogicalKeyboardKey.arrowUp): () {
        setState(() => count = count + 1);
      },
      const SingleActivator(LogicalKeyboardKey.arrowDown): () {
        setState(() => count = count - 1);
      },
    },
    child: Focus(
      autofocus: true,
      child: Column(
        children: <Widget>[
          const Text('Press the up arrow key to add to the counter'),
          const Text('Press the down arrow key to subtract from the counter'),
          Text('count: $count'),
        ],
      ),
    ),
  );
}
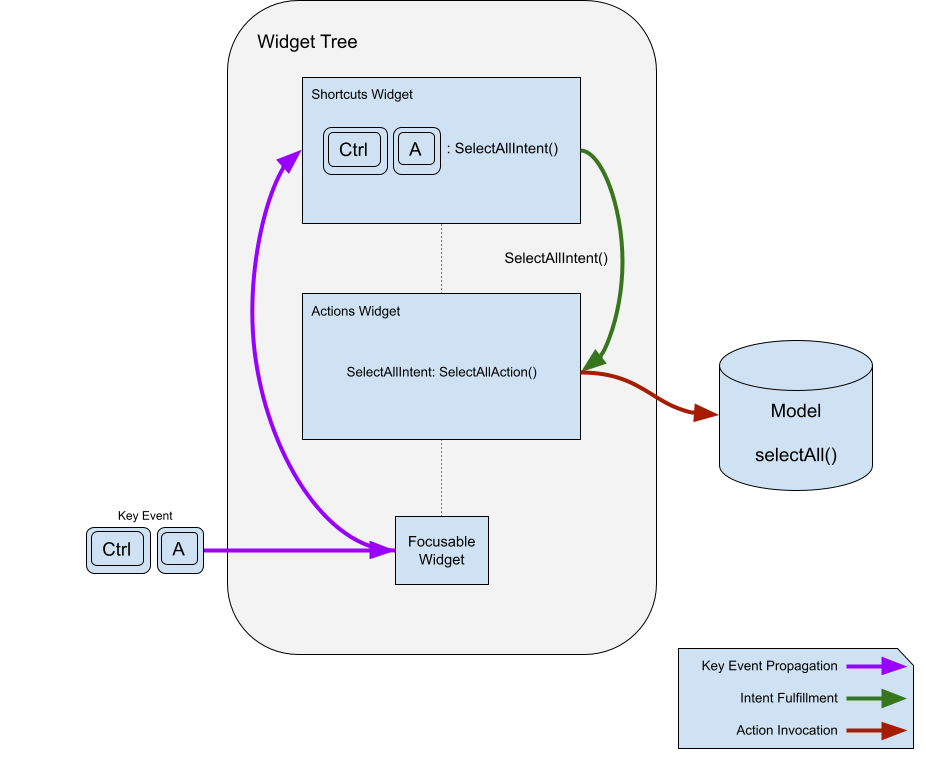
快捷鍵
#如下面所示,actions(操作)本身就很有用,但最常見的使用情境是將其綁定到鍵盤快捷鍵。這正是 Shortcuts 元件 (Widget) 存在的目的。
它被插入到元件 (Widget) 階層中,用來定義代表使用者意圖的按鍵組合,當該組合被按下時觸發。要將這個按鍵組合的預期用途轉換為具體的操作,會使用 Actions 元件來將
Intent 映射到 Action。例如,你可以定義一個 SelectAllIntent,並將其綁定到你自己的 SelectAllAction
或 CanvasSelectAllAction,系統會根據應用程式中哪一部分擁有焦點,從同一個按鍵綁定中呼叫其中之一。讓我們看看按鍵綁定的部分是如何運作的:
@override
Widget build(BuildContext context) {
  return Shortcuts(
    shortcuts: <LogicalKeySet, Intent>{
      LogicalKeySet(LogicalKeyboardKey.control, LogicalKeyboardKey.keyA):
          const SelectAllIntent(),
    },
    child: Actions(
      dispatcher: LoggingActionDispatcher(),
      actions: <Type, Action<Intent>>{
        SelectAllIntent: SelectAllAction(model),
      },
      child: Builder(
        builder: (context) => TextButton(
          onPressed: Actions.handler<SelectAllIntent>(
            context,
            const SelectAllIntent(),
          ),
          child: const Text('SELECT ALL'),
        ),
      ),
    ),
  );
}
傳遞給 Shortcuts 元件 (Widget) 的對應表會將 LogicalKeySet(或 ShortcutActivator,請參見下方備註)對應到一個
Intent 實例。邏輯鍵集合(logical key set)定義了一組一個或多個鍵,而 intent(意圖)則表示按鍵操作的預期用途。Shortcuts
元件會在對應表中查找按鍵操作,以找到 Intent 實例,並將其傳遞給 action 的 invoke() 方法。
ShortcutManager
#
shortcut manager(快捷鍵管理器)是一個比 Shortcuts 元件 (Widget) 生命週期更長的物件,當它接收到鍵盤事件時,會將事件傳遞下去。它包含決定如何處理按鍵的邏輯、向上遍歷樹狀結構以尋找其他快捷鍵對應表的邏輯,並維護一個將按鍵組合對應到 intent 的對應表。
雖然 ShortcutManager 的預設行為通常是理想的,但 Shortcuts 元件 (Widget) 接受一個 ShortcutManager,你可以透過繼承它來自訂其功能。
舉例來說,如果你想記錄每一個被 Shortcuts 元件處理的按鍵,你可以建立一個 LoggingShortcutManager:
class LoggingShortcutManager extends ShortcutManager {
  @override
  KeyEventResult handleKeypress(BuildContext context, KeyEvent event) {
    final KeyEventResult result = super.handleKeypress(context, event);
    if (result == KeyEventResult.handled) {
      print('Handled shortcut $event in $context');
    }
    return result;
  }
}
現在,每當 Shortcuts 元件 (Widget) 處理快捷鍵時,都會印出鍵盤事件(key event)以及相關的 context。
Actions
#
Actions 允許定義應用程式可以執行的操作,這些操作可透過 Intent 來呼叫。Actions 可以啟用或停用,並會接收觸發它們的 intent 實例作為參數,以便根據 intent 進行設定。
定義 Actions
#
最簡單的 Actions 形式,就是繼承 Action<Intent> 並實作 invoke() 方法的子類別。以下是一個簡單的 action 範例,會在提供的 model 上呼叫一個函式:
class SelectAllAction extends Action<SelectAllIntent> {
SelectAllAction(this.model);
final Model model;
@override
void invoke(covariant SelectAllIntent intent) => model.selectAll();
}
或者,如果建立新類別太麻煩,可以使用 CallbackAction:
CallbackAction(onInvoke: (intent) => model.selectAll());
當你擁有一個 action(操作)後,可以使用 Actions
元件 (Widget) 將其加入到你的應用程式中。這個元件會接收一個將 Intent 型別對應到 Action 的對應表(map):
@override
Widget build(BuildContext context) {
  return Actions(
    actions: <Type, Action<Intent>>{SelectAllIntent: SelectAllAction(model)},
    child: child,
  );
}
Shortcuts 元件 (Widget) 會使用 Focus 元件 (Widget) 的 context 和 Actions.invoke
來尋找要觸發的 action。如果 Shortcuts 元件沒有在遇到的第一個 Actions 元件中找到符合的 intent 型別,則會繼續往上尋找下一個父層的
Actions 元件,如此類推,直到抵達元件樹(widget tree)的根節點,或找到符合的 intent 型別並觸發對應的 action 為止。
觸發 Actions
#
Actions 系統有多種方式可以觸發 action。最常見的方式是透過前一節介紹的 Shortcuts 元件 (Widget),但也有其他方式可以查詢 actions 子系統並觸發 action。你也可以觸發那些沒有綁定到按鍵的 action。
例如,若要尋找與某個 intent 相關聯的 action,你可以使用:
Action<SelectAllIntent>? selectAll = Actions.maybeFind<SelectAllIntent>(
  context,
);
這會傳回與 SelectAllIntent 型別相關聯的 Action(如果在指定的 context 中有可用的話)。如果沒有可用的,則會傳回 null。如果應該始終有相關聯的
Action 可用,請改用 find 而非 maybeFind,當找不到符合的 Intent 型別時,find
會拋出例外。
若要呼叫該 action(如果存在),請呼叫:
Object? result;
if (selectAll != null) {
  result = Actions.of(
    context,
  ).invokeAction(selectAll, const SelectAllIntent());
}
將上述內容合併為一個呼叫,可以使用以下方式:
Object? result = Actions.maybeInvoke<SelectAllIntent>(
  context,
  const SelectAllIntent(),
);
有時候,你會希望在按下按鈕或其他控制項時觸發一個動作(action)。
你可以使用 Actions.handler 函式來達成這個目的。
如果該 intent 有對應到一個已啟用的 action,Actions.handler 函式會建立一個處理器閉包(handler closure)。
然而,如果沒有對應的 mapping,則會回傳 null。
這樣一來,如果在當前上下文中沒有符合條件且已啟用的 action,按鈕就會被停用。
@override
Widget build(BuildContext context) {
  return Actions(
    actions: <Type, Action<Intent>>{SelectAllIntent: SelectAllAction(model)},
    child: Builder(
      builder: (context) => TextButton(
        onPressed: Actions.handler<SelectAllIntent>(
          context,
          SelectAllIntent(controller: controller),
        ),
        child: const Text('SELECT ALL'),
      ),
    ),
  );
}
Actions 元件只有在 isEnabled(Intent intent) 回傳 true 時才會觸發動作,這讓動作本身可以決定 dispatcher 是否應該考慮執行它。如果該動作未啟用,則
Actions 元件會讓元件階層中更高處(如果存在)的另一個已啟用動作有機會被執行。
前一個範例之所以使用 Builder,是因為 Actions.handler 和 Actions.invoke(例如)只會在所提供的
context 中尋找動作。如果範例將傳遞給 build 的 context 作為參數,框架就會開始從目前元件之上的階層尋找動作。使用
Builder 可以讓框架找到在同一個 build 函式中定義的動作。
你可以在不需要 BuildContext 的情況下觸發動作,但因為 Actions 元件需要 context 來尋找可執行的動作,所以你必須提供一個 context,可以自行建立
Action 實例,或是透過 Actions.find 在適當的 context 中尋找。
要觸發動作,請將該動作傳遞給 ActionDispatcher 的 invoke 方法,不論是你自己建立的,還是從現有的 Actions
元件透過 Actions.of(context) 方法取得的。在呼叫 invoke 前,請先檢查該動作是否已啟用。當然,你也可以直接在動作本身呼叫
invoke,並傳入 Intent,但這樣就不會享有 action dispatcher 可能提供的服務(例如記錄、復原/重做等)。
Action dispatchers
#大多數時候,你只需要觸發一個動作,讓它完成自己的工作即可,不需要再理會。但有時候,你可能會想記錄所有被執行的動作。
這時就可以用自訂 dispatcher 來取代預設的 ActionDispatcher。你可以將自己的 ActionDispatcher 傳給 Actions
元件,這樣它就會處理從其下方所有未自行設定 dispatcher 的 Actions 元件所觸發的動作。
Actions 在觸發動作時,首先會查找 ActionDispatcher,並將動作交給它執行。如果找不到,則會建立一個預設的 ActionDispatcher,直接執行該動作。
如果你想記錄所有被觸發的動作,可以自訂一個 LoggingActionDispatcher 來達成:
class LoggingActionDispatcher extends ActionDispatcher {
@override
Object? invokeAction(
covariant Action<Intent> action,
covariant Intent intent, [
BuildContext? context,
]) {
print('Action invoked: $action($intent) from $context');
super.invokeAction(action, intent, context);
return null;
}
@override
(bool, Object?) invokeActionIfEnabled(
covariant Action<Intent> action,
covariant Intent intent, [
BuildContext? context,
]) {
print('Action invoked: $action($intent) from $context');
return super.invokeActionIfEnabled(action, intent, context);
}
}
然後你將其傳遞給頂層的 Actions 元件 (Widget):
@override
Widget build(BuildContext context) {
  return Actions(
    dispatcher: LoggingActionDispatcher(),
    actions: <Type, Action<Intent>>{SelectAllIntent: SelectAllAction(model)},
    child: Builder(
      builder: (context) => TextButton(
        onPressed: Actions.handler<SelectAllIntent>(
          context,
          const SelectAllIntent(),
        ),
        child: const Text('SELECT ALL'),
      ),
    ),
  );
}
這會在每次執行動作時記錄下來,如下所示:
flutter: Action invoked: SelectAllAction#906fc(SelectAllIntent#a98e3) from Builder(dependencies: _[ActionsMarker])
整合應用
#
Actions 和 Shortcuts 的結合非常強大:你可以在元件 (Widget) 層級定義通用的 intent,並將其對應到特定的 action。以下是一個簡單的應用程式,說明上述概念。這個應用程式會建立一個文字欄位(text field),旁邊有「全選」和「複製到剪貼簿」按鈕。這些按鈕會呼叫 action 來完成各自的功能。所有被呼叫的 action 和快捷鍵(shortcut)都會被記錄下來。
import 'package:flutter/material.dart';
import 'package:flutter/services.dart';

/// A text field that also has buttons to select all the text and copy the
/// selected text to the clipboard.
class CopyableTextField extends StatefulWidget {
  const CopyableTextField({super.key, required this.title});

  final String title;

  @override
  State<CopyableTextField> createState() => _CopyableTextFieldState();
}

class _CopyableTextFieldState extends State<CopyableTextField> {
  late final TextEditingController controller = TextEditingController();
  late final FocusNode focusNode = FocusNode();

  @override
  void dispose() {
    controller.dispose();
    focusNode.dispose();
    super.dispose();
  }

  @override
  Widget build(BuildContext context) {
    return Actions(
      dispatcher: LoggingActionDispatcher(),
      actions: <Type, Action<Intent>>{
        ClearIntent: ClearAction(controller),
        CopyIntent: CopyAction(controller),
        SelectAllIntent: SelectAllAction(controller, focusNode),
      },
      child: Builder(
        builder: (context) {
          return Scaffold(
            body: Center(
              child: Row(
                children: <Widget>[
                  const Spacer(),
                  Expanded(
                    child: TextField(
                      controller: controller,
                      focusNode: focusNode,
                    ),
                  ),
                  IconButton(
                    icon: const Icon(Icons.copy),
                    onPressed: Actions.handler<CopyIntent>(
                      context,
                      const CopyIntent(),
                    ),
                  ),
                  IconButton(
                    icon: const Icon(Icons.select_all),
                    onPressed: Actions.handler<SelectAllIntent>(
                      context,
                      const SelectAllIntent(),
                    ),
                  ),
                  const Spacer(),
                ],
              ),
            ),
          );
        },
      ),
    );
  }
}

/// A ShortcutManager that logs all keys that it handles.
class LoggingShortcutManager extends ShortcutManager {
  @override
  KeyEventResult handleKeypress(BuildContext context, KeyEvent event) {
    final KeyEventResult result = super.handleKeypress(context, event);
    if (result == KeyEventResult.handled) {
      print('Handled shortcut $event in $context');
    }
    return result;
  }
}

/// An ActionDispatcher that logs all the actions that it invokes.
class LoggingActionDispatcher extends ActionDispatcher {
  @override
  Object? invokeAction(
    covariant Action<Intent> action,
    covariant Intent intent, [
    BuildContext? context,
  ]) {
    print('Action invoked: $action($intent) from $context');
    super.invokeAction(action, intent, context);

    return null;
  }
}

/// An intent that is bound to ClearAction in order to clear its
/// TextEditingController.
class ClearIntent extends Intent {
  const ClearIntent();
}

/// An action that is bound to ClearIntent that clears its
/// TextEditingController.
class ClearAction extends Action<ClearIntent> {
  ClearAction(this.controller);

  final TextEditingController controller;

  @override
  Object? invoke(covariant ClearIntent intent) {
    controller.clear();

    return null;
  }
}

/// An intent that is bound to CopyAction to copy from its
/// TextEditingController.
class CopyIntent extends Intent {
  const CopyIntent();
}

/// An action that is bound to CopyIntent that copies the text in its
/// TextEditingController to the clipboard.
class CopyAction extends Action<CopyIntent> {
  CopyAction(this.controller);

  final TextEditingController controller;

  @override
  Object? invoke(covariant CopyIntent intent) {
    final String selectedString = controller.text.substring(
      controller.selection.baseOffset,
      controller.selection.extentOffset,
    );
    Clipboard.setData(ClipboardData(text: selectedString));

    return null;
  }
}

/// An intent that is bound to SelectAllAction to select all the text in its
/// controller.
class SelectAllIntent extends Intent {
  const SelectAllIntent();
}

/// An action that is bound to SelectAllAction that selects all text in its
/// TextEditingController.
class SelectAllAction extends Action<SelectAllIntent> {
  SelectAllAction(this.controller, this.focusNode);

  final TextEditingController controller;
  final FocusNode focusNode;

  @override
  Object? invoke(covariant SelectAllIntent intent) {
    controller.selection = controller.selection.copyWith(
      baseOffset: 0,
      extentOffset: controller.text.length,
      affinity: controller.selection.affinity,
    );

    focusNode.requestFocus();

    return null;
  }
}

/// The top level application class.
///
/// Shortcuts defined here are in effect for the whole app,
/// although different widgets may fulfill them differently.
class MyApp extends StatelessWidget {
  const MyApp({super.key});

  static const String title = 'Shortcuts and Actions Demo';

  @override
  Widget build(BuildContext context) {
    return MaterialApp(
      title: title,
      theme: ThemeData(
        colorScheme: ColorScheme.fromSeed(seedColor: Colors.deepPurple),
      ),
      home: Shortcuts(
        shortcuts: <LogicalKeySet, Intent>{
          LogicalKeySet(LogicalKeyboardKey.escape): const ClearIntent(),
          LogicalKeySet(LogicalKeyboardKey.control, LogicalKeyboardKey.keyC):
              const CopyIntent(),
          LogicalKeySet(LogicalKeyboardKey.control, LogicalKeyboardKey.keyA):
              const SelectAllIntent(),
        },
        child: const CopyableTextField(title: title),
      ),
    );
  }
}

void main() => runApp(const MyApp());Unless stated otherwise, the documentation on this site reflects Flutter 3.44.0. Page last updated on 2026-06-14. View source or report an issue.