為 iOS 與 macOS 設定 Flutter flavors
如何為 iOS 或 macOS 應用程式建立 Flutter flavors。
本指南將說明如何為 iOS 或 macOS 應用程式建立 Flutter flavors。
概覽
#Flutter flavor 基本上是一組設定,用來定義應用程式的特定版本應該如何建置與執行。例如,某個 flavor 可以決定特定版本的應用程式所使用的圖示、應用程式名稱、API 金鑰、功能旗標(feature flag)以及日誌等級。
如果你想為 iOS 應用程式建立 Flutter flavors,必須在 Xcode 中進行設定。Xcode 並沒有「flavor」這個概念,而是需要建立「scheme」(方案),並為其附加自訂的設定(configuration)。
下表展示了兩個 Flutter flavors(staging、production)作為 Xcode schemes,並分別指派了自訂的 Xcode 設定:
| Scheme | Configurations for the scheme |
|---|---|
| staging | Debug-staging Profile-staging Release-staging |
| production | Debug-production Profile-production Release-production |
設定 Xcode schemes
#
以下步驟將說明如何為你的 Flutter iOS 專案設定兩個名為 staging 和 production 的 Xcode schemes。若要設定 macOS 專案,只需將所有
iOS 的參考替換為 macOS 即可。
為了讓流程更順暢,我們以一個名為 flavors_example 的全新 Flutter 專案作為起點,但你也可以從現有專案開始。
-
建立一個名為
flavors_example的全新 Flutter 專案。consoleflutter create flavors_example -
開啟
flavors_example專案的 iOS 版本預設 Xcode workspace。consolecd flavors_example && open ios/Runner.xcworkspace -
在 Xcode 專案導覽器中開啟
flavors_example專案:開啟 專案導覽器(View > Navigators > Project)。
在 專案導覽器頂部,選擇 Runner。
-
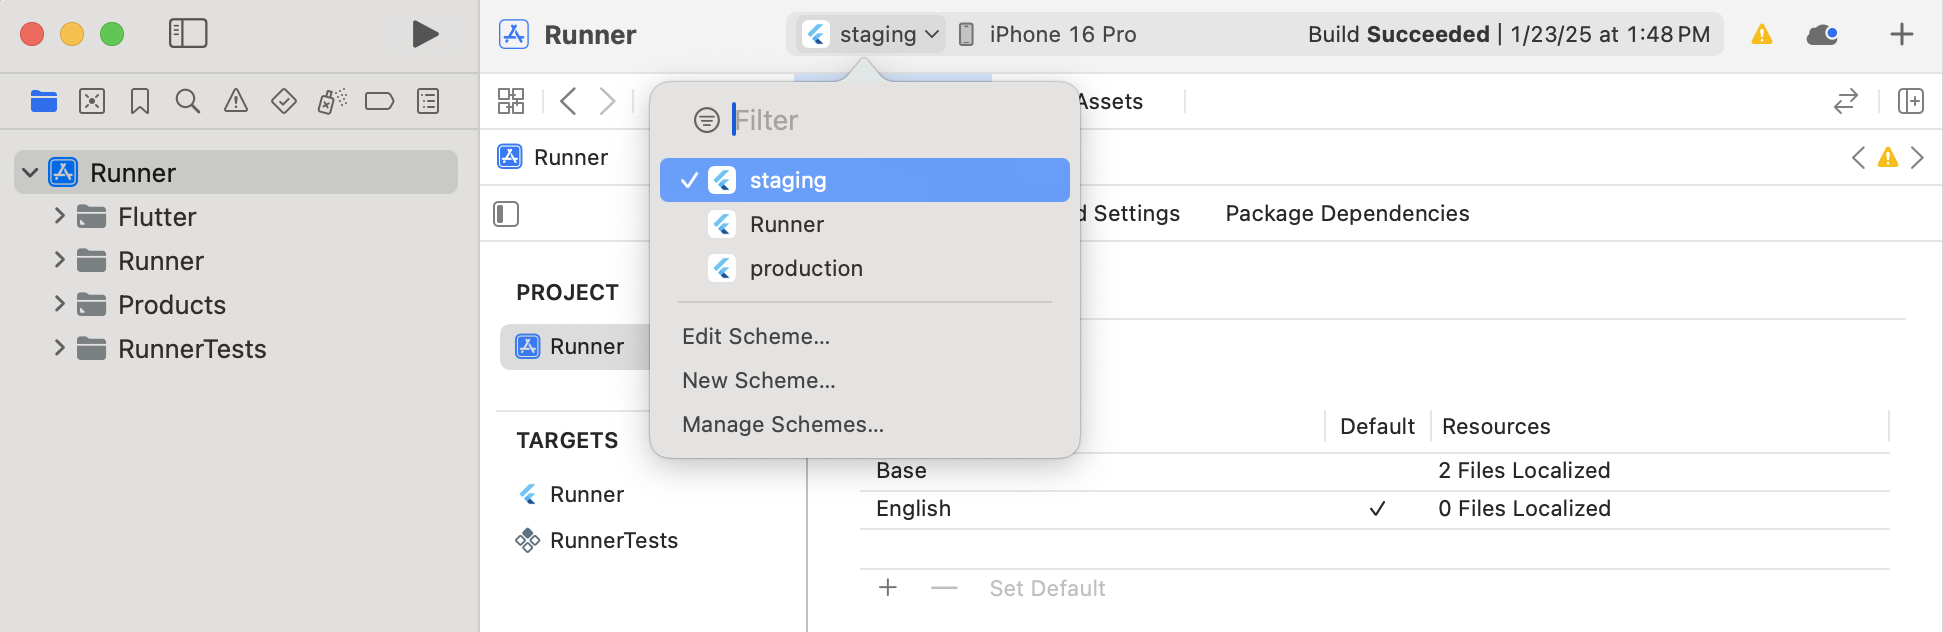
在 Xcode 中建立 scheme(方案):
開啟 新增方案(New Scheme) 視窗(Product > Scheme > New Scheme)。
在 Target 欄位中,選擇 Runner。
在 Name 欄位輸入
staging。點擊 Okay 以新增新方案。
針對名為
production的方案,重複上述步驟。完成後,請確認你已擁有以下方案:
-
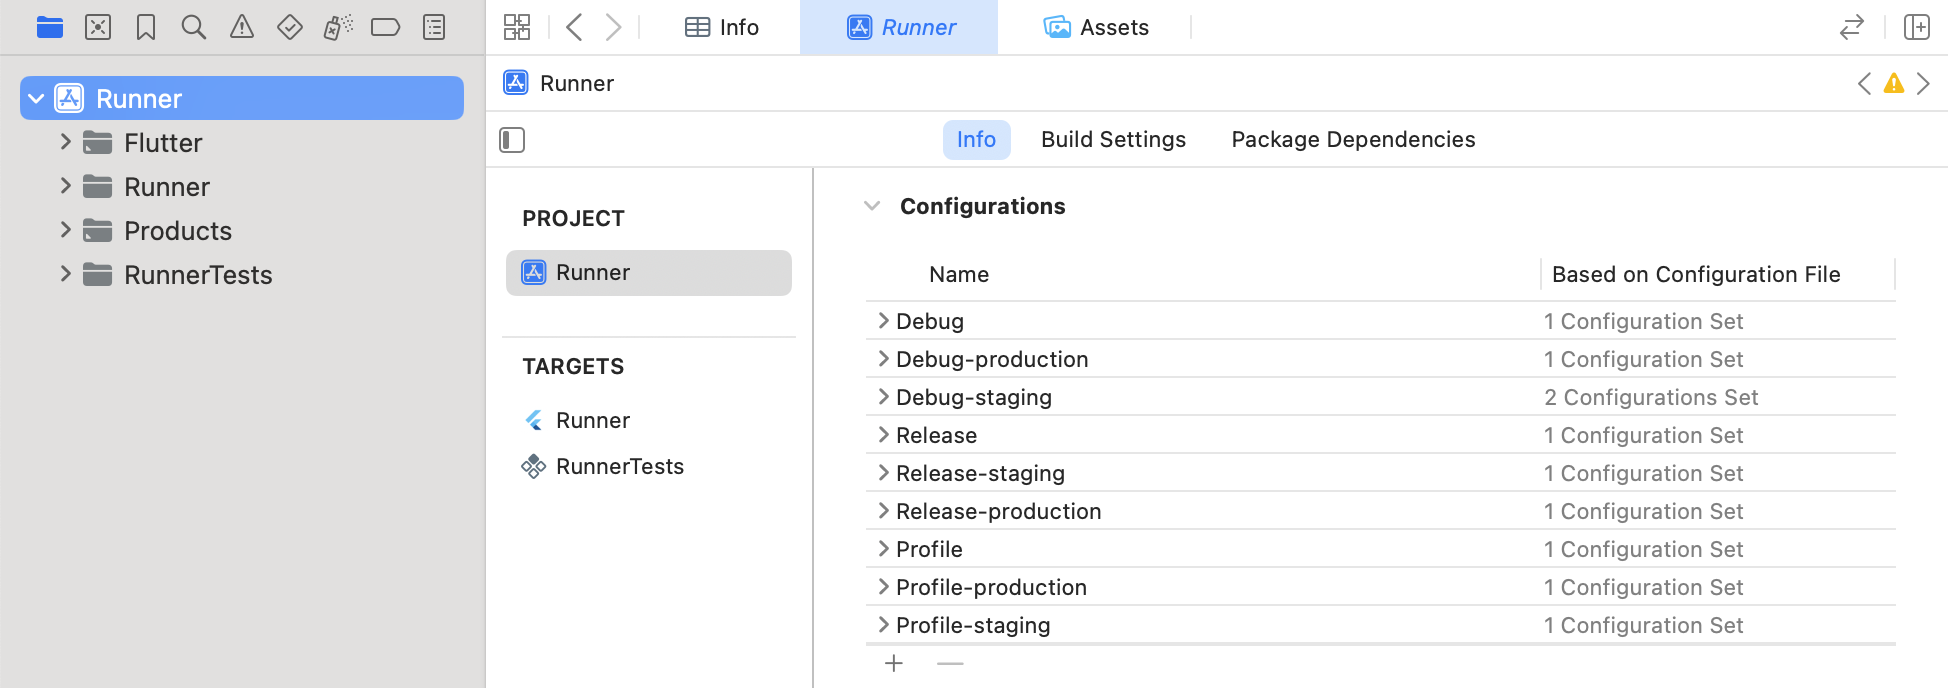
在 Xcode 中為這些方案建立對應的組態(configuration):
在 專案導覽器中,選擇 Runner。
在主視窗 PROJECT 區塊下,選擇 Runner。
若尚未開啟,請切換至 Info 分頁。
前往 Configurations 區段,並新增新的
Debug組態。- 點擊 +,選擇 Duplicate "Debug" configuration,並將新組態命名為
Debug-staging。 - 點擊 +,選擇 Duplicate "Debug" configuration,並將新組態命名為
Debug-production。
- 點擊 +,選擇 Duplicate "Debug" configuration,並將新組態命名為
針對
Release組態與Profile組態,重複上述步驟。完成後,請確認你已擁有以下組態:
-
在 Xcode 中將組態(configurations)指派給 schemes:
開啟 Manage Schemes 視窗 (Product > Scheme > Manage Schemes)。
選取
stagingscheme 並進行編輯。在下列分頁中,依照以下方式更新 Build Configuration 欄位:
- Run:
Debug-staging - Test:
Debug-staging - Profile:
Profile-staging - Analyze:
Debug-staging - Archive:
Release-staging
- Run:
點擊 Close。
對
productionscheme 重複上述步驟。
-
如果你正在處理一個已存在且至少有一個 Podfile 的 Flutter 專案,請更新該 Podfile。更多資訊請參閱 Update Podfiles。
-
為了確保你已正確完成所有設定,請在 Xcode 中於新 schemes 上執行你的應用程式。你不會看到任何差異,因為組態設定尚未變更,但你需要確認應用程式可以正常執行。
選取
stagingscheme (Product > Schemes > staging)。在工具列中
staging右側,選擇你想測試的 iOS 裝置。下列範例中,裝置為iPhone 16 Pro。
執行該 app scheme(Product > Run)。
對
productionscheme 重複上述步驟。
-
如果一切運作正常,你就可以開始自訂你的組態。更多資訊請參閱 Customize configurations。
啟動 Xcode scheme
#
當你在 Xcode 中為 iOS 應用程式建立好 schemes 之後,可以透過 Xcode 或 Flutter 啟動特定的 scheme。你也可以依照這些步驟,將任何 iOS
相關的參考替換為 macOS,以啟動 macOS 專案。
使用 flavor 旗標(Flutter CLI)
#你可以使用以下步驟,透過 Flutter 命令列介面(Flutter CLI)在 Debug 模式下啟動 Xcode scheme:
在你的 IDE 中啟動 iOS 模擬器。
-
在終端機中,切換到
flavors_example目錄,並輸入以下指令:consoleflutter run --flavor <xcode_scheme_name><xcode_scheme_name>:請將此處替換為你的 Xcode scheme 名稱(例如:staging或production)。
範例:
consoleflutter run --flavor staging
取得目前的 flavor
#-
匯入 services 函式庫: 若要存取
appFlavor常數,請在你的 Dart 檔案中新增以下匯入:dartimport 'package:flutter/services.dart'; -
檢查 flavor 值: 在你的應用程式邏輯中(通常在
main()裡),使用appFlavor常數來處理特定 flavor 的設定:dartvoid main() { // appFlavor will match the name of the Xcode scheme if (appFlavor == 'production') { // Logic for production environment Config.apiUrl = 'https://api.flavors_example.com'; } else if (appFlavor == 'staging') { // Logic for staging environment Config.apiUrl = 'https://staging.api.flavors_example.com'; } runApp(const MyApp()); }
使用 run 指令(Xcode)
#你可以依照以下步驟,在 Xcode 中啟動特定的 scheme:
-
選擇你想要測試的 scheme (Product > Schemes > Choose scheme)。
在工具列中,於 scheme 名稱旁邊,選擇你要測試的裝置。
-
執行你應用程式的 scheme (Product > Run)。
自訂設定
#
在你新增 Xcode scheme 之後,可以針對你的 iOS 應用程式進行自訂。若是 macOS 專案,也可以使用這些步驟,僅需將所有 iOS 的參照替換為 macOS。
建立獨特的 App 顯示名稱
#如果你有多個 scheme,獨特的 App 名稱可以讓你快速辨識部署的 App 正在使用哪個 scheme。
以下步驟說明如何在 Xcode 中,為名為 staging 和 production 的兩個 scheme,在名為 flavors_example
的專案中新增不同的 App 顯示名稱。
-
在 Xcode 中建立使用者自訂設定:
開啟專案導覽器 (View > Navigators > Project)。
在專案導覽器頂部,選擇 Runner。
在主視窗的 TARGETS 下,選擇 Runner。
開啟 Build Settings 分頁。
在 Basic 分頁左側,點擊 + 並選擇 Add User-Defined Setting。
建立一個名稱為
APP_DISPLAY_NAME的設定。展開 APP_DISPLAY_NAME 設定。
將下列值指派給對應的 key:
- Debug-production:
Flavors prod - Debug-staging:
Flavors staging - Profile-production:
Flavors prod - Profile-staging:
Flavors staging - Release-production:
Flavors prod - Release-staging:
Flavors staging
- Debug-production:
-
在 Xcode 中更新
Info.plist:在專案導覽器中,選擇 Runner > Runner > Info,以開啟
flavor_test/ios/Runner/Info.plist。在 Information Property List 下,找到下列 key 並更新其值:
- Key:
CFBundleDisplayName - Value:
$(APP_DISPLAY_NAME)
- Key:
-
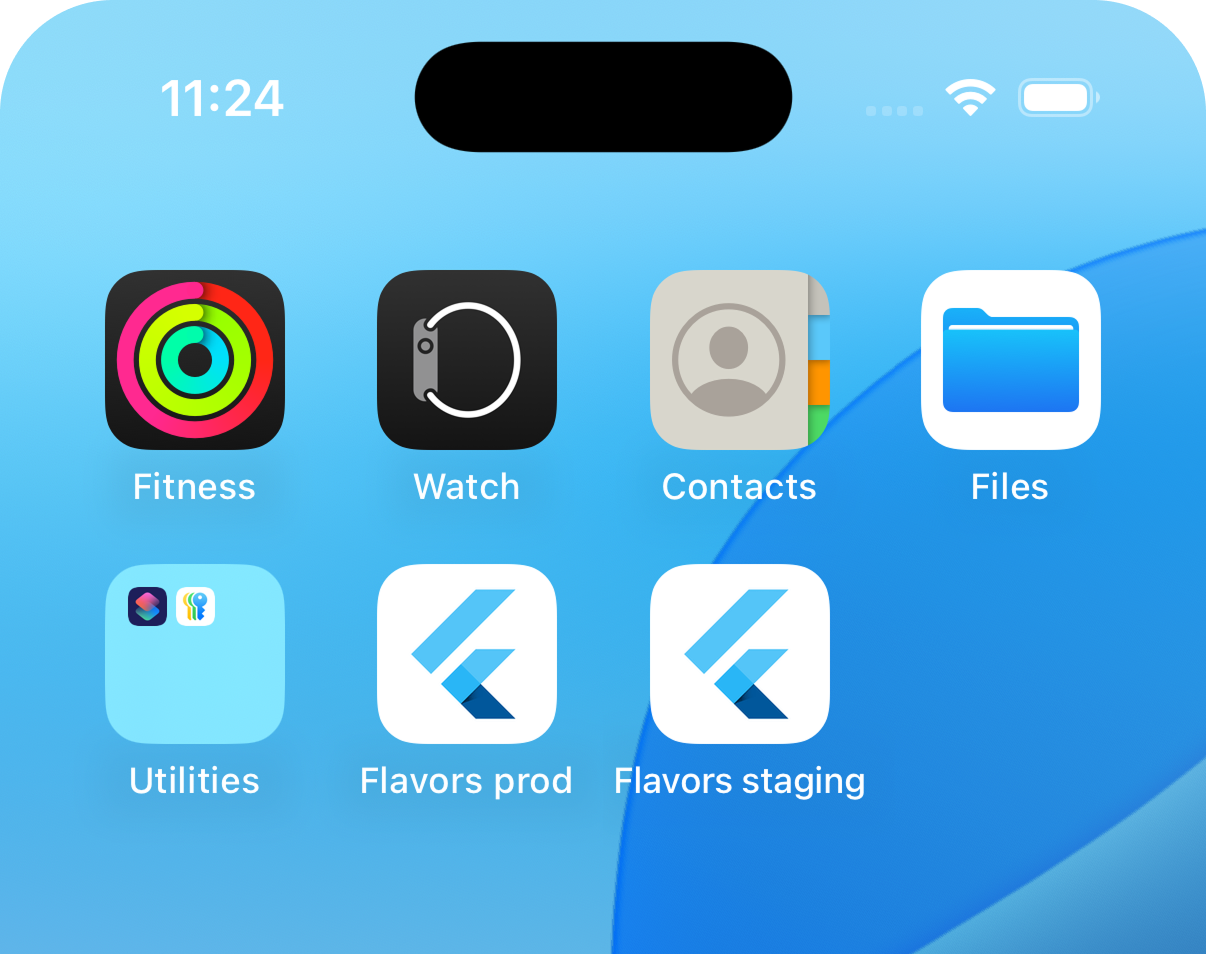
針對每個 scheme(
staging、production)啟動 App,並確認每個 App 的顯示名稱是否已正確變更。如何啟動 scheme,請參考啟動 Xcode scheme 中的步驟。
建立獨特的圖示
#如果你有多個 scheme,為每個設定使用不同的圖示,可以幫助你快速辨識部署的 App 正在使用哪個 scheme。
以下步驟說明如何在 Xcode 中,為名為 staging 和 production 的兩個 scheme,在名為 flavors_example
的 iOS 專案中新增不同的圖示。
-
準備你的圖示:
使用你喜歡的設計工具設計 staging 圖示及 production 圖示。
產生 staging 與 production 圖示所需尺寸的版本,並以 PNG 格式儲存。
-
將圖示加入你的 Xcode 專案:
開啟專案導覽器 (View > Navigators > Project)。
在專案導覽器中,選擇 Runner > Runner > Assets,以開啟 Assets 視窗。
針對 staging 圖示,完成下列步驟:
點擊 + > iOS > iOS App icon。
將圖示命名為
AppIcon-staging。將 staging 圖示拖曳到 AppIcon-staging 視窗,並確認圖示已指派到正確的尺寸。
針對 production 圖示,重複前述步驟。
-
將圖示連結到你的 scheme:
開啟專案導覽器。
在主視窗的 TARGETS 下,選擇 Runner。
若尚未開啟,請開啟 General 分頁。
前往 Apps Icons and Launch Screen 區段並展開。
在 App icon 欄位的右側,點擊 + 並依下列方式更新欄位:
- Debug-staging:
AppIcon-staging - Profile-staging:
AppIcon-staging - Release-staging:
AppIcon-staging - Debug-production:
AppIcon-production - Profile-production:
AppIcon-production - Release-production:
AppIcon-production
- Debug-staging:
-
針對每個 scheme(
staging、production)啟動 App,並確認每個 App 的圖示是否已正確變更。如何啟動 scheme,請參考啟動 Xcode scheme 中的步驟。
新增獨特的 Bundle Identifier
#
Bundle Identifier 是 Apple 平台上應用程式的唯一識別碼。如果你將多個 Xcode scheme 作為 Flutter flavor 使用,可以讓 Apple 將每個 scheme 視為獨立的應用程式。為此,你需要為每個 scheme 指定不同的 bundle identifier。這樣可以讓你在一個版本(例如
staging)測試新功能或修復錯誤,而不影響另一個版本(例如 production)。
以下步驟說明如何為名為 staging 和 production 的兩個 Xcode scheme,在名為 flavors_example
的 iOS 專案中設定唯一的 bundle identifier。
-
在 Xcode 中,開啟專案導覽器 (View > Navigators > Project)。
-
在主視窗的 TARGETS 下,選擇 Runner。
開啟 Build Settings 分頁。
前往 Packaging 區段。
展開 Product Bundle Identifier 設定,以檢視不同的建置組態。
-
針對每個 scheme 的建置組態,設定所需的 bundle identifier。例如:
Debug-staging、Profile-staging、Release-staging:
com.example.flavorsExample.stagingDebug、Profile、Release、Debug-production、 Profile-production、Release-production:
com.example.flavorsExample
-
確認這些 bundle identifier 已包含在你的 App ID 中,並且你的 App ID 已註冊到 Apple Developer 帳戶。
資源(Assets)打包
#
如果你的應用程式中有僅特定 flavor 會用到的資源,可以設定僅在啟動該 flavor 時才將這些資源打包進 App,避免未使用的資源讓 App bundle 檔案變大。若要為每個 flavor 打包資源,請在專案的 pubspec 中,於
assets 欄位下新增 flavors 子欄位。欲了解更多資訊,請參閱 assets 欄位
以及 Flutter pubspec options。
更新 Podfiles
#如果你為 Flutter iOS 專案建立新的 Xcode scheme,且現有 Flutter 專案中已有 iOS Podfile,則必須更新 Flutter iOS Podfile,使其與你在 Xcode 中的變更一致。
以下步驟說明如何將名為 staging 和 production 的兩個新 Xcode scheme,納入名為 flavors_example
的 Flutter 專案的 iOS Podfile。若為 macOS 專案,也可參考這些步驟,僅需將所有 iOS 的參照替換為 macOS。
在你的 IDE 中,開啟
ios/Podfile檔案。-
進行下列更新並儲存你的變更。
flavors_example/ios/Podfilerubyproject 'Runner', { ... 'Debug' => :debug, 'Debug-staging' => :debug, 'Debug-production' => :debug, 'Profile' => :release, 'Profile-staging' => :release, 'Profile-production' => :release, 'Release' => :release, 'Release-staging' => :release, 'Release-production' => :release, ...
新增唯一的建置設定
#
你可以使用 build settings
來管理你的 iOS 建置流程,從編譯、連結到除錯與發佈。你可以將建置設定(build settings)與 Flutter flavors 搭配使用的一種方式,是將這些建置設定指派給 Xcode 的建置組態(build configurations)。例如,你可能會想要為
Debug-staging 和 Debug-production 指派不同的 API URL。例如:
# Debug-staging build settings
API_BASE_URL = staging.flavors.com/api
# Debug-production build settings
API_BASE_URL = flavors.com/api
如果你想要為特定的建置組態(build configuration)新增額外的建置設定,請參考 Apple 的 將建置組態檔案新增至你的專案。
新增其他自訂設定
#本文件僅包含幾個常見的 Xcode scheme 組態,但實際上你可以套用更多不同的設定。 如需進一步了解,請參閱 自訂專案的建置 scheme。
更多資訊
#如需更多關於建立與使用 flavor 的資訊,請參考以下資源:
Unless stated otherwise, the documentation on this site reflects Flutter 3.44.0. Page last updated on 2026-06-14. View source or report an issue.