適用於應用程式開發者的 Swift Package Manager
如何使用 Swift Package Manager 管理原生 iOS 或 macOS 相依套件
如何開啟 Swift Package Manager
#自 3.44 版本起,Flutter 的 Swift Package Manager (SwiftPM) 支援預設為開啟狀態。 升級 Flutter 並執行應用程式後,系統會自動加入 SwiftPM 整合, 使專案下載 Flutter 插件所相依的 Swift 套件。 若要使用舊版 Flutter, 你可能需要從應用程式中移除 Swift Package Manager 整合。
請注意,對於尚未支援 Swift Package Manager 的相依套件, Flutter 會回退至 CocoaPods。
[選用] 若要確認專案是否正在使用 SwiftPM:
在 Xcode 中執行應用程式。
-
確認 Run Prepare Flutter Framework Script 已作為建置前置動作 (pre-action) 執行, 且
FlutterGeneratedPluginSwiftPackage已列為目標相依性 (target dependency)。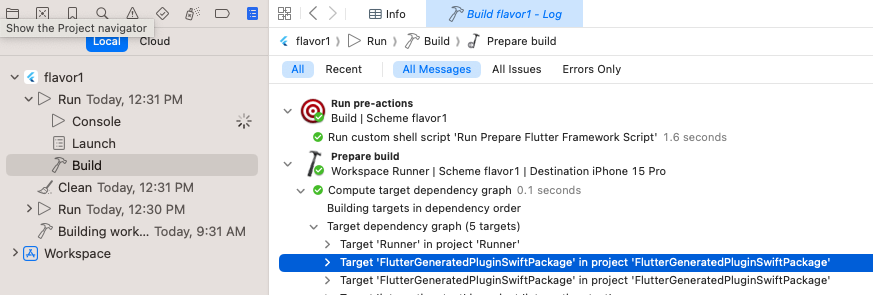
確認 Run Prepare Flutter Framework Script 已作為建置前置動作執行
若你先前已停用 SwiftPM,可能需要執行
flutter config --enable-swift-package-manager 來重新啟用。
若自動遷移可正常運作,設定便已完成! 你可以離開此頁面了。
如何手動新增 Swift Package Manager 整合
#當你升級至 Flutter 3.44 或更新版本並執行應用程式時, 系統會自動加入 SwiftPM 整合。只有在自動遷移發生問題、 需要手動將 SwiftPM 整合加入專案時,才需要參考以下說明。
大多數開發者不需要進行此操作。
若在自動遷移至 SwiftPM 時遇到問題,請回報 Issue。 請附上錯誤訊息,並在可能的情況下, 將以下檔案的副本附加至 Issue 中:
ios/Runner.xcodeproj/project.pbxproj-
ios/Runner.xcodeproj/xcshareddata/xcschemes/Runner.xcscheme(或所用 flavor 的 xcscheme 檔案)
遷移至 SwiftPM 需要更新
ios/Runner.xcodeproj/project.pbxproj 與
ios/Runner.xcodeproj/xcshareddata/xcschemes/Runner.xcscheme 檔案。
步驟 1:新增 FlutterGeneratedPluginSwiftPackage 套件相依
#在 Xcode 中開啟
ios/Runner.xcworkspace。-
前往專案的 Package Dependencies。
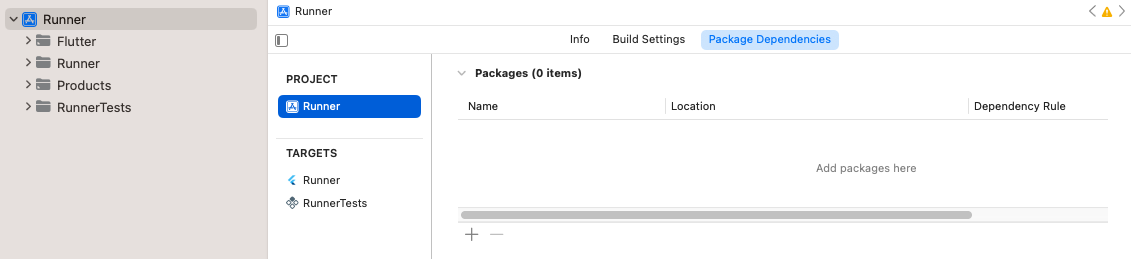
專案的套件相依項目
點選 add 按鈕。
在開啟的對話框中,點選 Add Local...。
-
前往
ios/Flutter/ephemeral/Packages/FlutterGeneratedPluginSwiftPackage並點選 Add Package。 -
確認已新增至
Runnertarget,然後點選 Add Package。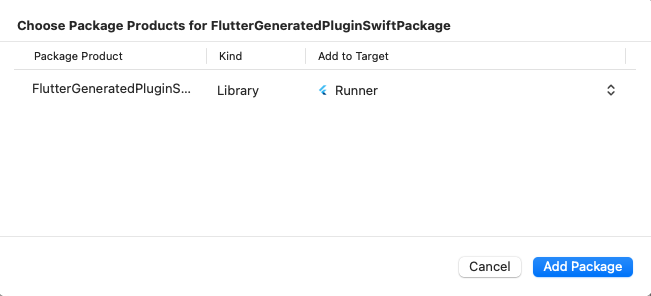
確認套件已新增至
Runnertarget -
確認
FlutterGeneratedPluginSwiftPackage已新增至 Frameworks, Libraries, and Embedded Content。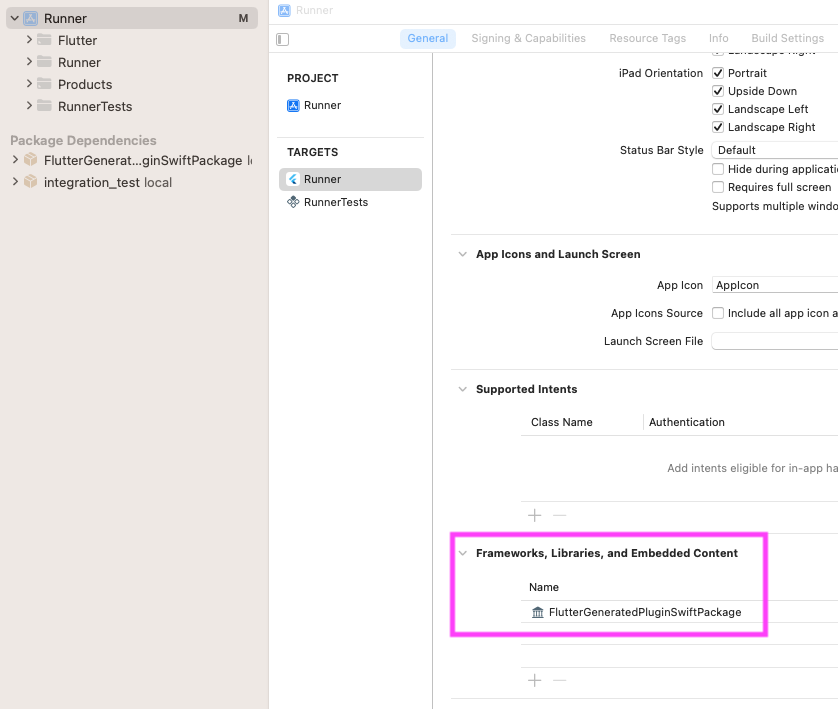
確認
FlutterGeneratedPluginSwiftPackage已新增至 Frameworks, Libraries, and Embedded Content
步驟 2:新增 Run Prepare Flutter Framework Script 預先動作
#以下步驟必須針對每個 flavor 個別完成。
前往 Product > Scheme > Edit Scheme。
展開左側欄的 Build 區段。
點選 Pre-actions。
-
點選 add 按鈕, 並從選單中選取 New Run Script Action。
-
點選 Run Script 標題並將其更名為:
Run Prepare Flutter Framework Script 將 Provide build settings from 變更為
Runner應用程式。-
在文字方塊中輸入以下內容:
sh"$FLUTTER_ROOT/packages/flutter_tools/bin/xcode_backend.sh" prepare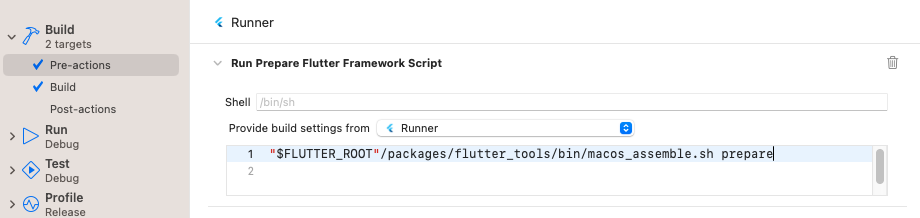
新增 Run Prepare Flutter Framework Script 建置預先動作
步驟 3:執行應用程式
#在 Xcode 中執行應用程式。
-
確認 Run Prepare Flutter Framework Script 已作為預先動作執行, 且
FlutterGeneratedPluginSwiftPackage已列為 target 相依項目。確認 Run Prepare Flutter Framework Script 已作為預先動作執行
確認應用程式可透過命令列以
flutter run正常執行。
遷移至 SwiftPM 需要更新
macos/Runner.xcodeproj/project.pbxproj 與
macos/Runner.xcodeproj/xcshareddata/xcschemes/Runner.xcscheme 檔案。
步驟 1:新增 FlutterGeneratedPluginSwiftPackage 套件相依性
#在 Xcode 中,開啟
macos/Runner.xcworkspace。-
導航至專案的 Package Dependencies。
專案的套件相依性
點擊 add 按鈕。
在開啟的對話框中,點擊 Add Local...。
-
導航至
macos/Flutter/ephemeral/Packages/FlutterGeneratedPluginSwiftPackage並點擊 Add Package。 -
確認已將其新增至 Runner Target,然後點擊 Add Package。
確認套件已新增至
Runnertarget -
確認
FlutterGeneratedPluginSwiftPackage已新增至 Frameworks, Libraries, and Embedded Content。確認
FlutterGeneratedPluginSwiftPackage已新增至 Frameworks, Libraries, and Embedded Content
步驟 2:新增 Run Prepare Flutter Framework Script 前置動作
#以下步驟必須對每個 flavor 分別完成。
前往 Product > Scheme > Edit Scheme。
展開左側欄的 Build 區段。
點擊 Pre-actions。
-
點擊 add 按鈕 並從選單中選取 New Run Script Action。
-
點擊 Run Script 標題並將其修改為:
Run Prepare Flutter Framework Script 將 Provide build settings from 改為
Runnertarget。-
在文字方塊中輸入以下內容:
sh"$FLUTTER_ROOT"/packages/flutter_tools/bin/macos_assemble.sh prepare新增 Run Prepare Flutter Framework Script 建置前置動作
步驟 3:執行應用程式
#在 Xcode 中執行應用程式。
-
確認 Run Prepare Flutter Framework Script 已作為前置動作執行, 且
FlutterGeneratedPluginSwiftPackage為目標相依項目。確認
Run Prepare Flutter Framework Script已作為前置動作執行 確認應用程式可透過命令列以
flutter run正常執行。
新增至現有應用程式 (add-to-app)
#若要使用 SwiftPM,請視情況參閱下列頁面之一:
新增至自訂 Xcode 目標
#你的 Flutter Xcode 專案可以有自訂的 Xcode 目標 (targets), 用於建置其他產出物,例如 framework 或單元測試。 你可以將 Swift Package Manager 整合加入這些自訂 Xcode 目標。
請依照如何手動新增 Swift Package Manager 整合中的步驟操作。
在步驟 1 的第 6 個項目中,
使用你的自訂目標取代 Flutter 目標。
在步驟 2 的第 6 個項目中,
使用你的自訂目標取代 Flutter 目標。
如何移除 Swift Package Manager 整合
#當應用程式被修改以支援 SwiftPM 後, Xcode 專案會更新並加入 Flutter 插件相依套件。
若要復原此遷移:
-
清理專案:
shflutter clean -
在 Xcode 中開啟應用程式 (
ios/Runner.xcworkspace或macos/Runner.xcworkspace)。 前往專案的 Package Dependencies。
-
點選
FlutterGeneratedPluginSwiftPackage套件,然後點選 remove 按鈕。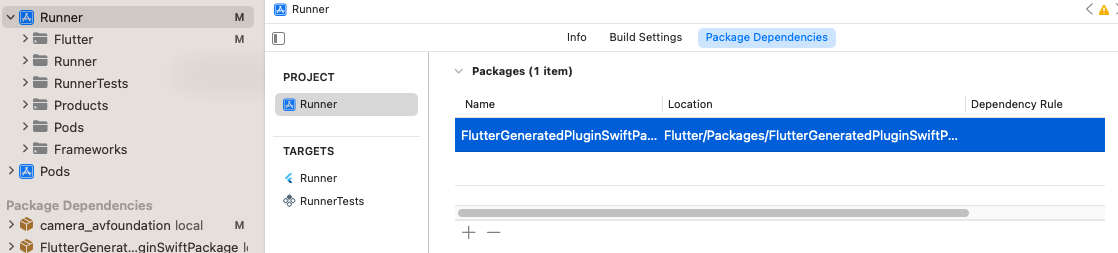
要移除的
FlutterGeneratedPluginSwiftPackage 前往
Runner目標的 Frameworks, Libraries, and Embedded Content。-
點選
FlutterGeneratedPluginSwiftPackage,然後點選 remove 按鈕。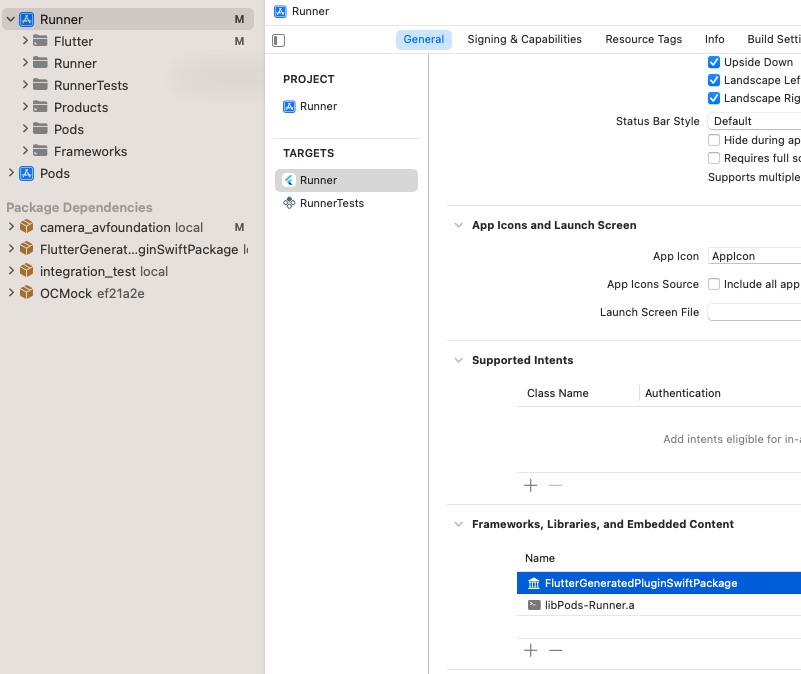
要移除的
FlutterGeneratedPluginSwiftPackage 前往 Product > Scheme > Edit Scheme。
展開左側邊欄的 Build 區段。
點選 Pre-actions。
展開 Run Prepare Flutter Framework Script。
-
點選 delete 按鈕。

要移除的建置前置動作
如何使用需要較高作業系統版本的 Swift Package Manager Flutter 插件
#若某個 Swift Package Manager Flutter 插件所要求的最低作業系統版本 高於專案目前的設定,你可能會收到類似以下的錯誤訊息:
Target Integrity (Xcode): The package product 'plugin_name_ios' requires minimum platform version 14.0 for the iOS platform, but this target supports 12.0
若要使用此插件:
-
在 Xcode 中開啟應用程式 (
ios/Runner.xcworkspace或macos/Runner.xcworkspace)。 -
提高應用程式目標的 Minimum Deployments 設定。
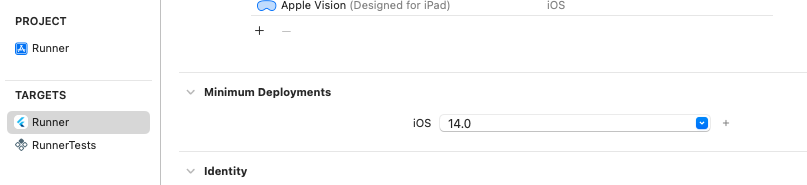
目標的 Minimum Deployments 設定
-
若你更新了 iOS 應用程式的 Minimum Deployments, 請重新產生 iOS 專案的設定檔:
shflutter build ios --config-only -
若你更新了 macOS 應用程式的 Minimum Deployments, 請重新產生 macOS 專案的設定檔:
shflutter build macos --config-only
如何關閉 Swift Package Manager
#一般情況下,請勿執行此操作。請記住, CocoaPods 套件庫將於 2026 年 12 月 2 日起變為唯讀, 未來將不允許停用 SwiftPM。
停用 Swift Package Manager 會導致 Flutter 對所有相依套件改用 CocoaPods。 但 SwiftPM 仍會保留在你的專案中。 若要從專案中完全移除 Swift Package Manager 整合, 請依照如何移除 Swift Package Manager 整合的說明操作。
為單一專案關閉 SwiftPM
#
在專案的 pubspec.yaml 檔案中,於 flutter 區段下,
在 config 子區段中將 enable-swift-package-manager 設為 false。
# The following section is specific to Flutter packages.
flutter:
  config:
    enable-swift-package-manager: false
這會為此專案的所有貢獻者關閉 Swift Package Manager。
為所有專案全域關閉 SwiftPM
#執行以下指令:
flutter config --no-enable-swift-package-manager
這會為目前使用者關閉 Swift Package Manager。
若某個專案與 Swift Package Manager 不相容, 所有貢獻者都需要執行此指令。
Unless stated otherwise, the documentation on this site reflects Flutter 3.44.0. Page last updated on 2026-06-14. View source or report an issue.