將 Flutter 應用程式整合至您的 iOS 專案
了解如何將 Flutter 應用程式整合至您現有的 iOS 專案。
Flutter UI 元件 (Widget) 可以使用 Swift 套件 以漸進方式加入至您現有的 iOS 應用程式。
前置需求
#- Flutter 3.44 或更新版本
- Xcode 15.0 或更新版本
從舊版整合方式遷移(如適用)
#如果您已使用 CocoaPods 或嵌入式框架 將 Flutter 整合至您的 iOS 應用程式, 在遵循以下 Swift Package Manager 說明之前, 必須先移除舊有的整合設定。
展開以查看從 CocoaPods 整合遷移的說明
如果您的應用程式先前使用 CocoaPods 整合, 必須先從您的 Podfile 中移除 Flutter 安裝程式碼。
從您的 Podfile 中移除 Flutter 安裝程式碼
MyApp/Podfilerubyflutter_application_path = '../my_flutter' load File.join(flutter_application_path, '.ios', 'Flutter', 'podhelper.rb') install_all_flutter_pods(flutter_application_path) flutter_post_install(installer) if defined?(flutter_post_install)執行
pod install。
展開以查看從嵌入式框架整合遷移的說明
如果您的應用程式先前使用 flutter build ios-framework 指令
產生的框架進行整合,
必須先從您的 Xcode 專案中移除這些框架。
前往您目標的 General 頁籤, 並移除 Frameworks, Libraries, and Embedded Content 下所有與 Flutter 相關的框架和程式庫。
這包括
App.xcframework、Flutter.xcframework、FlutterPluginRegistrant.xcframework以及所有 Flutter 插件的xcframework檔案。從您的 Podfile 中移除 Flutter pod
MyApp/Podfilerubypod 'Flutter', :podspec => '/path/to/MyApp/Flutter/[build mode]/Flutter.podspec'執行
pod install。
舊版整合指南 保留以供參考, 但將不再持續維護。
整理專案之間的相對位置
#本指南假設您現有的 iOS 應用程式 與您的 Flutter 應用程式或模組位於相鄰目錄中。 如果您的目錄結構不同, 您需要相應地調整範例中的相對路徑。
範例目錄結構如下所示:
-
my_flutter_app/
- ios/
lib/
- main.dart
-
MyNativeApp/
- MyNativeApp.xcodeproj/
-
my_flutter_app/
- .ios/
lib/
- main.dart
-
MyNativeApp/
- MyNativeApp.xcodeproj/
使用 Swift Package Manager 整合
#-
建置 FlutterNativeIntegration Swift 套件
在您的 Flutter 應用程式或模組中,執行以下指令:
flutter build swift-package --platform ios這將產生以下目錄:
my_flutter_app/build/ios/SwiftPackages/
- FlutterNativeIntegration/(一個 Swift 套件)
- Scripts/(所需指令碼及其他檔案的目錄)
您可以選擇使用
--output旗標 變更此輸出的位置。 -
將 FlutterNativeIntegration 加入您的 Xcode 專案
在 Xcode 中開啟您現有的 iOS 應用程式。
在 Project navigator 中,右鍵點擊您的專案 並選取 Add Files to "MyNativeApp"...
瀏覽並選取產生的
FlutterNativeIntegrationSwift 套件,然後點擊 Add。選取 Reference files in place 並點擊 Finish。
在 File inspector 中, 確認 Location 為 Relative to Project。 如果不是,您需要將 Flutter 輸出目錄 移至與原生應用程式相鄰的目錄中。
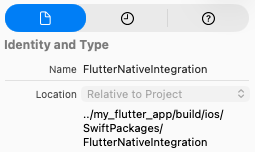
Xcode File inspector 中顯示的 FlutterNativeIntegration 相對位置。
前往您目標的 General 頁籤, 並在 Frameworks, Libraries, and Embedded Content 下加入
FlutterNativeIntegration。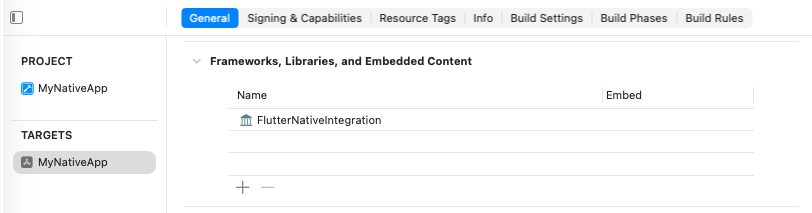
Frameworks, Libraries, and Embedded Content 下的 FlutterNativeIntegration。
-
新增建置設定
在 Build Settings 頁籤中, 設定 Flutter 應用程式 Swift 套件輸出目錄的位置:
FLUTTER_SWIFT_PACKAGE_OUTPUT=$SRCROOT/../my_flutter_app/build/ios/SwiftPackages針對自訂配置,設定 Flutter 建置模式。
Flutter 支援三種建置模式:Debug、Profile 和 Release。 建置模式使用
CONFIGURATION來決定。 如果您的配置名稱與這些名稱不符, 您可以將FLUTTER_BUILD_MODE建置設定 設為其中一個值。
在 Build Settings 下為自訂配置設定
FLUTTER_BUILD_MODE。(選用)允許 Xcode 重新建置您的 Flutter 應用程式。
在您的目標中加入以下建置設定, 以允許 Xcode 在其建置過程中重新建置您的 Flutter 應用程式。 這讓您可以對 Flutter 應用程式進行變更, 而無需重新執行
flutter build swift-package。 此功能需要在機器上安裝 Flutter。FLUTTER_APPLICATION_PATH=$SRCROOT/../my_flutter_app ENABLE_USER_SCRIPT_SANDBOXING=NO
-
將 Pre-action Run Script 加入 Scheme
開啟 Product > Scheme > Edit Scheme... > Build(左側欄)> Pre-action > + > New Run Script Action
在 Provide build settings from 下拉選單中選取您的專案。
將指令碼設定為以下內容:
/bin/sh $FLUTTER_SWIFT_PACKAGE_OUTPUT/Scripts/flutter_integration.sh prebuild
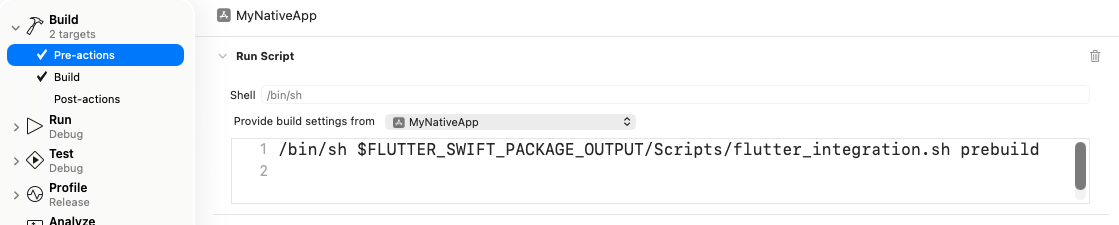
Scheme 編輯器中的 Pre-action Run Script。
-
在 Target 中加入新的 Run Script Build Phase
前往您目標的 Build Phases > + > New Run Script Phase
將指令碼設定為以下內容:
/bin/sh $FLUTTER_SWIFT_PACKAGE_OUTPUT/Scripts/flutter_integration.sh assemble取消勾選 Based on dependency analysis
在 Input File Lists 中加入以下內容:
$(FLUTTER_SWIFT_PACKAGE_OUTPUT)/Scripts/FlutterAssembleInputs.xcfilelist
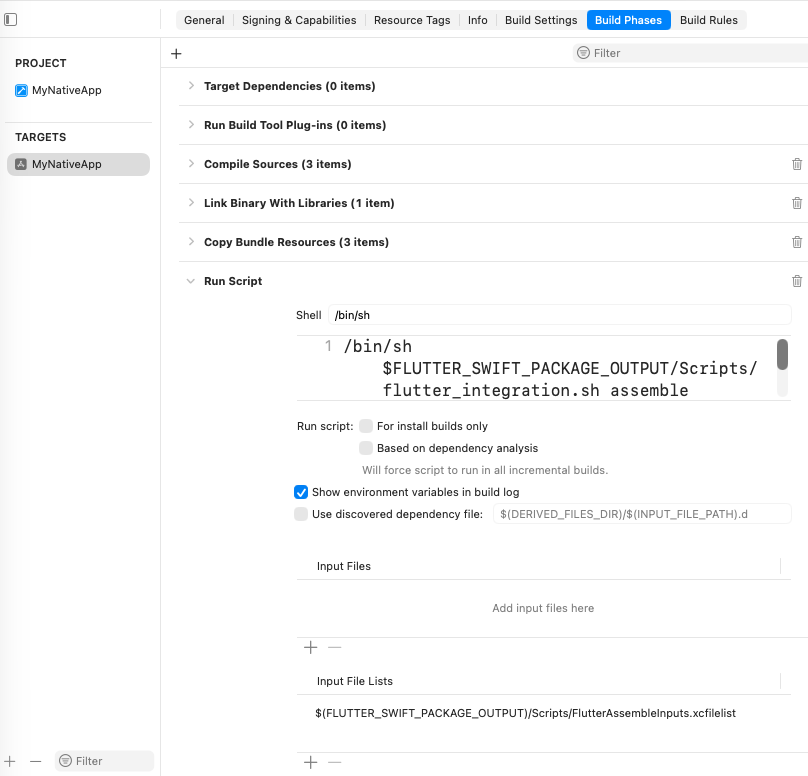
Build Phases 下的 New Run Script Build Phase。
-
(選用)設定 LLDB Init File
使用 Flutter 的 LLDB Init File 可以改善 在 iOS 26+ 實體裝置上偵錯時的效能。
開啟 Product > Scheme > Edit Scheme... > Run(左側欄)。
將 LLDB Init File 設定為以下路徑:
$(FLUTTER_SWIFT_PACKAGE_OUTPUT)/Scripts/flutter_lldbinit或者,如果您的 Scheme 已有 LLDB Init File, 可以將 Flutter 的 LLDB 檔案加入其中。 Flutter 的 LLDB Init File 路徑必須相對於 您專案的 LLDB Init File 位置。
command source --relative-to-command-file "../my_flutter_app/build/ios/SwiftPackages/Scripts/flutter_lldbinit"
設定本機網路隱私權限
#
在 iOS 14 及更新版本中,請在 iOS 應用程式的 Debug 版本中啟用 Dart multicast DNS 服務。
這可透過 flutter attach 新增除錯功能,例如熱重載與 DevTools。
若要僅在應用程式的 Debug 版本中設定本機網路隱私權限,
請為每個建置設定建立獨立的 Info.plist 檔案。
SwiftUI 專案預設不含 Info.plist 檔案。
若需要建立 property list,
可透過 Xcode 或文字編輯器進行。
以下說明假設使用預設的 Debug 與 Release 設定。
請依照你的應用程式建置設定調整名稱。
-
建立新的 property list。
在 Xcode 中開啟你的專案。
在 Project Navigator 中,點擊專案名稱。
在編輯器面板的 Targets 清單中,點擊你的應用程式。
點擊 Info 分頁。
展開 Custom iOS Target Properties。
在清單上按右鍵,選擇 Add Row。
從下拉選單中選擇 Bonjour Services。 這會在專案目錄中建立一個名為
Info的新 property list 檔案, 在 Finder 中顯示為Info.plist。
-
將
Info.plist重新命名為Info-Debug.plist。在左側專案清單中點擊 Info 檔案。
在右側的 Identity and Type 面板中, 將 Name 從
Info.plist改為Info-Debug.plist。
-
建立 Release property list。
在 Project Navigator 中,點擊
Info-Debug.plist。選擇 File > Duplicate...。 你也可以按下 Cmd + Shift + S。
在對話框中,將 Save As: 欄位設為
Info-Release.plist,然後點擊 Save。
-
在 Debug property list 中新增必要的屬性。
在 Project Navigator 中,點擊
Info-Debug.plist。在 Bonjour Services 陣列中新增字串值
_dartVmService._tcp。(選用) 若要設定自訂的權限對話框文字, 新增鍵值 Privacy - Local Network Usage Description。
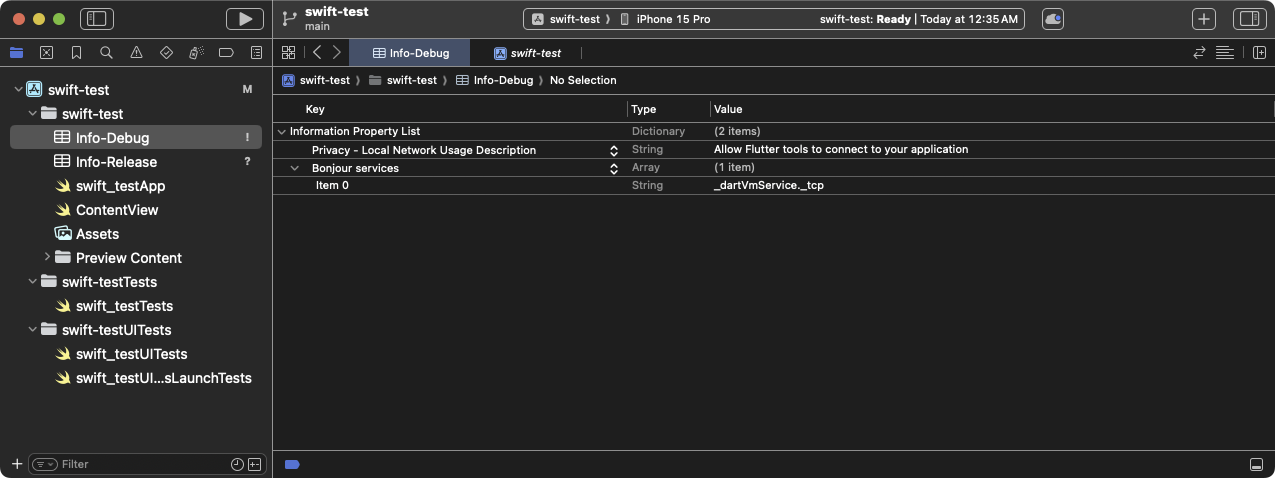
已新增 Bonjour Services 與 Privacy - Local Network Usage Description 鍵值的
Info-Debugproperty list
-
設定目標,讓不同建置模式使用不同的 property list。
在 Project Navigator 中,點擊你的專案。
點擊 Build Settings 分頁。
點擊 All 與 Combined 子分頁。
在搜尋框中輸入
plist。 這會將設定篩選為包含 property list 的項目。捲動清單直到看見 Packaging。
點擊 Info.plist File 設定。
將 Info.plist File 的值 從
path/to/Info.plist改為path/to/Info-$(CONFIGURATION).plist。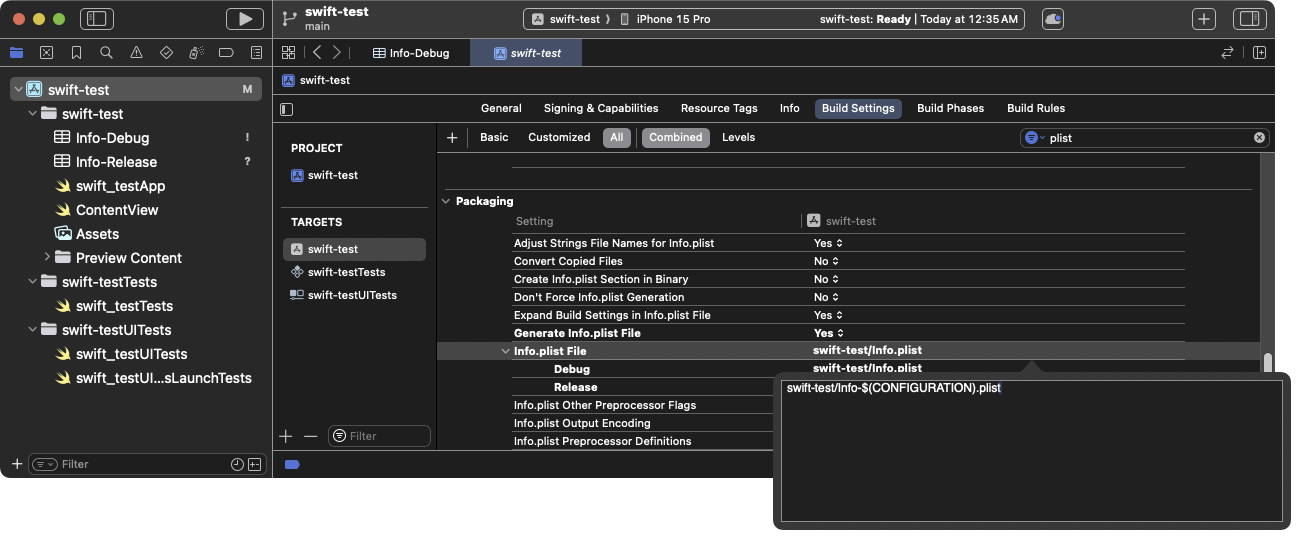
更新
Info.plist建置設定以使用特定建置模式的 property list這會在 Debug 模式下解析為 Info-Debug.plist, 在 Release 模式下解析為 Info-Release.plist。
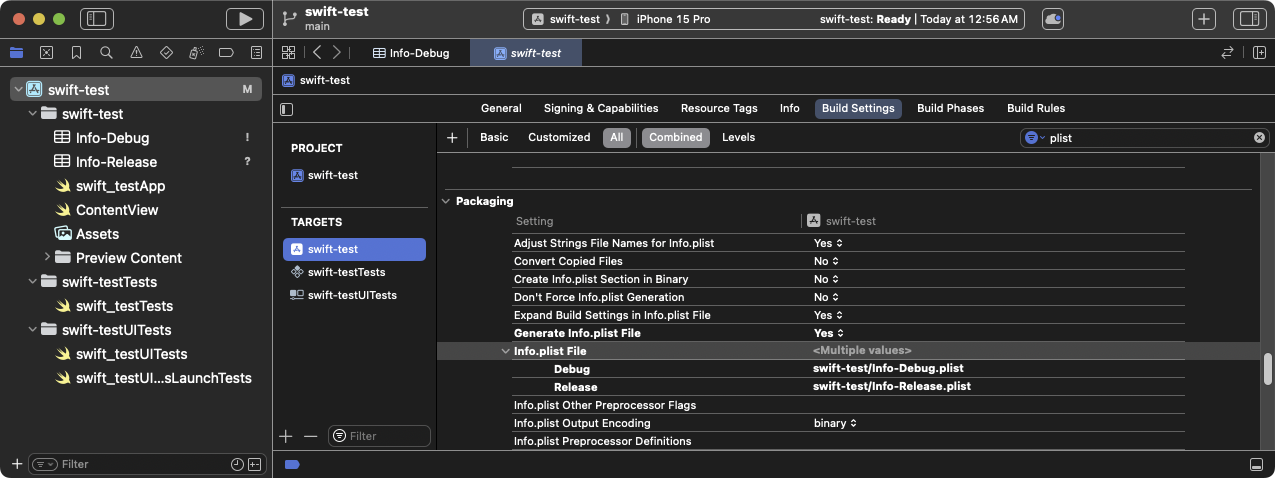
顯示各設定變體的更新後 Info.plist File 建置設定
-
從 Build Phases 中移除 Release property list。
在 Project Navigator 中,點擊你的專案。
點擊 Build Phases 分頁。
展開 Copy Bundle Resources。
若此清單包含
Info-Release.plist, 點擊該項目,然後點擊其下方的 -(減號) 以將 property list 從資源清單中移除。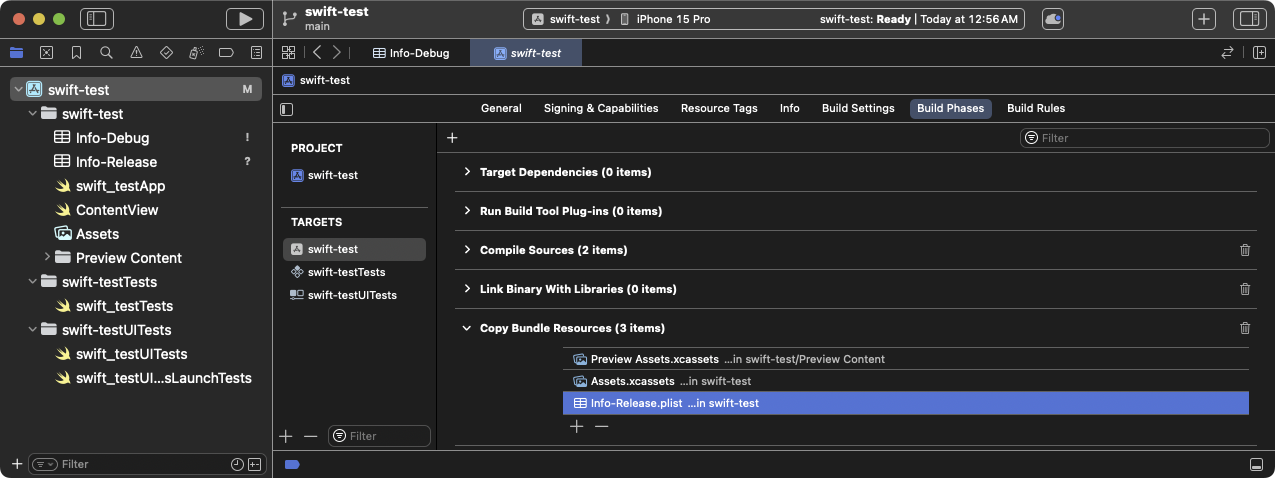
顯示 Info-Release.plist 設定的 Copy Bundle 建置階段,請移除此設定。
-
你的 Debug 應用程式載入的第一個 Flutter 畫面會提示要求本機網路權限。
點擊 OK。
(選用) 若要在應用程式載入前授予權限,請啟用 Settings > Privacy > Local Network > Your App。
後續步驟
#您現在可以將 Flutter 畫面加入您現有的 iOS 應用程式。
Unless stated otherwise, the documentation on this site reflects Flutter 3.44.0. Page last updated on 2026-06-14. View source or report an issue.