使用整合測試檢查應用程式功能
學習如何撰寫整合測試
介紹
#本指南說明如何在你的 Flutter 應用程式中執行整合測試。透過本指南,你將學會以下內容:
- 設定整合測試。
- 驗證應用程式是否顯示特定文字。
- 點擊特定元件 (Widget)。
- 執行整合測試。
本指南會參考 Flutter 內建的 counter_app 專案以及 Flutter 的 integration_test
套件。
integration_test 套件讓你可以:
- 使用
flutter drive指令,在實體裝置或模擬器上執行測試。 - 在 Firebase Test Lab 上執行,以自動化多種裝置的測試。
- 使用 flutter_test API,以類似 元件測試(widget tests) 的風格撰寫測試。
建立一個新的應用程式進行測試
#
整合測試需要一個可供測試的應用程式。
本範例使用 Flutter 在執行 flutter create 指令時產生的內建 Counter App
範例。
Counter App 允許使用者點擊按鈕來增加計數器數值。
-
若要建立內建 Flutter 應用程式的實例,請在終端機執行以下指令:
flutter create counter_app 切換到
counter_app目錄。在你偏好的 IDE 中開啟
lib/main.dart。-
在
floatingActionButton()元件中新增key參數, 並傳入Key類別的實例,其字串值為increment。dartfloatingActionButton: FloatingActionButton( key: const ValueKey('increment'), onPressed: _incrementCounter, tooltip: 'Increment', child: const Icon(Icons.add), ), 儲存你的
lib/main.dart檔案。
完成這些變更後,
lib/main.dart 檔案應該會如下所示。
import 'package:flutter/material.dart';
void main() => runApp(const MyApp());
class MyApp extends StatelessWidget {
const MyApp({super.key});
@override
Widget build(BuildContext context) {
return const MaterialApp(
title: 'Counter App',
home: MyHomePage(title: 'Counter App Home Page'),
);
}
}
class MyHomePage extends StatefulWidget {
const MyHomePage({super.key, required this.title});
final String title;
@override
State<MyHomePage> createState() => _MyHomePageState();
}
class _MyHomePageState extends State<MyHomePage> {
int _counter = 0;
void _incrementCounter() {
setState(() {
_counter++;
});
}
@override
Widget build(BuildContext context) {
return Scaffold(
appBar: AppBar(title: Text(widget.title)),
body: Center(
child: Column(
mainAxisAlignment: MainAxisAlignment.center,
children: <Widget>[
const Text('You have pushed the button this many times:'),
Text(
'$_counter',
style: Theme.of(context).textTheme.headlineMedium,
),
],
),
),
floatingActionButton: FloatingActionButton(
// Provide a Key to this button. This allows finding this
// specific button inside the test suite, and tapping it.
key: const Key('increment'),
onPressed: _incrementCounter,
tooltip: 'Increment',
child: const Icon(Icons.add),
),
);
}
}
新增 integration_test 相依套件
#
你需要將測試套件加入你的新應用程式中。
要使用 sdk: flutter 將 integration_test 和 flutter_test 套件作為
dev_dependencies 新增,請執行以下指令。
flutter pub add "dev:integration_test:{sdk: flutter}"
Output:
Building flutter tool...
Resolving dependencies...
Got dependencies.
Resolving dependencies...
+ file 7.0.0
+ flutter_driver 0.0.0 from sdk flutter
+ fuchsia_remote_debug_protocol 0.0.0 from sdk flutter
+ integration_test 0.0.0 from sdk flutter
...
  test_api 0.6.1 (0.7.1 available)
  vm_service 13.0.0 (14.2.1 available)
+ webdriver 3.0.3
Changed 8 dependencies!
7 packages have newer versions incompatible with dependency constraints.
Try `flutter pub outdated` for more information.
已更新 pubspec.yaml 檔案:
# ...
dev_dependencies:
  # ... added dependencies
  flutter_test:
    sdk: flutter
  flutter_lints: ^6.0.0
  integration_test:
    sdk: flutter
# ...
建立整合測試檔案
#整合測試位於你的 Flutter 專案中的一個獨立目錄內。
- 建立一個名為
integration_test的新目錄。 - 在該目錄中新增一個名為
app_test.dart的空檔案。
最終的目錄結構應如下所示:
counter_app/
  lib/
    main.dart
  integration_test/
    app_test.dart
撰寫整合測試
#
整合測試檔案是一個 Dart 程式碼檔案,
其相依於 integration_test、flutter_test,
以及你應用程式的 Dart 檔案。
在你偏好的 IDE 中開啟
integration_test/app_test.dart檔案。-
複製以下程式碼並貼到你的
integration_test/app_test.dart檔案中。 最後一個 import 應該指向你counter_app的main.dart檔案。 (此處的import指向名為introduction的範例應用程式。)integration_test/counter_test.dartdartimport 'package:flutter/material.dart'; import 'package:flutter_test/flutter_test.dart'; import 'package:how_to/main.dart'; import 'package:integration_test/integration_test.dart'; void main() { IntegrationTestWidgetsFlutterBinding.ensureInitialized(); group('end-to-end test', () { testWidgets('tap on the floating action button, verify counter', ( tester, ) async { // Load app widget. await tester.pumpWidget(const MyApp()); // Verify the counter starts at 0. expect(find.text('0'), findsOneWidget); // Finds the floating action button to tap on. final fab = find.byKey(const ValueKey('increment')); // Emulate a tap on the floating action button. await tester.tap(fab); // Trigger a frame. await tester.pumpAndSettle(); // Verify the counter increments by 1. expect(find.text('1'), findsOneWidget); }); }); }
本範例分為三個步驟:
-
初始化
IntegrationTestWidgetsFlutterBinding。 這個單例服務會在實體裝置上執行測試。 使用
WidgetTester類別來互動並測試元件。測試重要情境。
執行整合測試
#根據你測試的平台,執行的整合測試會有所不同。
- 若要測試桌面平台,請使用命令列或 CI 系統。
- 若要測試行動平台,請使用命令列或 Firebase Test Lab。
- 若要在網頁瀏覽器中測試,請使用命令列。
在桌面平台上測試
#如果你使用 CI 系統測試 Linux 應用程式,請展開
要測試 Linux 應用程式,你的 CI 系統必須先啟動 X server。
在 GitHub Action、GitLab Runner 或類似的設定檔中,
請設定整合測試與 xvfb-run 工具一起運作。
這麼做會啟動一個 X Window 系統,讓 Flutter 可以在其中啟動並測試你的 Linux 應用程式。
以下以 GitHub Actions 為例,你的 jobs.setup.steps 應包含類似以下的步驟:
      - name: Run Integration Tests
        uses: username/xvfb-action@v1.1.2
        with:
          run: flutter test integration_test -d linux -r github
這會在 X Window 中啟動整合測試。
如果你沒有以這種方式設定整合測試, Flutter 會回傳錯誤。
Building Linux application...
Error waiting for a debug connection: The log reader stopped unexpectedly, or never started.
若要在 macOS、Windows 或 Linux 平台上進行測試, 請完成以下步驟。
-
在專案根目錄執行下列指令。
flutter test integration_test/app_test.dart -
如果有提供選擇測試平台的選項, 請選擇桌面平台。 輸入
1以選擇桌面平台。
根據所選平台,指令結果應類似以下輸出。
PS C:\path\to\counter_app> flutter test .\integration_test\app_test.dart
Resolving dependencies...
Downloading packages...
  flutter_lints 3.0.2 (4.0.0 available)
  leak_tracker 10.0.4 (10.0.5 available)
  leak_tracker_flutter_testing 3.0.3 (3.0.5 available)
  lints 3.0.0 (4.0.0 available)
  material_color_utilities 0.8.0 (0.11.1 available)
  meta 1.12.0 (1.15.0 available)
  test_api 0.7.0 (0.7.1 available)
  vm_service 14.2.1 (14.2.2 available)
Got dependencies!
8 packages have newer versions incompatible with dependency constraints.
Try `flutter pub outdated` for more information.

Connected devices:

Windows (desktop) • windows • windows-x64    • Microsoft Windows [Version 10.0.22631.3593]
Chrome (web)      • chrome  • web-javascript • Google Chrome 124.0.6367.207
Edge (web)        • edge    • web-javascript • Microsoft Edge 124.0.2478.97

[1]: Windows (windows)
[2]: Chrome (chrome)
[3]: Edge (edge)

Please choose one (or "q" to quit): 1

00:00 +0: loading C:/path/to/counter_app/integration_test/app_test.dart               B
00:29 +0: loading C:/path/to/counter_app/counter_app/integration_test/app_test.dart   29.1s
√ Built build\windows\x64\runner\Debug\counter_app.exe
00:31 +1: All tests passed!
flutter test integration_test
Resolving dependencies...
Downloading packages...
flutter_lints 3.0.2 (4.0.0 available)
> leak_tracker 10.0.4 (was 10.0.0) (10.0.5 available)
> leak_tracker_flutter_testing 3.0.3 (was 2.0.1) (3.0.5 available)
> leak_tracker_testing 3.0.1 (was 2.0.1)
lints 3.0.0 (4.0.0 available)
material_color_utilities 0.8.0 (0.11.1 available)
> meta 1.12.0 (was 1.11.0) (1.15.0 available)
> test_api 0.7.0 (was 0.6.1) (0.7.1 available)
> vm_service 14.2.1 (was 13.0.0) (14.2.2 available)
Changed 6 dependencies!
8 packages have newer versions incompatible with dependency constraints.
Try `flutter pub outdated` for more information.
Connected devices:
macOS (desktop) • macos • darwin-arm64 • macOS 14.4.1 23E224 darwin-arm64
Mac Designed for iPad (desktop) • mac-designed-for-ipad • darwin • macOS 14.4.1 23E224 darwin-arm64
Chrome (web) • chrome • web-javascript • Google Chrome 124.0.6367.208
No wireless devices were found.
[1]: macOS (macos)
[2]: Mac Designed for iPad (mac-designed-for-ipad)
[3]: Chrome (chrome)
Please choose one (or "q" to quit): 1
00:01 +0: loading /path/to/counter_app/integration_test/app_test.dart R
00:02 +0: loading /path/to/counter_app/integration_test/app_test.dart 846ms
00:03 +0: loading /path/to/counter_app/integration_test/app_test.dart B
Building macOS application...
✓ Built build/macos/Build/Products/Debug/counter_app.app
00:32 +1: All tests passed!
flutter test integration_test/app_test.dart
Connected devices:
Linux (desktop) • linux • linux-x64 • Ubuntu 22.04.4 LTS 6.5.0-35-generic
Chrome (web) • chrome • web-javascript • Google Chrome 104.0.5112.101
[1]: Linux (linux)
[2]: Chrome (chrome)
Please choose one (or "q" to quit): 1
00:00 +0: /path/to/counter_app/integration_test/app_test.dart B
00:16 +0: /path/to/counter_app/integration_test/app_test.dart
✓ Built build/linux/x64/debug/bundle/counter_app
在 Android 裝置上進行測試
#若要在實體 Android 裝置上進行測試, 請完成以下步驟。
連接 Android 裝置。
-
在專案根目錄下執行以下指令。
flutter test integration_test/app_test.dart結果應該會類似以下的輸出。
flutter test integration_test/app_test.dart 00:04 +0: loading /path/to/counter_app/integration_test/app_test.dart 00:15 +0: loading /path/to/counter_app/integration_test/app_test.dart 00:18 +0: loading /path/to/counter_app/integration_test/app_test.dart 2,387ms Installing build/app/outputs/flutter-apk/app.apk... 612ms 00:21 +1: All tests passed! 確認測試結束後已移除 Counter App。如果沒有移除,後續測試將會失敗。如有需要,請長按該應用程式,並從選單中選擇 Remove App。
在 iOS 裝置上測試
#若要在實體 iOS 裝置上進行測試,請完成以下步驟。
連接 iOS 裝置。
-
在專案根目錄下執行以下指令。
flutter test integration_test/app_test.dart結果應該會類似以下的輸出。
flutter test integration_test/app_test.dart 00:04 +0: loading /path/to/counter_app/integration_test/app_test.dart 00:15 +0: loading /path/to/counter_app/integration_test/app_test.dart 00:18 +0: loading /path/to/counter_app/integration_test/app_test.dart 2,387ms Xcode build done. 13.5s 00:21 +1: All tests passed! -
確認測試結束後已移除 Counter App。 如果沒有移除,後續測試將會失敗。如有需要,請長按該應用程式,並從選單中選擇 Remove App。
在網頁瀏覽器中進行測試
#若要在網頁瀏覽器中進行測試,請依照以下步驟操作。
-
將 ChromeDriver 安裝到你選擇的目錄中。
npx @puppeteer/browsers install chromedriver@stable為了簡化安裝,此指令會使用
@puppeteer/browsersNode 函式庫。 將 ChromeDriver 的路徑加入到你的
$PATH環境變數中。-
驗證 ChromeDriver 是否安裝成功。
chromedriver --version ChromeDriver 124.0.6367.60 (8771130bd84f76d855ae42fbe02752b03e352f17-refs/branch-heads/6367@{#798}) -
在你的
counter_app專案目錄中, 建立一個名為test_driver的新目錄。mkdir test_driver 在此目錄中,建立一個名為
integration_test.dart的新檔案。-
複製以下程式碼,並貼到你的
integration_test.dart檔案中。test_driver/integration_test.dartdartimport 'package:integration_test/integration_test_driver.dart'; Future<void> main() => integrationDriver(); -
請依下列方式啟動
chromedriver:chromedriver --port=4444 -
從專案的根目錄執行以下指令:
flutter drive \ --driver=test_driver/integration_test.dart \ --target=integration_test/app_test.dart \ -d chrome回應結果應類似以下輸出:
Resolving dependencies... leak_tracker 10.0.0 (10.0.5 available) leak_tracker_flutter_testing 2.0.1 (3.0.5 available) leak_tracker_testing 2.0.1 (3.0.1 available) material_color_utilities 0.8.0 (0.11.1 available) meta 1.11.0 (1.14.0 available) test_api 0.6.1 (0.7.1 available) vm_service 13.0.0 (14.2.1 available) Got dependencies! 7 packages have newer versions incompatible with dependency constraints. Try `flutter pub outdated` for more information. Launching integration_test/app_test.dart on Chrome in debug mode... Waiting for connection from debug service on Chrome... 10.9s This app is linked to the debug service: ws://127.0.0.1:51523/3lofIjIdmbs=/ws Debug service listening on ws://127.0.0.1:51523/3lofIjIdmbs=/ws 00:00 +0: end-to-end test tap on the floating action button, verify counter 00:01 +1: (tearDownAll) 00:01 +2: All tests passed! All tests passed. Application finished.若要以無頭(headless)測試方式執行,請使用
-d web-server選項來執行flutter drive:flutter drive \ --driver=test_driver/integration_test.dart \ --target=integration_test/app_test.dart \ -d web-server
欲瞭解更多資訊,請參閱 Running Flutter driver tests with web 維基頁面。
在 Firebase Test Lab(Android)中進行測試
#你可以使用 Firebase Test Lab 來測試 Android 目標。
Android 設定
#請依照 README 的 Android Device Testing 章節說明進行設定。
Test Lab 專案設定
#開啟你的 Firebase Console。
如有需要,建立新的 Firebase 專案。
-
導航至 Quality > Test Lab。
上傳 Android APK
#請依照以下步驟上傳 Android APK。
-
使用 Gradle 建置 APK。
// Go to the Android directory which contains the gradlew script pushd android // Build a debug APK for Flutter with gradlew // Note that a standard --release build will not include package:integration_test flutter build apk --debug // Build an Android test APK ./gradlew app:assembleAndroidTest // Build a debug APK by passing in an integration test ./gradlew app:assembleDebug -Ptarget=integration_test/<name>_test.dart-
<name>_test.dart:在 Project Setup(專案設定)章節中建立的檔案。
-
-
如有需要,可將參數以逗號分隔的清單傳入整合測試。請將所有參數編碼為
base64。./gradlew project:task -Pdart-defines="{base64 (key=value)}[, ...]"(key=value)}[, ...]:請以逗號分隔的鍵值對列表取代此處。
-
返回到你之前的目錄。
popd
如需更多說明,請參閱 README 的 Firebase Test Lab 章節。
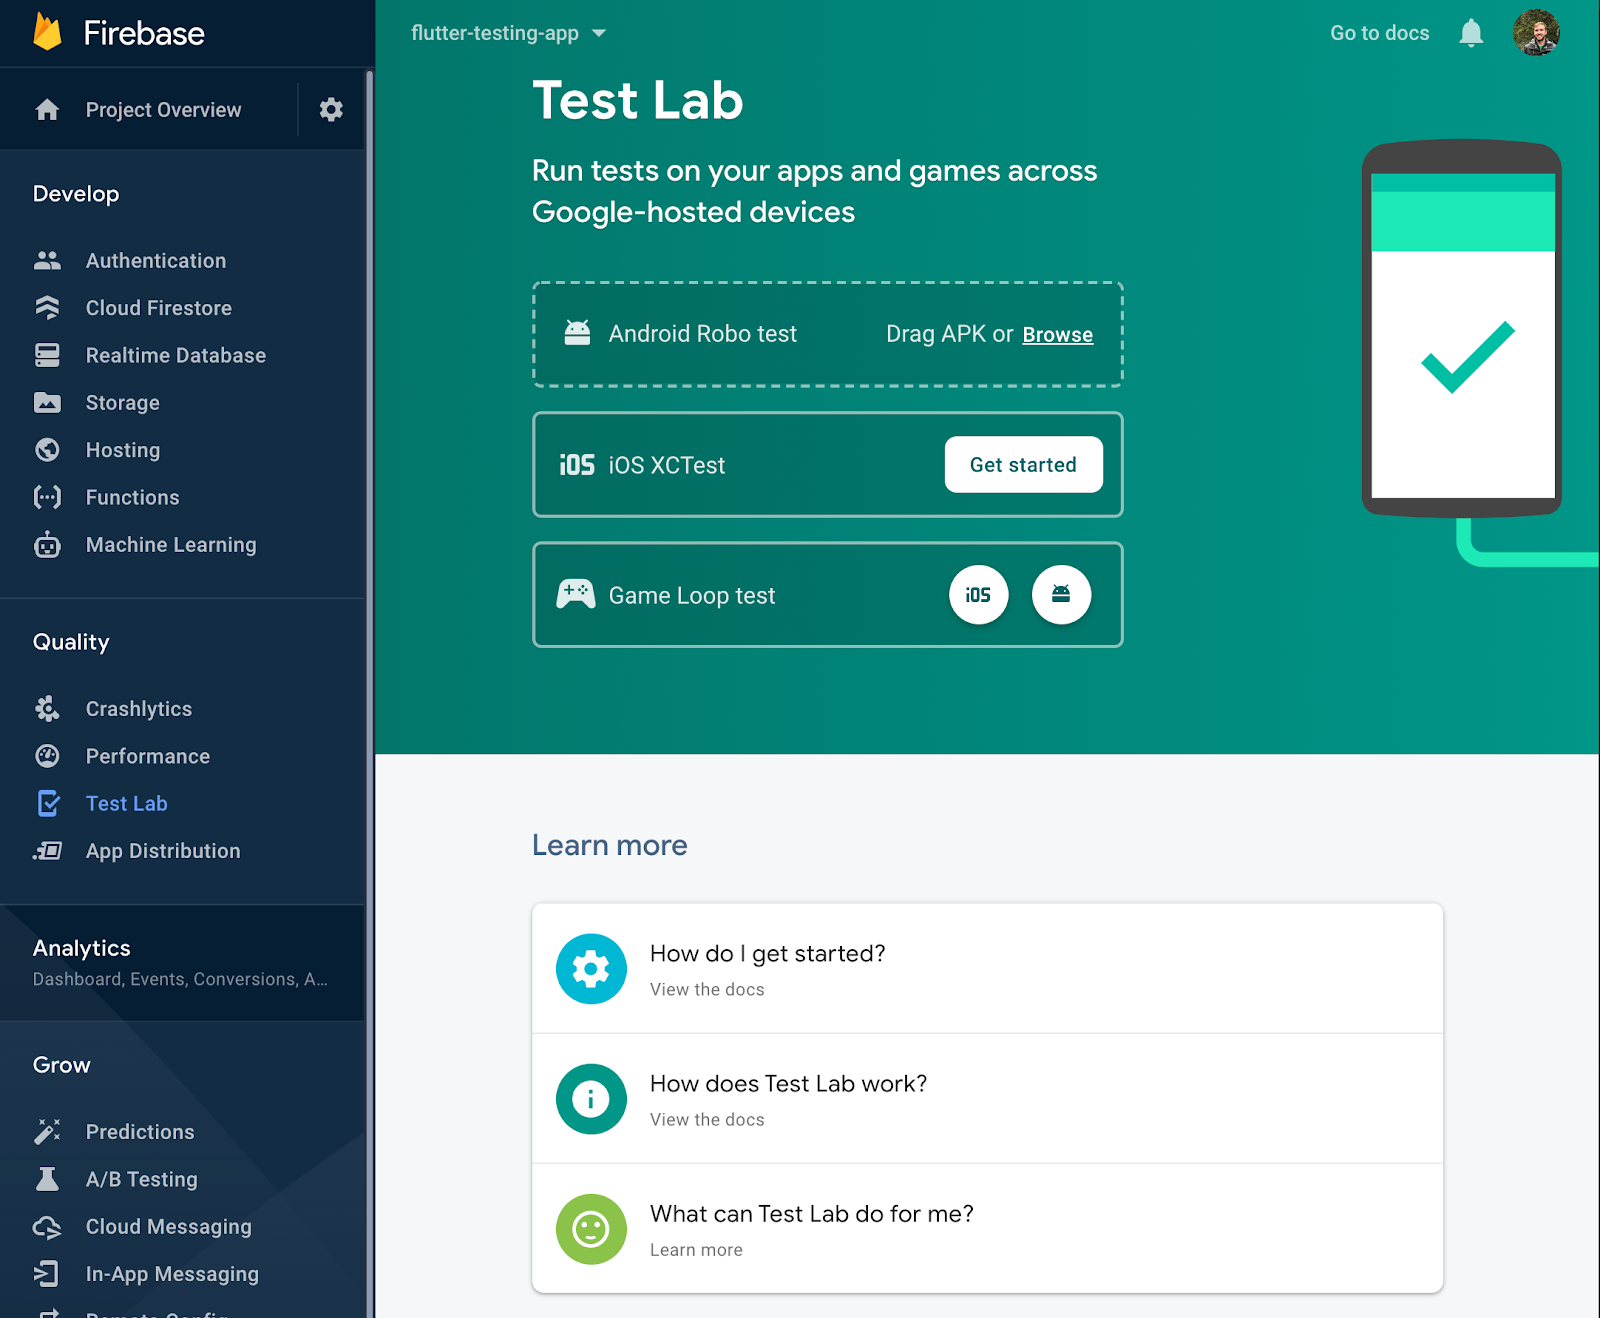
啟動 Robo 測試
#若要使用 Robo test 執行整合測試,請完成以下步驟。
-
將 debug APK 從
<flutter_project_directory>/build/app/outputs/apk/debug拖曳到網頁上的 Android Robo Test 目標區。例如: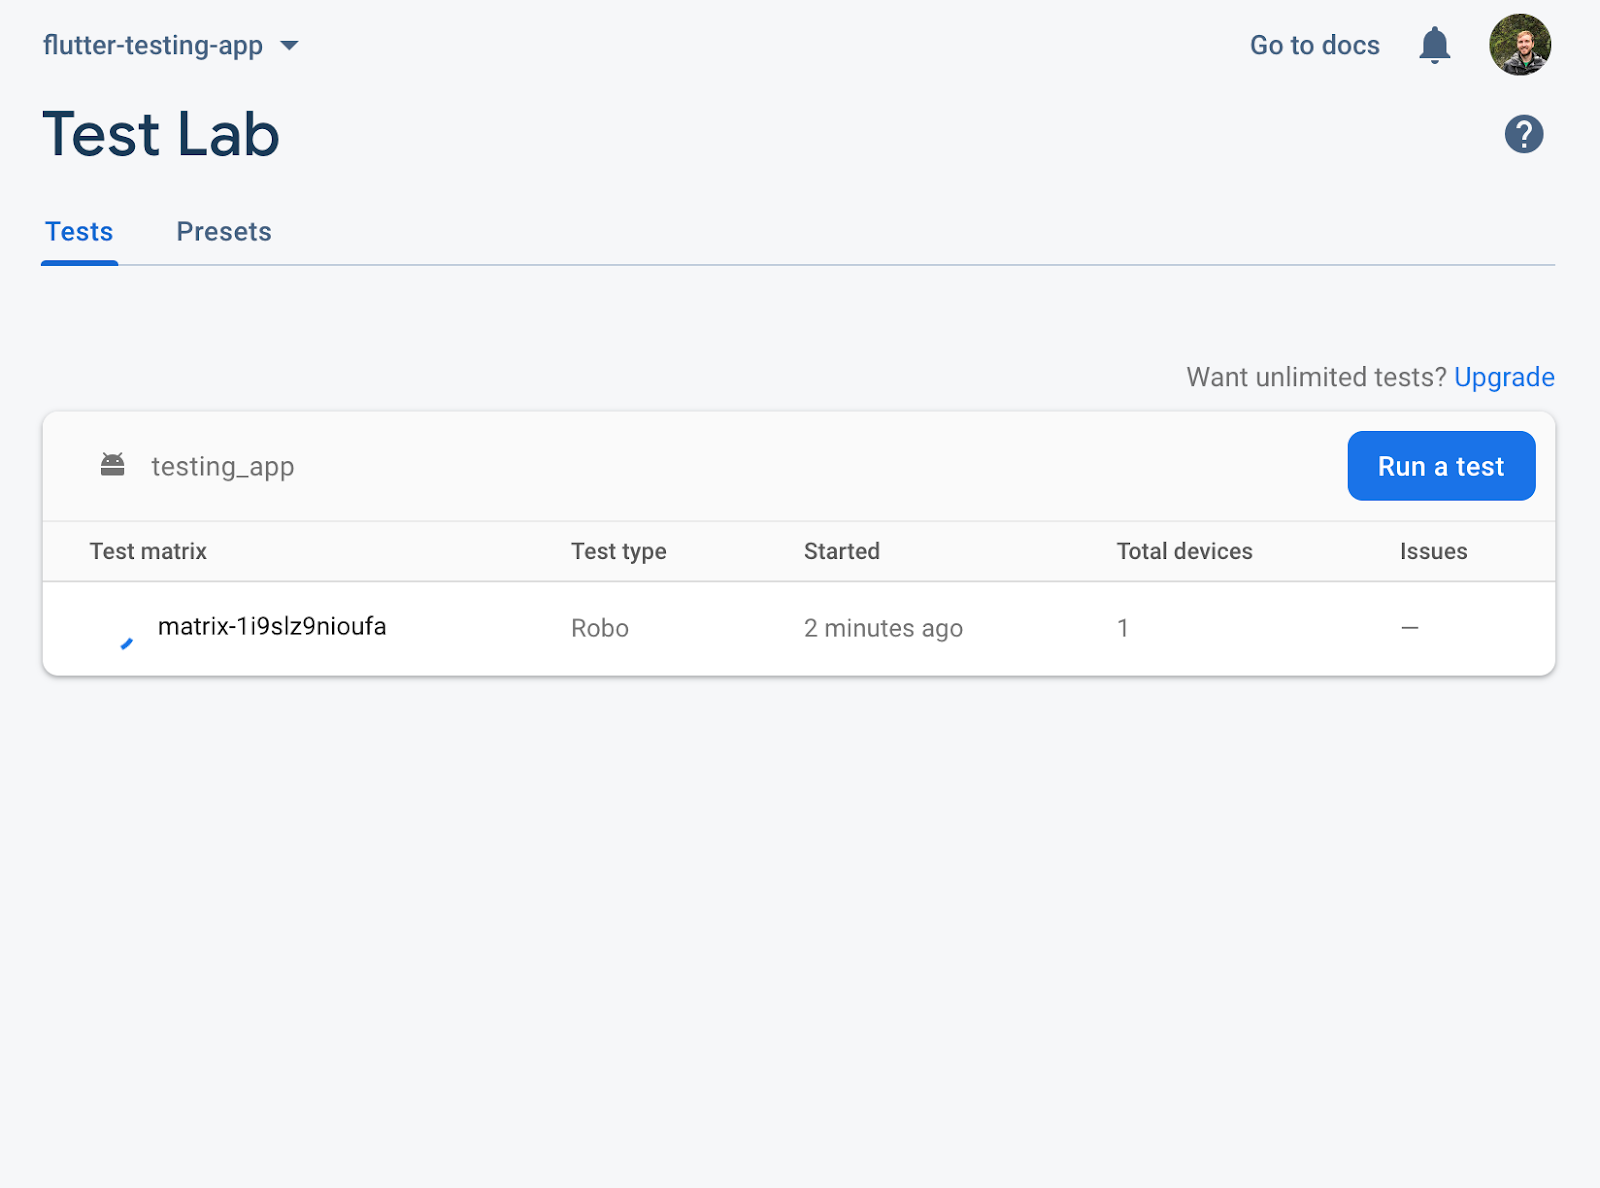
點擊 Run a test(執行測試)。
選擇 Instrumentation 測試類型。
-
將 App APK 加入 App APK or AAB 欄位。
<flutter_project_directory>/build/app/outputs/apk/debug/<file>.apk -
將 Test APK 加入 Test APK 欄位。
<flutter_project_directory>/build/app/outputs/apk/androidTest/debug/<file>.apk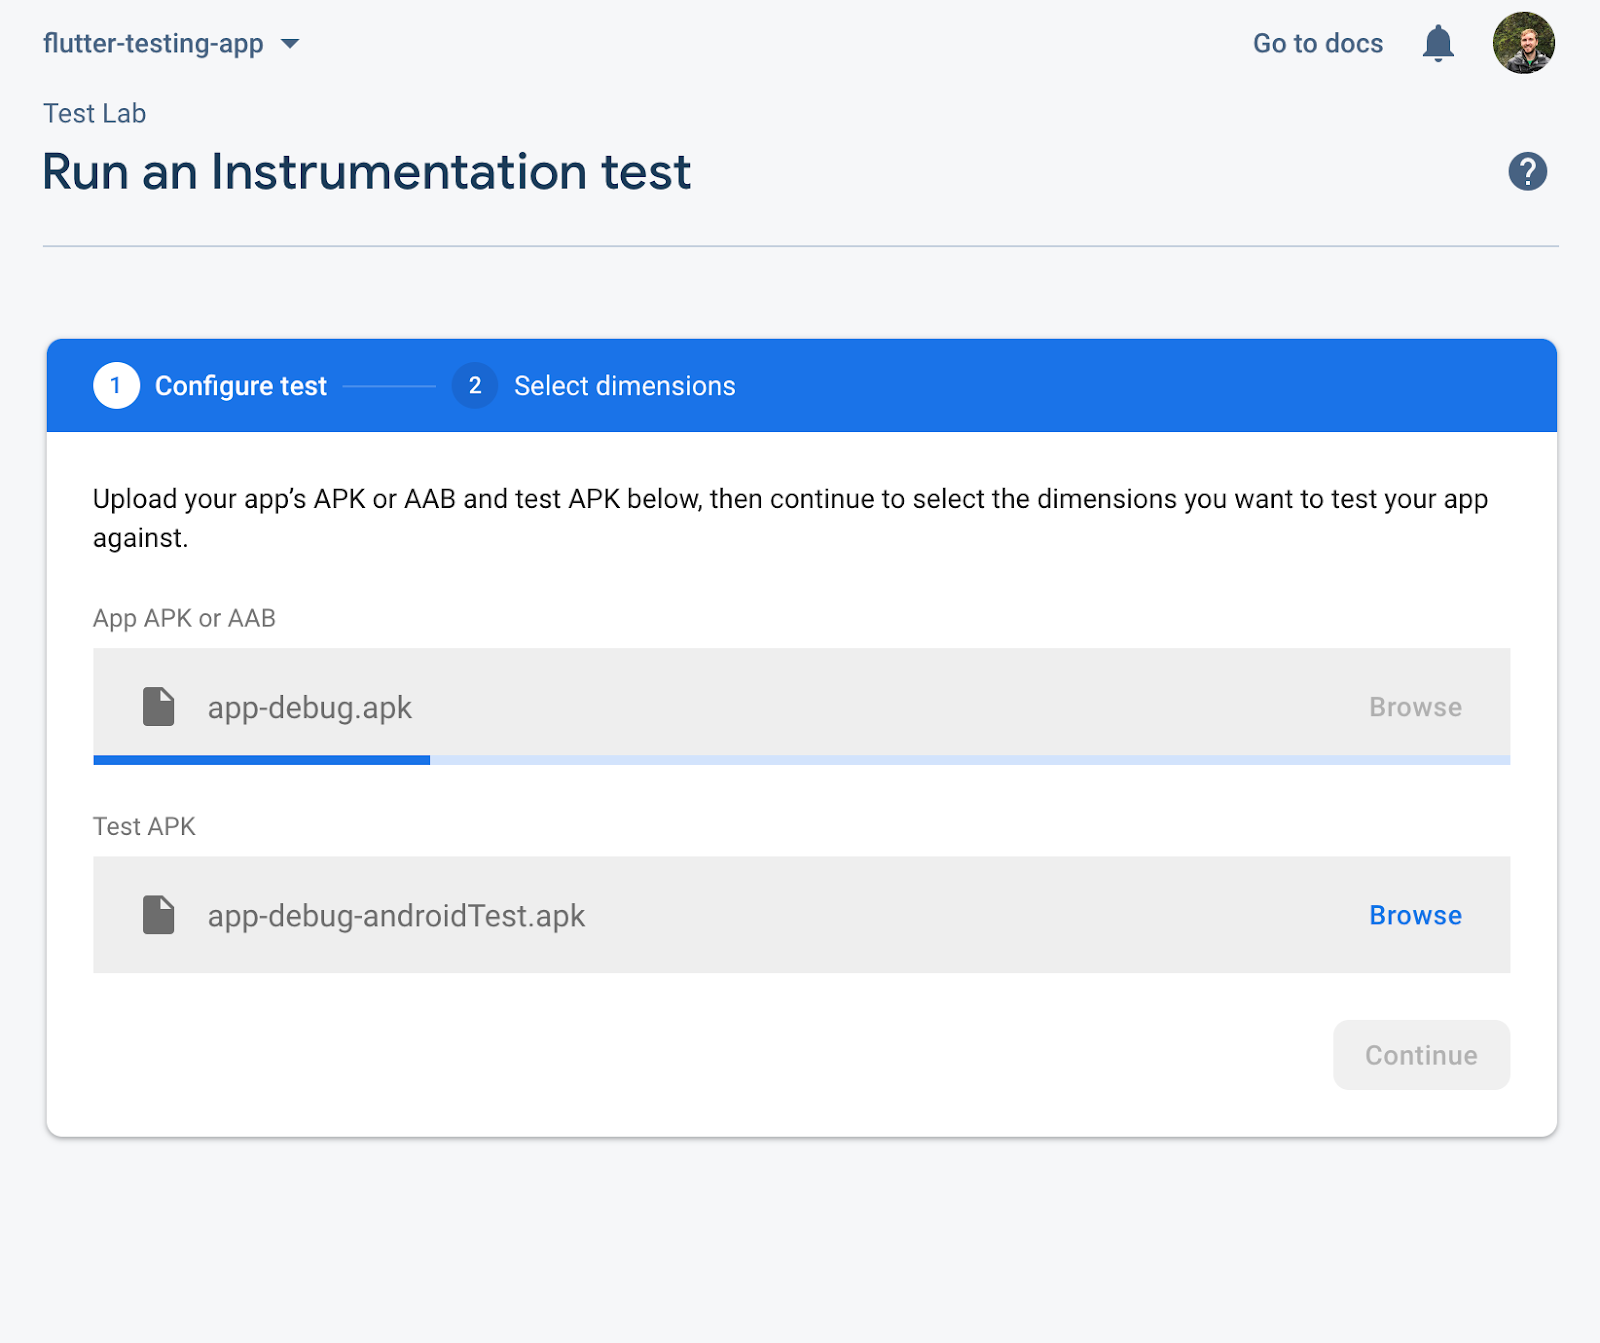
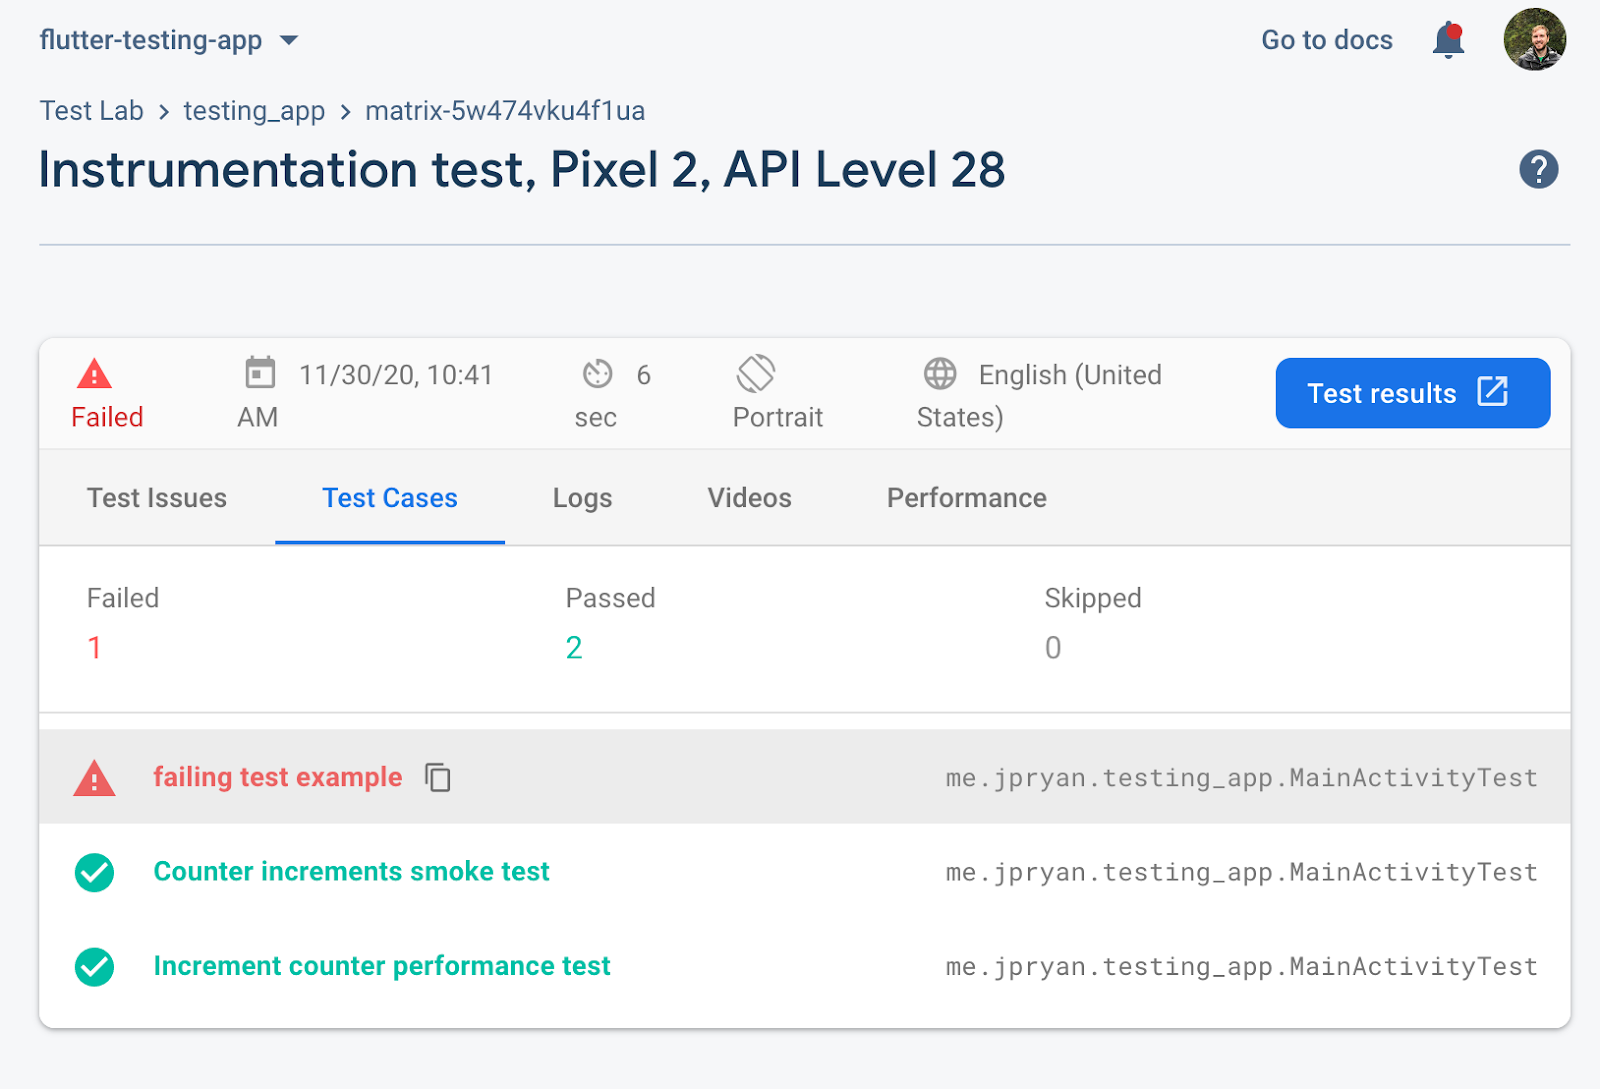
-
若發生失敗,請點擊紅色圖示以檢視輸出結果:
在 Firebase Test Lab(iOS)中進行測試
#你可以使用 Firebase Test Lab 測試 iOS 目標。
iOS 設定
#請依照 iOS 裝置測試說明 進行。
Test Lab 專案設定
#開啟你的 Firebase Console。
如有需要,請建立新的 Firebase 專案。
-
導航至 Quality > Test Lab。
透過 Firebase Console 上傳 Xcode 測試
#如需瞭解如何從 ZIP 檔案上傳測試,請參閱 Firebase Test Lab Console 的 Firebase Test Lab iOS 說明。
透過命令列將 Xcode 測試上傳至 Firebase Console
#如需瞭解如何從命令列將 ZIP 檔案中的測試上傳至 Firebase Test Lab Console,請參閱 iOS 裝置測試說明。
Unless stated otherwise, the documentation on this site reflects Flutter 3.44.0. Page last updated on 2026-06-14. View source or report an issue.