將 Flutter 模組整合到您的 iOS 專案中(舊版)
學習如何將 Flutter 模組整合到您現有的 iOS 專案中。
您可以將 Flutter UI 元件 (Widget) 以嵌入式 framework 的方式,逐步加入到現有的 iOS 應用程式中。 要在現有應用程式中嵌入 Flutter,請考慮下列三種方法之一。
| 嵌入方式 | 方法說明 | 優點 |
|---|---|---|
| 使用 CocoaPods (推薦) | 安裝並使用 Flutter SDK 與 CocoaPods。每次 Xcode 建置 iOS 應用程式時,Flutter 會從原始碼編譯 flutter_module。 |
將 Flutter 嵌入應用程式最簡單的方法。 |
| 使用 iOS frameworks | 為 Flutter 元件建立 iOS framework,將其嵌入到您的 iOS 專案,並更新現有應用程式的建置設定。 | 不需要每位開發者都在本機安裝 Flutter SDK 與 CocoaPods。 |
| 同時使用 iOS frameworks 與 CocoaPods | 在 Xcode 中嵌入 iOS 應用程式與插件的 framework,但將 Flutter engine 以 CocoaPods podspec 方式發佈。 | 提供一種替代方案,避免直接分發大型 Flutter engine(Flutter.xcframework)函式庫。 |
當您將 Flutter 加入現有的 iOS 應用程式時,會增加您的 iOS 應用程式的體積。
若需以 UIKit 建立的應用程式範例,請參考 add_to_app code samples 中的 iOS 目錄。 若需 SwiftUI 範例,請參考 News Feed App 的 iOS 目錄。
開發系統需求
#Flutter 需要安裝最新版的 Xcode 與 CocoaPods。
建立 Flutter 模組
#無論您選擇哪種嵌入方式,嵌入 Flutter 到現有應用程式前,請先建立 Flutter 模組。 請使用下列指令來建立 Flutter 模組。
cd /path/to/my_flutter
flutter create --template module my_flutter
Flutter 會在 /path/to/my_flutter/ 下建立模組專案。
如果你使用 CocoaPods 方法,請將模組儲存在與你現有 iOS 應用程式相同的父目錄下。
從 Flutter 模組目錄中,
你可以執行與其他 Flutter 專案相同的 flutter 指令,
例如 flutter run 或 flutter build ios。
你也可以在 VS Code 或
Android Studio/IntelliJ 中,搭配 Flutter 與 Dart 插件來執行該模組。
這個專案在你將模組嵌入現有 iOS 應用程式之前,
會包含一個單一畫面的範例版本。
這有助於你測試僅與 Flutter 有關的程式碼部分。
管理你的模組
#my_flutter 模組目錄結構類似於一般的 Flutter 應用程式。
-
my_flutter/
.ios/
- Runner.xcworkspace
Flutter/
- podhelper.rb
lib/
- main.dart
- test/
- pubspec.yaml
你的 Dart 程式碼應該加入到 lib/ 目錄中。
你的 Flutter 相依套件、套件與插件必須加入到 pubspec.yaml 檔案中。
.ios/ 隱藏子資料夾中包含一個 Xcode workspace,
你可以在其中執行你的模組獨立版本。
這個包裝專案負責啟動你的 Flutter 程式碼。
它包含協助腳本,方便你建置 frameworks 或
透過 CocoaPods 將模組嵌入到你現有的應用程式中。
在你的 iOS 應用程式中嵌入 Flutter 模組
#當你開發好 Flutter 模組後, 可以使用本頁頂端表格中描述的方法進行嵌入。
你可以在模擬器或真實裝置上以 Debug 模式執行, 並在真實裝置上以 Release 模式執行。
使用 CocoaPods 與 Flutter SDK
#方法說明
#第一種方法使用 CocoaPods 嵌入 Flutter 模組。 CocoaPods 負責管理 Swift 專案的相依套件, 包含 Flutter 程式碼與插件。 每次 Xcode 建置應用程式時, CocoaPods 就會嵌入 Flutter 模組。
如此可讓你快速迭代,確保使用最新版本的 Flutter 模組,而無需在 Xcode 之外執行額外指令。
若要進一步了解 CocoaPods, 請參閱 CocoaPods 入門指南。
觀看影片
#如果你偏好透過影片學習, 以下影片介紹了如何將 Flutter 加入 iOS 應用程式:
需求條件
#專案中每位開發人員都必須在本機安裝 Flutter SDK 與 CocoaPods。
範例專案結構
#本節假設你的現有應用程式與 Flutter 模組位於同層目錄中。 如果你的目錄結構不同, 請調整相對路徑。 範例目錄結構如下所示:
-
my_flutter/
- .ios/
Flutter/
- podhelper.rb
-
MyApp/
- Podfile
更新你的 Podfile
#
將 Flutter 模組加入你的 Podfile 設定檔。
本節假設你的 Swift 應用程式名稱為 MyApp。
-
(選用) 若你的現有應用程式缺少
Podfile設定檔, 請切換至應用程式目錄的根目錄。 使用pod init指令建立Podfile檔案。 -
更新你的
Podfile設定檔。在
platform宣告之後加入以下幾行。MyApp/Podfilerubyflutter_application_path = '../my_flutter' load File.join(flutter_application_path, '.ios', 'Flutter', 'podhelper.rb')針對每個需要嵌入 Flutter 的 Podfile 目標(target), 加入對
install_all_flutter_pods(flutter_application_path)方法的呼叫。 請將這些呼叫加在上一步驟的設定之後。MyApp/Podfilerubytarget 'MyApp' do install_all_flutter_pods(flutter_application_path) end在
Podfile的post_install區塊中, 加入對flutter_post_install(installer)的呼叫。 此區塊應為Podfile設定檔中的最後一個區塊。MyApp/Podfilerubypost_install do |installer| flutter_post_install(installer) if defined?(flutter_post_install) end
若要查看 Podfile 範例,請參閱 Flutter Podfile 範例。
嵌入你的框架
#
在建置時,Xcode 會將你的 Dart 程式碼、每個 Flutter 插件
以及 Flutter 引擎分別封裝成各自的 *.xcframework 套件。
CocoaPods 的 podhelper.rb 腳本接著會將這些
*.xcframework 套件嵌入你的專案中。
Flutter.xcframework包含 Flutter 引擎。App.xcframework包含此專案已編譯的 Dart 程式碼。<plugin>.xcframework包含一個 Flutter 插件。
若要將 Flutter 引擎、你的 Dart 程式碼以及 Flutter 插件 嵌入你的 iOS 應用程式,請完成以下步驟。
-
重新整理你的 Flutter 插件。
若你修改了
pubspec.yaml檔案中的 Flutter 相依套件, 請在 Flutter 模組目錄中執行flutter pub get。 這將重新整理podhelper.rb腳本所讀取的插件清單。flutter pub get -
使用 CocoaPods 嵌入插件與框架。
切換至位於
/path/to/MyApp/MyApp的 iOS 應用程式專案目錄。使用
pod install指令。pod install
你的 iOS 應用程式的 Debug 與 Release 建置組態 會嵌入對應建置模式的 Flutter 元件。
-
建置專案。
在 Xcode 中開啟
MyApp.xcworkspace。確認你開啟的是
MyApp.xcworkspace, 而非MyApp.xcodeproj。.xcworkspace檔案包含 CocoaPod 相依套件,.xcodeproj則不包含。選取 Product > Build,或按下 Cmd + B。
設定 LLDB Init 檔案
#-
產生 Flutter LLDB 檔案。
- 在你的 Flutter 應用程式中,執行以下指令:
flutter build ios --config-only此指令將在
.ios/Flutter/ephemeral目錄中產生 LLDB 檔案。 -
設定 LLDB Init 檔案。
前往 Product > Scheme > Edit Scheme。
在左側邊欄選取 Run 區段。
使用與你在更新你的 Podfile 一節的 Podfile 中 相同的相對路徑,設定 LLDB Init File。
$(SRCROOT)/../my_flutter/.ios/Flutter/ephemeral/flutter_lldbinit若你的方案中已有 LLDB Init File, 可以將 Flutter 的 LLDB 檔案加入其中。 Flutter LLDB Init 檔案的路徑必須相對於 你專案 LLDB Init 檔案的位置。
例如,若你的 LLDB 檔案位於
/path/to/MyApp/.lldbinit, 請加入以下內容:command source --relative-to-command-file "../my_flutter/.ios/Flutter/ephemeral/flutter_lldbinit"
在 Xcode 中連結並嵌入框架
#做法
#在第二種方法中,請編輯現有的 Xcode 專案、 產生所需的框架,並將其嵌入應用程式中。 Flutter 會為 Flutter 本身、已編譯的 Dart 程式碼,以及每個 Flutter 插件 產生對應的 iOS 框架。 請嵌入這些框架,並更新現有應用程式的建置設定。
需求
#此方法無需額外的軟體或硬體需求。 在下列情況下請使用此方法:
- 團隊成員無法安裝 Flutter SDK 與 CocoaPods
- 您不想在現有 iOS 應用程式中使用 CocoaPods 作為相依套件管理工具
限制
#
Flutter 無法處理 xcframeworks 的共用相依套件。
若宿主應用程式與 Flutter 模組的插件定義了相同的 Pod 相依套件,
且你使用此選項整合 Flutter 模組,將會產生錯誤。
這些錯誤包括 Multiple commands produce 'CommonDependency.framework' 之類的問題。
若要解決此問題,請在宿主應用程式的 Podfile 中,
將 Flutter 模組內每個插件原始碼連結到其 podspec 檔案。
請連結原始碼,而非插件的 xcframework 框架。
下一節將說明如何產生該框架。
若要防止共用相依套件存在時發生的錯誤,
請使用帶有 --no-plugins 旗標的 flutter build ios-framework
指令。
範例專案結構
#以下範例假設你想將框架輸出至 /path/to/MyApp/Flutter/。
flutter build ios-framework --output=/path/to/MyApp/Flutter/
每次在 Flutter 模組中修改程式碼後,都需重新執行此指令。
產生的專案結構應類似以下目錄樹。
-
/path/to/MyApp/
Flutter/
Debug/
- Flutter.xcframework
- App.xcframework
- FlutterPluginRegistrant.xcframework(If you have plugins with iOS-platform code)
- example_plugin.xcframework(One framework file for each plugin)
Profile/
- Flutter.xcframework
- App.xcframework
- FlutterPluginRegistrant.xcframework
- example_plugin.xcframework
Release/
- Flutter.xcframework
- App.xcframework
- FlutterPluginRegistrant.xcframework
- example_plugin.xcframework
操作步驟
#在 Xcode 中,如何將產生的框架連結、嵌入或同時進行兩者, 取決於框架的類型。
- 連結並嵌入動態框架。
- 連結靜態框架。切勿嵌入靜態框架。
Flutter 插件可能會產生靜態或動態框架。 請連結靜態框架,_絕對不要_嵌入它們。
若你將靜態框架嵌入 iOS 應用程式,
將無法把該應用程式發布到 App Store。
發布時會出現
Found an unexpected Mach-O header code 封存錯誤。
連結所有框架
#若要連結必要的框架,請按照以下步驟操作。
-
選擇要連結的框架。
在 Project Navigator 中,點擊你的專案。
點擊 Build Phases 頁籤。
展開 Link Binary With Libraries。
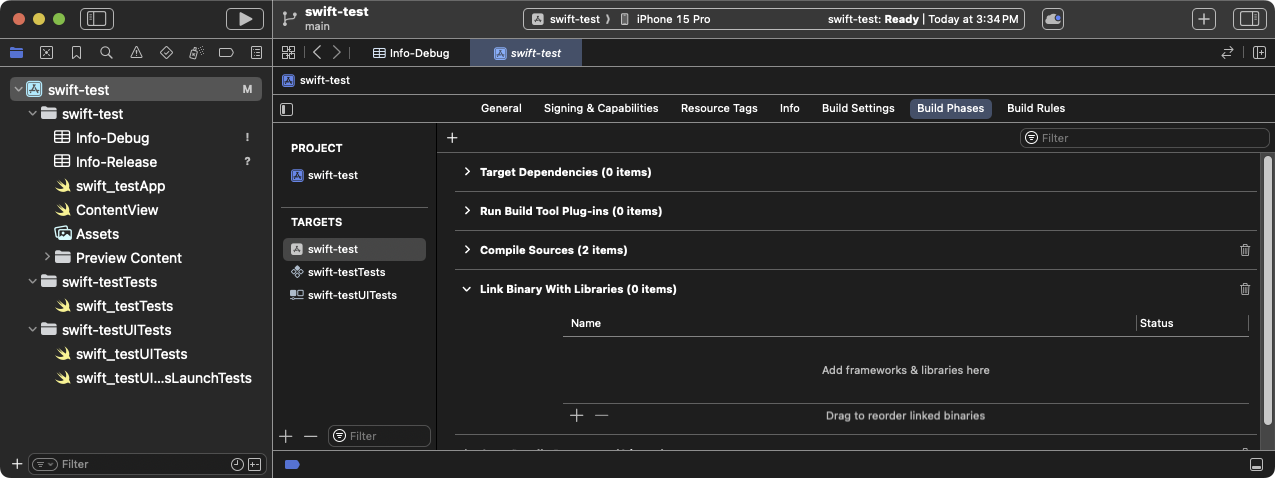
在 Xcode 中展開 Link Binary With Libraries 建置階段
點擊 +(加號)。
點擊 Add Other... 然後 Add Files...。
在 Choose frameworks and libraries to add: 對話框中, 瀏覽至
/path/to/MyApp/Flutter/Release/目錄。按住 Command 鍵點擊該目錄中的框架,然後點擊 Open。
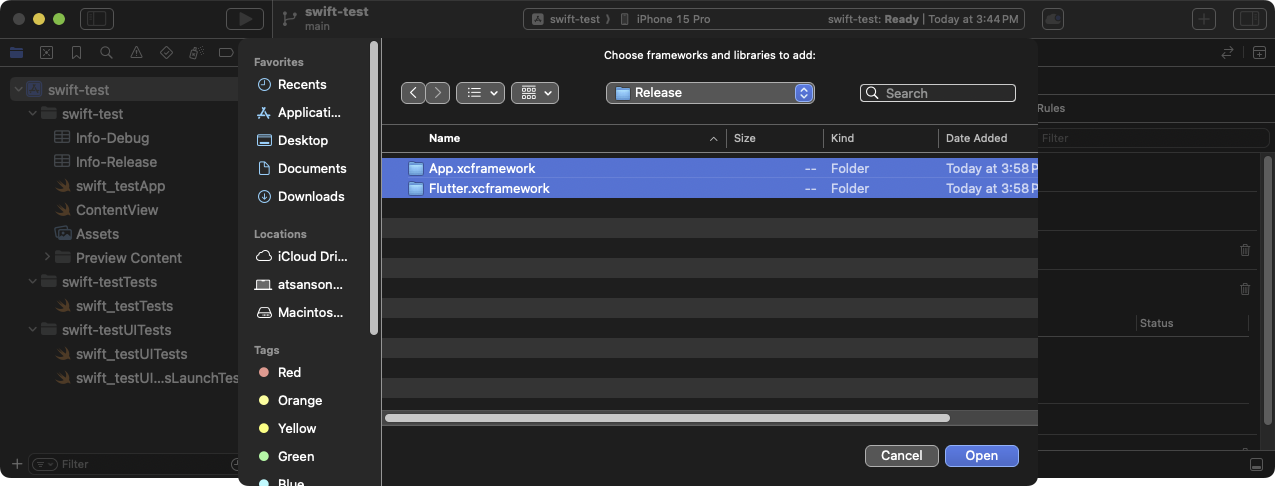
在 Xcode 的 Choose frameworks and libraries to add: 對話框中選擇要連結的框架
-
更新函式庫的路徑以對應建置模式。
啟動 Finder。
瀏覽至
/path/to/MyApp/目錄。右鍵點擊
MyApp.xcodeproj並選擇 Show Package Contents。用 Xcode 開啟
project.pbxproj。該檔案會在 Xcode 的文字 編輯器中開啟。這也會鎖定 Project Navigator,直到你關閉文字編輯器。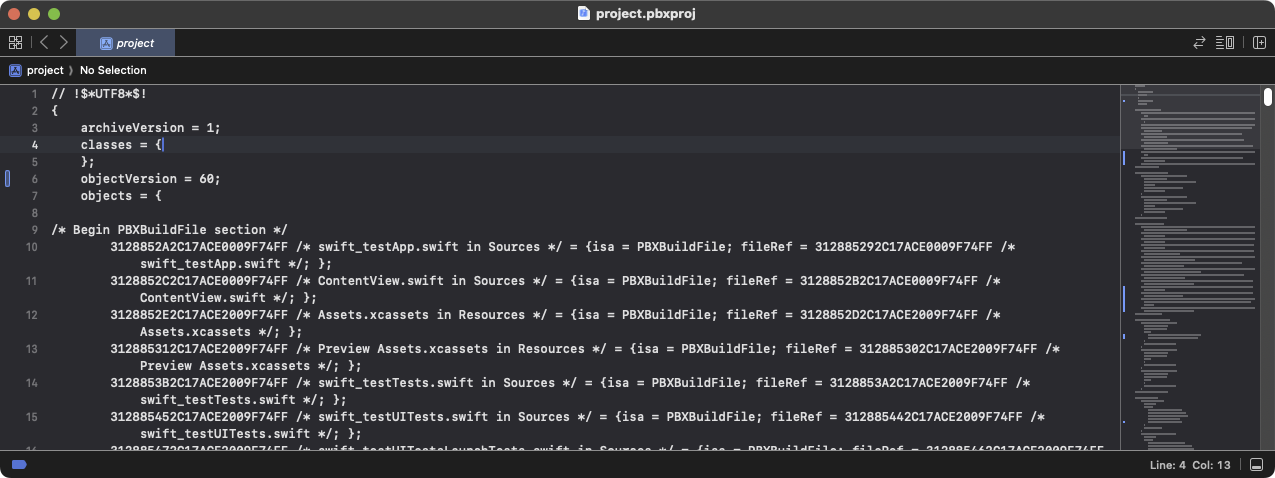
在 Xcode 文字編輯器中開啟的
project-pbxproj檔案在
/* Begin PBXFileReference section */中找到 類似以下文字的行。312885572C1A441C009F74FF /* Flutter.xcframework */ = { isa = PBXFileReference; expectedSignature = "AppleDeveloperProgram:S8QB4VV633:FLUTTER.IO LLC"; lastKnownFileType = wrapper.xcframework; name = Flutter.xcframework; path = Flutter/Release/Flutter.xcframework; sourceTree = "<group>"; }; 312885582C1A441C009F74FF /* App.xcframework */ = { isa = PBXFileReference; lastKnownFileType = wrapper.xcframework; name = App.xcframework; path = Flutter/Release/App.xcframework; sourceTree = "<group>"; };將上一步驟中反白的
Release文字 改為$(CONFIGURATION),並在路徑前後加上 引號。312885572C1A441C009F74FF /* Flutter.xcframework */ = { isa = PBXFileReference; expectedSignature = "AppleDeveloperProgram:S8QB4VV633:FLUTTER.IO LLC"; lastKnownFileType = wrapper.xcframework; name = Flutter.xcframework; path = "Flutter/$(CONFIGURATION)/Flutter.xcframework"; sourceTree = "<group>"; }; 312885582C1A441C009F74FF /* App.xcframework */ = { isa = PBXFileReference; lastKnownFileType = wrapper.xcframework; name = App.xcframework; path = "Flutter/$(CONFIGURATION)/App.xcframework"; sourceTree = "<group>"; };
-
更新搜尋路徑。
點擊 Build Settings 頁籤。
瀏覽至 Search Paths。
雙擊 Framework Search Paths 右側。
在組合框中,點擊 +(加號)。
輸入
$(inherited)並按下 Enter。點擊 +(加號)。
輸入
$(PROJECT_DIR)/Flutter/$(CONFIGURATION)/並按下 Enter。
在 Xcode 中更新 Framework Search Paths
連結框架後,它們應會顯示在 目標 General 設定的 Frameworks, Libraries, and Embedded Content 區段中。
嵌入動態框架
#若要嵌入動態框架,請完成以下步驟。
-
瀏覽至 General > Frameworks, Libraries, and Embedded Content。
-
點擊每個動態框架並選擇 Embed & Sign。
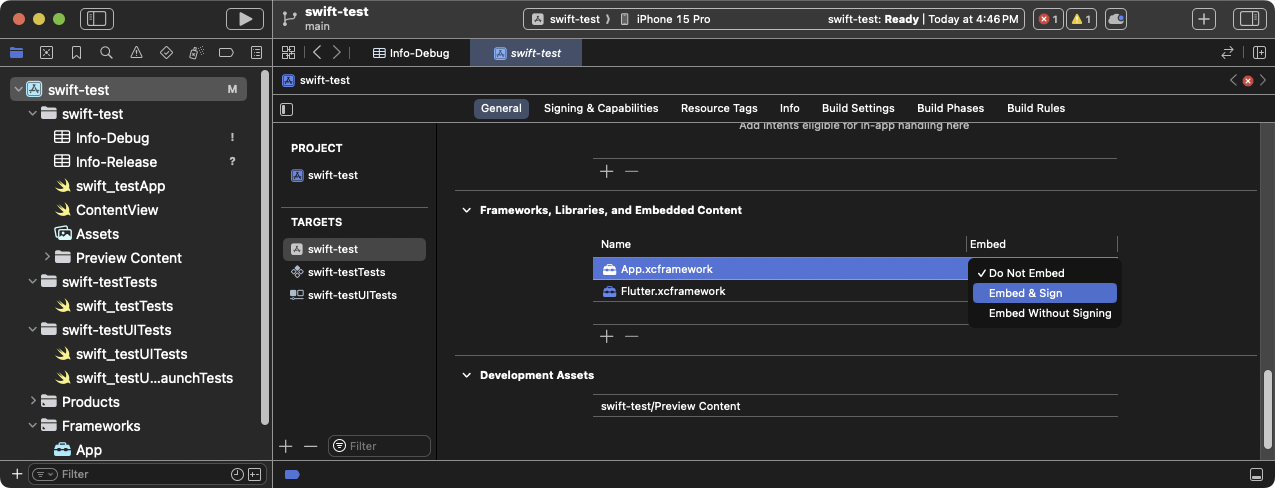
在 Xcode 中為每個框架選擇 Embed & Sign
請勿包含任何靜態框架, 包括
FlutterPluginRegistrant.xcframework。 點擊 Build Phases 頁籤。
-
展開 Embed Frameworks。 你的動態框架應顯示在該區段中。
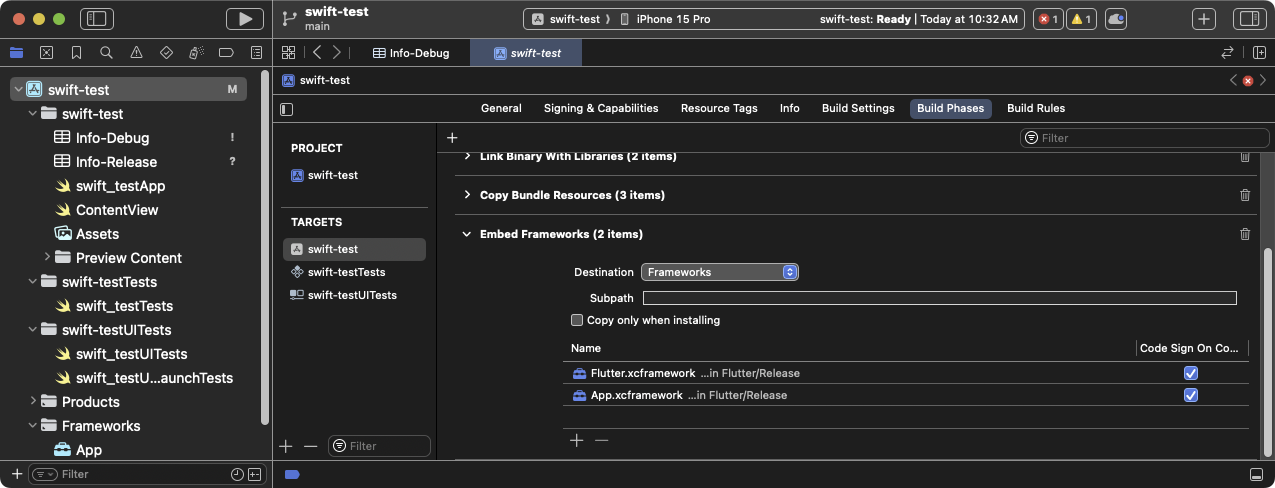
在 Xcode 中展開的 Embed Frameworks 建置階段
-
建置專案。
在 Xcode 中開啟
MyApp.xcworkspace。請確認你開啟的是
MyApp.xcworkspace而 不是MyApp.xcodeproj。.xcworkspace檔案包含 CocoaPod 相依套件,.xcodeproj則沒有。選擇 Product > Build 或按下 Cmd + B。
設定 LLDB Init File
#-
產生 Flutter LLDB 檔案。
- 在你的 Flutter 應用程式中,如果尚未執行,請重新執行
flutter build ios-framework:
flutter build ios-framework --output=/path/to/MyApp/Flutter/這將在
/path/to/MyApp/Flutter/目錄中產生 LLDB 檔案。 - 在你的 Flutter 應用程式中,如果尚未執行,請重新執行
-
設定 LLDB Init File。
前往 Product > Scheme > Edit Scheme。
在左側邊欄選擇 Run 區段。
將 LLDB Init File 設定為以下路徑:
$(PROJECT_DIR)/Flutter/flutter_lldbinit如果你的 Scheme 已有 LLDB Init File,可以將 Flutter 的 LLDB 檔案加入其中。Flutter 的 LLDB Init File 路徑必須相對於 你專案的 LLDB Init File 所在位置。
例如,若你的 LLDB 檔案位於
/path/to/MyApp/.lldbinit, 請加入以下內容:command source --relative-to-command-file "Flutter/flutter_lldbinit"
在 Xcode 中使用框架並以 podspec 方式使用 Flutter 框架
#方法說明
#
此方法將 Flutter 產生為 CocoaPods 的 podspec,
而非將龐大的 Flutter.xcframework 分發給其他開發者、
機器或持續整合系統。
Flutter 仍會為已編譯的 Dart 程式碼
以及每個 Flutter 插件產生 iOS 框架。
嵌入這些框架並更新現有應用程式的建置設定。
需求
#此方法不需要額外的軟體或硬體需求。 在以下使用情境中採用此方法:
- 團隊成員無法安裝 Flutter SDK 與 CocoaPods
- 你不想在現有的 iOS 應用程式中使用 CocoaPods 作為相依套件管理工具
限制
#
Flutter 無法處理 xcframeworks 的共用相依套件。
若宿主應用程式與 Flutter 模組的插件定義了相同的 Pod 相依套件,
且你使用此選項整合 Flutter 模組,將會產生錯誤。
這些錯誤包括 Multiple commands produce 'CommonDependency.framework' 之類的問題。
若要解決此問題,請在宿主應用程式的 Podfile 中,
將 Flutter 模組內每個插件原始碼連結到其 podspec 檔案。
請連結原始碼,而非插件的 xcframework 框架。
下一節將說明如何產生該框架。
若要防止共用相依套件存在時發生的錯誤,
請使用帶有 --no-plugins 旗標的 flutter build ios-framework
指令。
此方法僅適用於 beta 或 stable 發布頻道。
範例專案結構
#以下範例假設你想將框架輸出至 /path/to/MyApp/Flutter/。
flutter build ios-framework --output=/path/to/MyApp/Flutter/
每次在 Flutter 模組中修改程式碼後,都需重新執行此指令。
產生的專案結構應類似以下目錄樹。
-
/path/to/MyApp/
Flutter/
Debug/
- Flutter.xcframework
- App.xcframework
- FlutterPluginRegistrant.xcframework(If you have plugins with iOS-platform code)
- example_plugin.xcframework(One framework file for each plugin)
Profile/
- Flutter.xcframework
- App.xcframework
- FlutterPluginRegistrant.xcframework
- example_plugin.xcframework
Release/
- Flutter.xcframework
- App.xcframework
- FlutterPluginRegistrant.xcframework
- example_plugin.xcframework
將 Flutter 引擎加入 Podfile
#使用 CocoaPods 的宿主應用程式可以將 Flutter 引擎加入其 Podfile。
pod 'Flutter', :podspec => '/path/to/MyApp/Flutter/[build mode]/Flutter.podspec'
連結並嵌入應用程式與插件框架
#Flutter 插件可能會產生靜態或動態框架。 請連結靜態框架,_絕對不要_嵌入它們。
若你將靜態框架嵌入 iOS 應用程式,
將無法把該應用程式發布到 App Store。
發布時會出現
Found an unexpected Mach-O header code 封存錯誤。
連結所有框架
#若要連結必要的框架,請按照以下步驟操作。
-
選擇要連結的框架。
在 Project Navigator 中,點擊你的專案。
點擊 Build Phases 頁籤。
展開 Link Binary With Libraries。
在 Xcode 中展開 Link Binary With Libraries 建置階段
點擊 +(加號)。
點擊 Add Other... 然後 Add Files...。
在 Choose frameworks and libraries to add: 對話框中, 瀏覽至
/path/to/MyApp/Flutter/Release/目錄。按住 Command 鍵點擊該目錄中的框架,然後點擊 Open。
在 Xcode 的 Choose frameworks and libraries to add: 對話框中選擇要連結的框架
-
更新函式庫的路徑以對應建置模式。
啟動 Finder。
瀏覽至
/path/to/MyApp/目錄。右鍵點擊
MyApp.xcodeproj並選擇 Show Package Contents。用 Xcode 開啟
project.pbxproj。該檔案會在 Xcode 的文字 編輯器中開啟。這也會鎖定 Project Navigator,直到你關閉文字編輯器。在 Xcode 文字編輯器中開啟的
project-pbxproj檔案在
/* Begin PBXFileReference section */中找到 類似以下文字的行。312885572C1A441C009F74FF /* Flutter.xcframework */ = { isa = PBXFileReference; expectedSignature = "AppleDeveloperProgram:S8QB4VV633:FLUTTER.IO LLC"; lastKnownFileType = wrapper.xcframework; name = Flutter.xcframework; path = Flutter/Release/Flutter.xcframework; sourceTree = "<group>"; }; 312885582C1A441C009F74FF /* App.xcframework */ = { isa = PBXFileReference; lastKnownFileType = wrapper.xcframework; name = App.xcframework; path = Flutter/Release/App.xcframework; sourceTree = "<group>"; };將上一步驟中反白的
Release文字 改為$(CONFIGURATION),並在路徑前後加上 引號。312885572C1A441C009F74FF /* Flutter.xcframework */ = { isa = PBXFileReference; expectedSignature = "AppleDeveloperProgram:S8QB4VV633:FLUTTER.IO LLC"; lastKnownFileType = wrapper.xcframework; name = Flutter.xcframework; path = "Flutter/$(CONFIGURATION)/Flutter.xcframework"; sourceTree = "<group>"; }; 312885582C1A441C009F74FF /* App.xcframework */ = { isa = PBXFileReference; lastKnownFileType = wrapper.xcframework; name = App.xcframework; path = "Flutter/$(CONFIGURATION)/App.xcframework"; sourceTree = "<group>"; };
-
更新搜尋路徑。
點擊 Build Settings 頁籤。
瀏覽至 Search Paths。
雙擊 Framework Search Paths 右側。
在組合框中,點擊 +(加號)。
輸入
$(inherited)並按下 Enter。點擊 +(加號)。
輸入
$(PROJECT_DIR)/Flutter/$(CONFIGURATION)/並按下 Enter。在 Xcode 中更新 Framework Search Paths
連結框架後,它們應會顯示在 目標 General 設定的 Frameworks, Libraries, and Embedded Content 區段中。
嵌入動態框架
#若要嵌入動態框架,請完成以下步驟。
-
瀏覽至 General > Frameworks, Libraries, and Embedded Content。
-
點擊每個動態框架並選擇 Embed & Sign。
在 Xcode 中為每個框架選擇 Embed & Sign
請勿包含任何靜態框架, 包括
FlutterPluginRegistrant.xcframework。 點擊 Build Phases 頁籤。
-
展開 Embed Frameworks。 你的動態框架應顯示在該區段中。
在 Xcode 中展開的 Embed Frameworks 建置階段
-
建置專案。
在 Xcode 中開啟
MyApp.xcworkspace。請確認你開啟的是
MyApp.xcworkspace而 不是MyApp.xcodeproj。.xcworkspace檔案包含 CocoaPod 相依套件,.xcodeproj則沒有。選擇 Product > Build 或按下 Cmd + B。
設定 LLDB Init File
#-
產生 Flutter LLDB 檔案。
- 在你的 Flutter 應用程式中,如果尚未執行,請重新執行
flutter build ios-framework:
flutter build ios-framework --output=/path/to/MyApp/Flutter/這將在
/path/to/MyApp/Flutter/目錄中產生 LLDB 檔案。 - 在你的 Flutter 應用程式中,如果尚未執行,請重新執行
-
設定 LLDB Init File。
前往 Product > Scheme > Edit Scheme。
在左側邊欄選擇 Run 區段。
將 LLDB Init File 設定為以下路徑:
$(PROJECT_DIR)/Flutter/flutter_lldbinit如果你的 Scheme 已有 LLDB Init File,可以將 Flutter 的 LLDB 檔案加入其中。Flutter 的 LLDB Init File 路徑必須相對於 你專案的 LLDB Init File 所在位置。
例如,若你的 LLDB 檔案位於
/path/to/MyApp/.lldbinit, 請加入以下內容:command source --relative-to-command-file "Flutter/flutter_lldbinit"
設定本地網路隱私權限
#
在 iOS 14 及更新版本中,請在 iOS 應用程式的 Debug 版本中啟用 Dart multicast DNS 服務。
這可透過 flutter attach 新增除錯功能,例如熱重載與 DevTools。
若要僅在應用程式的 Debug 版本中設定本機網路隱私權限,
請為每個建置設定建立獨立的 Info.plist 檔案。
SwiftUI 專案預設不含 Info.plist 檔案。
若需要建立 property list,
可透過 Xcode 或文字編輯器進行。
以下說明假設使用預設的 Debug 與 Release 設定。
請依照你的應用程式建置設定調整名稱。
-
建立新的 property list。
在 Xcode 中開啟你的專案。
在 Project Navigator 中,點擊專案名稱。
在編輯器面板的 Targets 清單中,點擊你的應用程式。
點擊 Info 分頁。
展開 Custom iOS Target Properties。
在清單上按右鍵,選擇 Add Row。
從下拉選單中選擇 Bonjour Services。 這會在專案目錄中建立一個名為
Info的新 property list 檔案, 在 Finder 中顯示為Info.plist。
-
將
Info.plist重新命名為Info-Debug.plist。在左側專案清單中點擊 Info 檔案。
在右側的 Identity and Type 面板中, 將 Name 從
Info.plist改為Info-Debug.plist。
-
建立 Release property list。
在 Project Navigator 中,點擊
Info-Debug.plist。選擇 File > Duplicate...。 你也可以按下 Cmd + Shift + S。
在對話框中,將 Save As: 欄位設為
Info-Release.plist,然後點擊 Save。
-
在 Debug property list 中新增必要的屬性。
在 Project Navigator 中,點擊
Info-Debug.plist。在 Bonjour Services 陣列中新增字串值
_dartVmService._tcp。(選用) 若要設定自訂的權限對話框文字, 新增鍵值 Privacy - Local Network Usage Description。
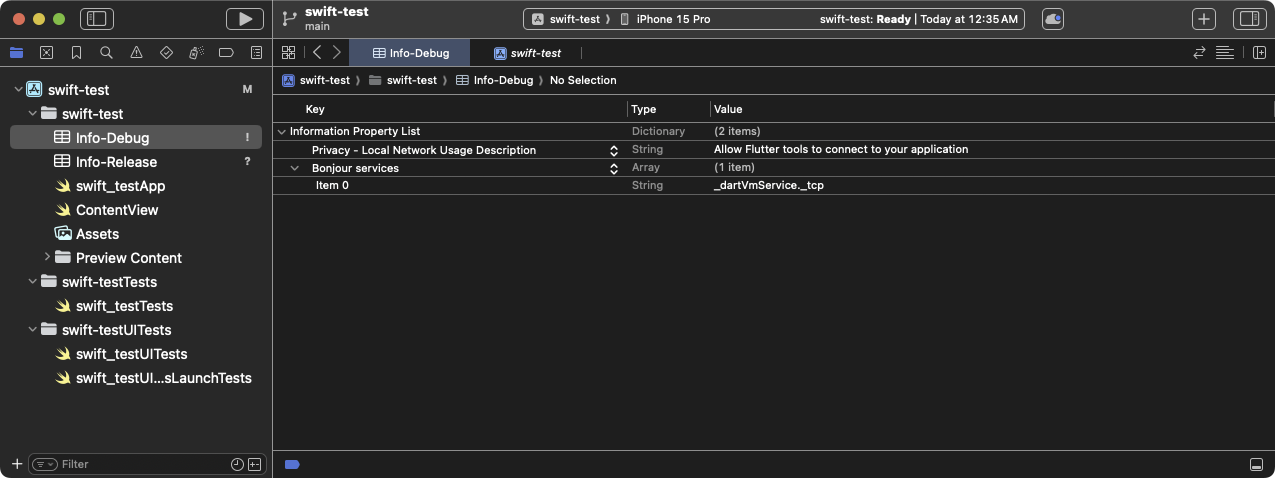
已新增 Bonjour Services 與 Privacy - Local Network Usage Description 鍵值的
Info-Debugproperty list
-
設定目標,讓不同建置模式使用不同的 property list。
在 Project Navigator 中,點擊你的專案。
點擊 Build Settings 分頁。
點擊 All 與 Combined 子分頁。
在搜尋框中輸入
plist。 這會將設定篩選為包含 property list 的項目。捲動清單直到看見 Packaging。
點擊 Info.plist File 設定。
將 Info.plist File 的值 從
path/to/Info.plist改為path/to/Info-$(CONFIGURATION).plist。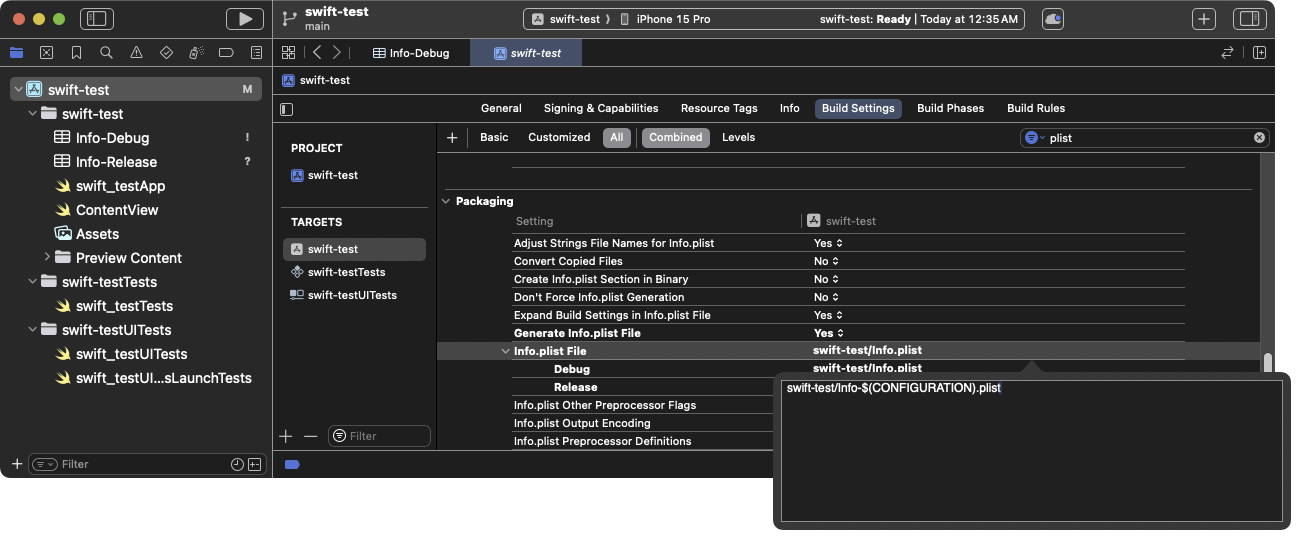
更新
Info.plist建置設定以使用特定建置模式的 property list這會在 Debug 模式下解析為 Info-Debug.plist, 在 Release 模式下解析為 Info-Release.plist。
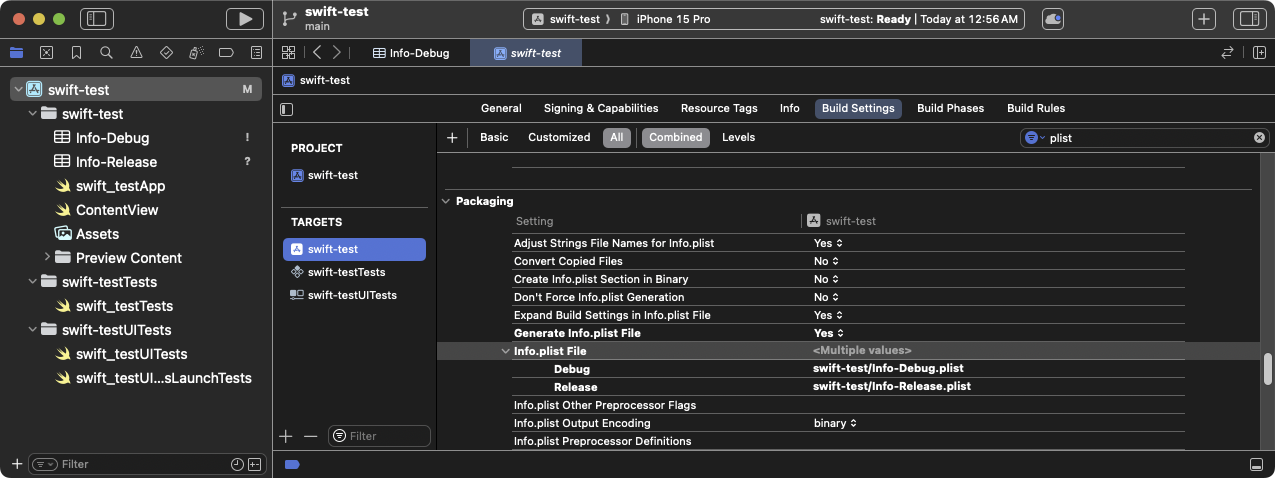
顯示各設定變體的更新後 Info.plist File 建置設定
-
從 Build Phases 中移除 Release property list。
在 Project Navigator 中,點擊你的專案。
點擊 Build Phases 分頁。
展開 Copy Bundle Resources。
若此清單包含
Info-Release.plist, 點擊該項目,然後點擊其下方的 -(減號) 以將 property list 從資源清單中移除。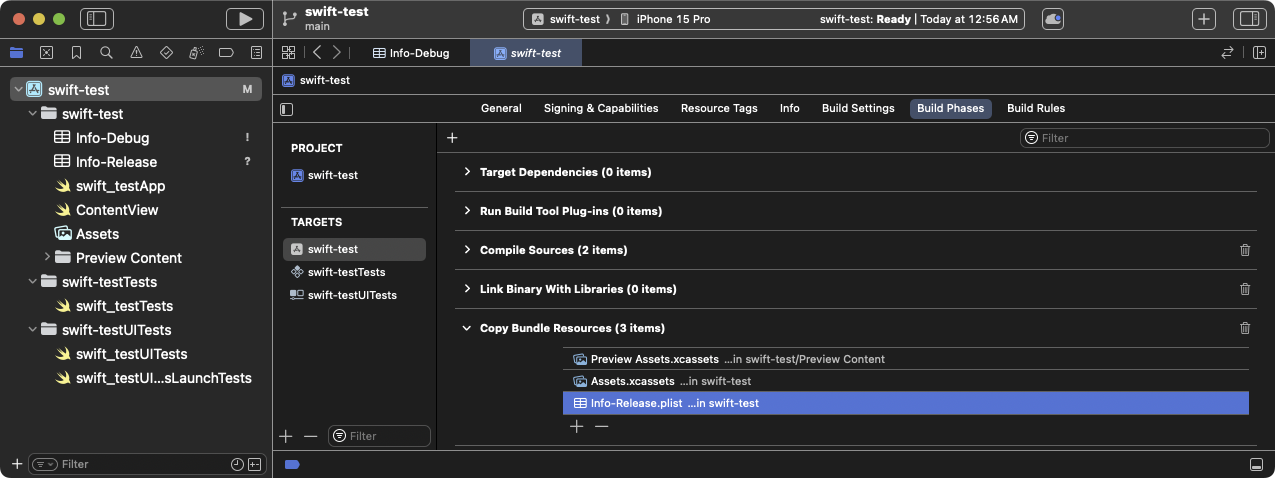
顯示 Info-Release.plist 設定的 Copy Bundle 建置階段,請移除此設定。
-
你的 Debug 應用程式載入的第一個 Flutter 畫面會提示要求本機網路權限。
點擊 OK。
(選用) 若要在應用程式載入前授予權限,請啟用 Settings > Privacy > Local Network > Your App。
解決 Apple Silicon Mac 已知問題
#
在 Apple Silicon 處理器的 Mac 上,
主應用程式會為 arm64 模擬器建置。
雖然 Flutter 支援 arm64 模擬器,但部分插件可能不支援。
如果你使用這類插件,可能會看到像
Undefined symbols for architecture arm64 的編譯錯誤。
若遇到此情況,
請將 arm64 從主應用程式的模擬器架構中排除。
在 Project Navigator 中點選你的專案。
點選 Build Settings 分頁。
點選 All 與 Combined 子分頁。
在 Architectures 下,點選 Excluded Architectures。
展開以查看可用的建置組態。
點選 Debug。
點選 +(加號)。
選擇 iOS Simulator。
在 Any iOS Simulator SDK 的值欄位雙擊。
點選 +(加號)。
-
在 Debug > Any iOS Simulator SDK 對話框中輸入
arm64。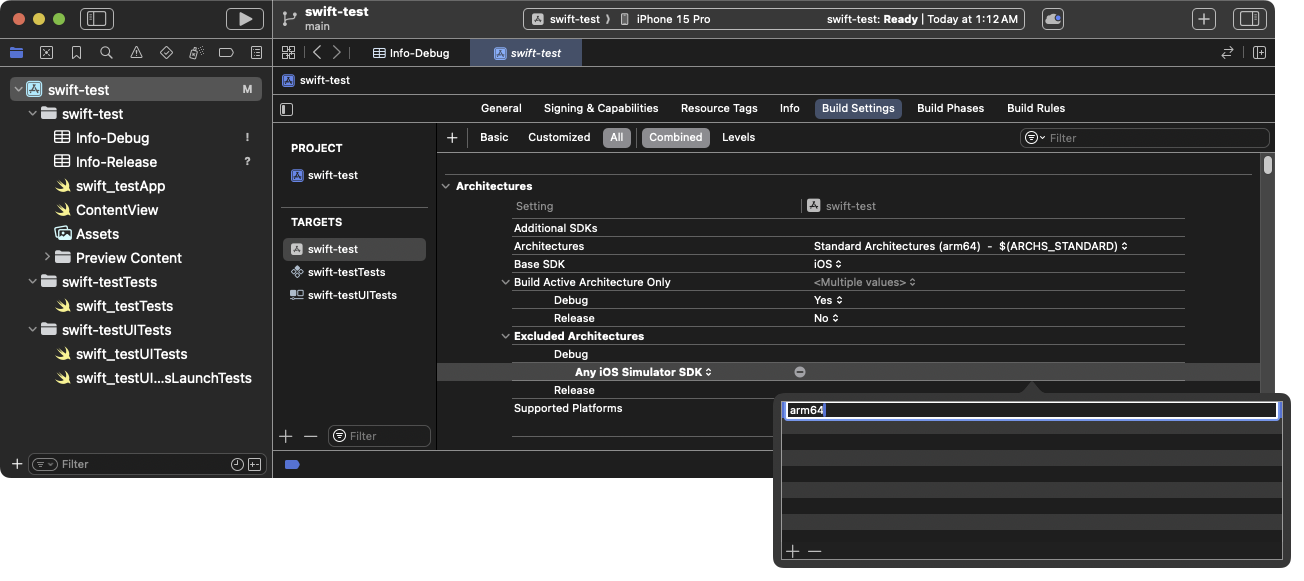
將
arm64加入為應用程式的排除架構 按下 Esc 關閉此對話框。
針對 Release 建置模式重複上述步驟。
對所有 iOS 單元測試目標也重複上述步驟。
下一步
#你現在可以將 Flutter 畫面 加入到你現有的 iOS 應用程式中。
Unless stated otherwise, the documentation on this site reflects Flutter 3.44.0. Page last updated on 2026-06-14. View source or report an issue.