# 交錯動畫(Staggered animations)
> 如何在 Flutter 中撰寫交錯動畫。
:::secondary 你將學到什麼
* 交錯動畫(staggered animation)由一連串依序或重疊的動畫所組成。
* 要建立交錯動畫,請使用多個 `Animation` 物件。
* 一個 `AnimationController` 控制所有的 `Animation` 物件。
* 每個 `Animation` 物件指定動畫在某個 `Interval` 期間的表現。
* 對於每個需要動畫化的屬性,都要建立一個 `Tween`。
:::
:::tip 術語說明
如果你對 tweens 或 tweening 的概念不熟悉,請參閱
[Flutter 動畫教學][Animations in Flutter tutorial]。
:::
交錯動畫(staggered animations)是一個簡單易懂的概念:視覺上的變化會以一連串的操作發生,而不是同時進行。
動畫可以是完全依序進行的,也可以部分或完全重疊。也可能會有空檔,期間沒有任何變化。
本指南將說明如何在 Flutter 中建立交錯動畫,
對單一元件 (Widget) 套用一連串依序與重疊的動畫。
點擊螢幕會啟動動畫,依序改變透明度、尺寸、形狀、顏色與內距(padding)。
以下影片展示了這個交錯動畫:
在影片中,你會看到單一元件 (Widget) 的動畫,這個元件一開始是帶有邊框、略帶圓角的藍色方形。
動畫依下列順序進行變化:
1. 淡入(Fades in)
1. 變寬
1. 變高並向上移動
1. 轉變為帶邊框的圓形
1. 顏色變為橘色
動畫播放完畢後,會反向播放回到初始狀態。
:::secondary Flutter 新手?
本頁假設你已經知道如何使用 Flutter 的元件(Widgets)建立版面配置。若想了解更多,請參閱 [Flutter 版面配置教學][Building Layouts in Flutter]。
:::
## 交錯動畫的基本結構
:::secondary 重點整理
* 所有動畫都由同一個
[`AnimationController`][] 所驅動。
* 不論動畫實際持續多久,控制器的值都必須介於 0.0 到 1.0 之間(包含 0.0 與 1.0)。
* 每個動畫都有一個 [`Interval`][],
範圍也是 0.0 到 1.0(包含端點)。
* 對於每個在某個區間內需要動畫化的屬性,都要建立一個
[`Tween`][]。`Tween` 會指定該屬性的起始與結束值。
* `Tween` 會產生一個 [`Animation`][]
物件,由控制器管理。
:::
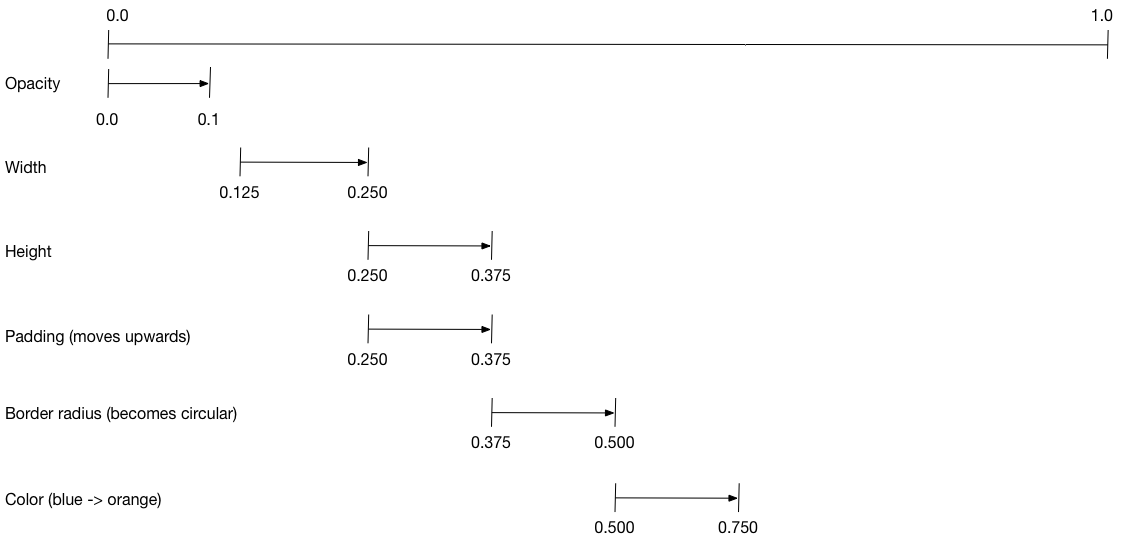
下圖展示了交錯動畫範例中所使用的 `Interval` 物件。
你可能會注意到以下特點:
* 透明度(opacity)在時間軸的前 10% 期間改變。
* 透明度變化與寬度變化之間有一個小空檔。
* 在時間軸的最後 25% 期間,沒有任何動畫發生。
* 增加 padding 會讓元件看起來往上移動。
* 將 border radius 增加到 `75.0`,
會讓 `150.0` x `150.0` 帶圓角的方形變成圓形。
* padding 與高度的變化發生在完全相同的區間,但這並非必要。
設定動畫的步驟如下:
* 建立一個 `AnimationController` 來管理所有的 `Animation` 物件。
* 為每個需要動畫化的屬性建立一個 `Tween`。
* `Tween` 定義了一個數值範圍。
* `Tween` 的 `animate()` 方法接收一個父動畫,
並產生該屬性的 `Animation`。
* 透過 `CurvedAnimation` 的 `curve` 屬性指定區間(interval)。
當控制動畫的值變化時,新的動畫值也會跟著變化,進而觸發 UI 更新。
以下程式碼建立了 `width` 屬性的 tween。
它會建立一個 [`CurvedAnimation`][],並指定一個緩動曲線(eased curve)。
其他可用的預先定義動畫曲線,請參閱 [`Curves`][]。
```dart
width = Tween(begin: 50, end: 150).animate(
CurvedAnimation(
parent: controller,
curve: const Interval(0.125, 0.250, curve: Curves.ease),
),
),
```
`begin` 和 `end` 的值不一定要是 double。
以下程式碼會為 `borderRadius` 屬性(用來控制方形角落的圓角程度)建立 Tween,
並使用 `BorderRadius.circular()`。
```dart
borderRadius =
BorderRadiusTween(
begin: BorderRadius.circular(4),
end: BorderRadius.circular(75),
).animate(
CurvedAnimation(
parent: controller,
curve: const Interval(0.375, 0.500, curve: Curves.ease),
),
),
```
### 完整的交錯動畫(staggered animation)
如同所有互動元件(Widgets),完整的動畫(Animation)由一對元件組成:一個無狀態元件(StatelessWidget)和一個有狀態元件(StatefulWidget)。
無狀態元件會指定 `Tween` 物件,定義 `Animation` 物件,並提供一個 `build()` 函式,負責建立元件樹中負責動畫的部分。
有狀態元件則會建立控制器(controller)、執行動畫(play the animation),並建立元件樹中非動畫的部分。當螢幕上任何位置偵測到點擊時,動畫就會開始。
**應用程式原始碼:**[交錯動畫範例][staggered animation example]
### 無狀態元件:StaggerAnimation
在無狀態元件 `StaggerAnimation` 中,`build()` 函式會實例化一個
[`AnimatedBuilder`][]——這是一個用於建立動畫(Animation)的通用元件(Widget)。
`AnimatedBuilder` 會建立一個元件,並使用 `Animation` 物件目前的值來設定它。
範例中建立了一個名為 `_buildAnimation()` 的函式(負責實際的 UI 更新),並將其指定給 `builder` 屬性。
`AnimatedBuilder` 會監聽動畫控制器(animation controller)的通知,當值變動時會將元件樹標記為 dirty。
每當動畫更新(tick)時,值就會被更新,進而呼叫 `_buildAnimation()`。
:::tip
這個範例在 `AnimatedBuilder` 內使用 `Opacity` 元件,
以便將所有動畫化的屬性集中在單一 builder 中。單獨對透明度做動畫時,
建議改用 [`FadeTransition`][],以避免每個影格都重建子元件。
:::
```dart highlightLines=6,12,63-69,74,94-95
import 'dart:async';
import 'package:flutter/scheduler.dart' show timeDilation;
import 'package:material_ui/material_ui.dart';
class StaggerAnimation extends StatelessWidget {
StaggerAnimation({super.key, required this.controller})
: // Each animation defined here transforms its value during the subset
// of the controller's duration defined by the animation's interval.
// For example, the opacity animation transforms its value during
// the first 10% of the controller's duration.
opacity = Tween(begin: 0, end: 1).animate(
CurvedAnimation(
parent: controller,
curve: const Interval(0, 0.100, curve: Curves.ease),
),
),
width = Tween(begin: 50, end: 150).animate(
CurvedAnimation(
parent: controller,
curve: const Interval(0.125, 0.250, curve: Curves.ease),
),
),
height = Tween(begin: 50, end: 150).animate(
CurvedAnimation(
parent: controller,
curve: const Interval(0.250, 0.375, curve: Curves.ease),
),
),
padding =
EdgeInsetsTween(
begin: const EdgeInsets.only(bottom: 16),
end: const EdgeInsets.only(bottom: 75),
).animate(
CurvedAnimation(
parent: controller,
curve: const Interval(0.250, 0.375, curve: Curves.ease),
),
),
borderRadius =
BorderRadiusTween(
begin: BorderRadius.circular(4),
end: BorderRadius.circular(75),
).animate(
CurvedAnimation(
parent: controller,
curve: const Interval(0.375, 0.500, curve: Curves.ease),
),
),
color = ColorTween(begin: Colors.indigo[100], end: Colors.orange[400])
.animate(
CurvedAnimation(
parent: controller,
curve: const Interval(0.500, 0.750, curve: Curves.ease),
),
);
final Animation controller;
final Animation opacity;
final Animation width;
final Animation height;
final Animation padding;
final Animation borderRadius;
final Animation color;
// This function is called each time the controller "ticks" a new frame.
// When it runs, all of the animation's values will have been
// updated to reflect the controller's current value.
Widget _buildAnimation(BuildContext context, Widget? child) {
return Container(
padding: padding.value,
alignment: Alignment.bottomCenter,
child: Opacity(
opacity: opacity.value,
child: Container(
width: width.value,
height: height.value,
decoration: BoxDecoration(
color: color.value,
border: Border.all(color: Colors.indigo[300]!, width: 3),
borderRadius: borderRadius.value,
),
),
),
);
}
@override
Widget build(BuildContext context) {
return AnimatedBuilder(builder: _buildAnimation, animation: controller);
}
}
```
### 有狀態元件:StaggerDemo
這個有狀態元件 `StaggerDemo` 會建立 `AnimationController`,並指定 2000 毫秒的動畫時長。它負責啟動動畫,並建立元件樹中不參與動畫的部分。當螢幕偵測到點擊時,動畫會開始執行,並會先正向播放,然後再反向播放。
播放期間的點擊會被忽略,讓整段動畫得以完整播完。
```dart highlightLines=1,28,32-33,40
class StaggerDemo extends StatefulWidget {
const StaggerDemo({super.key});
@override
State createState() => _StaggerDemoState();
}
class _StaggerDemoState extends State
with SingleTickerProviderStateMixin {
late final AnimationController _controller;
@override
void initState() {
super.initState();
_controller = AnimationController(
duration: const Duration(milliseconds: 2000),
vsync: this,
);
}
@override
void dispose() {
_controller.dispose();
super.dispose();
}
Future _playAnimation() async {
if (_controller.isAnimating) return;
try {
await _controller.forward().orCancel;
await _controller.reverse().orCancel;
} on TickerCanceled {
// The animation got canceled, probably because it was disposed of.
}
}
@override
Widget build(BuildContext context) {
return Scaffold(
appBar: AppBar(title: const Text('Staggered Animation')),
body: GestureDetector(
behavior: HitTestBehavior.opaque,
onTap: _playAnimation,
child: Center(
child: Container(
width: 300,
height: 300,
decoration: BoxDecoration(
color: Colors.black.withValues(alpha: 0.1),
border: Border.all(color: Colors.black.withValues(alpha: 0.5)),
),
child: StaggerAnimation(controller: _controller.view),
),
),
),
);
}
}
void main() {
timeDilation = 10; // 1 is normal animation speed.
runApp(const MaterialApp(home: StaggerDemo()));
}
```
[`Animation`]: https://api.flutter.dev/flutter/animation/Animation-class.html
[`AnimationController`]: https://api.flutter.dev/flutter/animation/AnimationController-class.html
[`AnimatedBuilder`]: https://api.flutter.dev/flutter/widgets/AnimatedBuilder-class.html
[Animations in Flutter tutorial]: /ui/animations/tutorial
[Building Layouts in Flutter]: /ui/layout
[`CurvedAnimation`]: https://api.flutter.dev/flutter/animation/CurvedAnimation-class.html
[`Curves`]: https://api.flutter.dev/flutter/animation/Curves-class.html
[`FadeTransition`]: https://api.flutter.dev/flutter/widgets/FadeTransition-class.html
[`Interval`]: https://api.flutter.dev/flutter/animation/Interval-class.html
[staggered animation example]: https://github.com/flutter/website/tree/main/examples/animation/staggered_animation
[`Tween`]: https://api.flutter.dev/flutter/animation/Tween-class.html