# Hero 動畫
> 如何讓元件在兩個螢幕間飛行並產生動畫效果。
:::secondary 你將學到什麼
* _Hero_ 指的是在螢幕間飛行的元件(Widget)。
* 使用 Flutter 的 `Hero` 元件建立 hero 動畫。
* 讓 hero 從一個螢幕飛到另一個螢幕。
* 在 hero 飛行過程中,將其形狀從圓形動畫轉換為矩形。
* Flutter 的 `Hero` 元件實作了一種常見的動畫風格,稱為 _共享元素轉場_(shared element transitions)或 _共享元素動畫_(shared element animations)。
:::
你很可能已經多次見過 hero 動畫。例如,一個螢幕顯示了一個待售商品的縮圖列表。選擇其中一個商品時,該縮圖會飛到新的螢幕,顯示更多細節及 **購買** 按鈕。將圖片從一個螢幕飛到另一個螢幕,在 Flutter 中稱為 _hero 動畫_,而這種動作有時也被稱為 _共享元素轉場_。
你可以觀看這段一分鐘的影片,快速認識 `Hero` 元件:
本指南將示範如何建立標準 hero 動畫,以及在飛行過程中將圖片從圓形變換為方形的 hero 動畫。
:::secondary 範例
本指南將逐步說明每種 hero 動畫風格的範例:
* [標準 hero 動畫](#standard-hero-animations)
* [徑向 hero 動畫](#radial-hero-animations)
如果你想自己執行這些範例,請依照 [執行範例](#run-the-examples) 的步驟操作。
:::
:::secondary Flutter 新手?
本頁假設你已經知道如何使用 Flutter 的元件(Widgets)建立版面配置。欲了解更多資訊,請參閱 [在 Flutter 中建立版面配置][Building Layouts in Flutter]。
:::
:::tip 術語說明
[_Route_][] 代表 Flutter 應用程式中的一個頁面或螢幕。
:::
## Hero 動畫風格
你可以在 Flutter 中透過 `Hero` 元件建立 hero 動畫。當 hero 從來源 route 動畫到目標 route 時,目標 route(不含 hero)會淡入顯示。通常,hero 是 UI 中兩個 route 共同擁有的小部分,例如圖片。對使用者來說,hero 就像是在 route 之間「飛行」。本指南將說明如何建立下列 hero 動畫:
### 標準動畫 {:#standard-hero-animation-preview}
_標準 hero 動畫_ 會讓 hero 從一個 route 飛到新的 route,通常會落在不同的位置並改變尺寸。
下方影片(以慢速錄製)展示了一個典型範例。點擊 route 中央的 flippers,會讓它們飛到新藍色 route 的左上角,並縮小尺寸。點擊藍色 route 中的 flippers(或使用裝置的返回手勢)則會讓 flippers 飛回原本的 route。
### 徑向動畫 {:#radial-hero-animation-preview}
在 _徑向 hero 動畫_ 中,hero 在 route 之間飛行時,其形狀會從圓形變為矩形。
下方影片(以慢速錄製)展示了一個徑向 hero 動畫的範例。一開始,三個圓形圖片的橫列出現在 route 底部。點擊任一圓形圖片,會將該圖片飛到新 route,並以方形顯示。點擊方形圖片,則會讓 hero 飛回原本的 route,並以圓形顯示。
在進入
[標準](#standard-hero-animations)
或 [徑向](#radial-hero-animations) hero 動畫的專屬章節前,建議先閱讀 [hero 動畫的基本結構](#basic-structure),了解 hero 動畫程式碼的架構,以及 [幕後原理](#behind-the-scenes),深入理解 Flutter 如何執行 hero 動畫。
## hero 動畫的基本結構
:::secondary 重點整理
* 在不同 route 中使用兩個具有相同 tag 的 hero 元件來實作動畫。
* `Navigator` 管理一個包含應用程式 route 的堆疊(stack)。
* 在 `Navigator` 堆疊上推入(push)或彈出(pop)route 會觸發動畫。
* Flutter 框架會計算一個矩形 Tween,[`RectTween`][],定義 hero 從來源 route 飛到目標 route 時的邊界。在飛行過程中,hero 會被移到應用程式的 overlay,使其顯示於兩個 route 之上。
:::
:::tip 術語說明
如果你對 Tween 或 Tweening 的概念不熟悉,請參閱 [Flutter 動畫教學][Animations in Flutter tutorial]。
:::
Hero 動畫是利用兩個 [`Hero`][] 元件實作:一個描述來源 route 的元件,另一個描述目標 route 的元件。對使用者而言,hero 看起來像是被「共用」的,只有開發者需要理解這個實作細節。Hero 動畫的程式碼結構如下:
1. 定義起始的 `Hero` 元件,稱為 _來源 hero_。hero 需指定其圖像表現(通常是一張圖片)、一個識別用的 tag,並存在於來源 route 所定義的 widget tree 中。
1. 定義結束的 `Hero` 元件,稱為 _目標 hero_。此 hero 也需指定其圖像表現,以及與來源 hero 相同的 tag。**兩個 hero 元件必須使用相同的 tag**,通常是代表底層資料的物件。為了最佳效果,兩個 hero 的 widget tree 應盡可能一致。
1. 建立包含目標 hero 的 route。目標 route 定義動畫結束時存在的 widget tree。
1. 透過將目標 route 推入(push)`Navigator` 堆疊來觸發動畫。`Navigator` 的 push 和 pop 操作,會對來源與目標 route 中 tag 相同的 hero 配對執行動畫。
Flutter 會計算一個 Tween,將 `Hero` 元件的邊界從起點動畫到終點(同時插值尺寸與位置),並在 overlay 上執行動畫。
下一節將更詳細說明 Flutter 的處理流程。
## 幕後原理
以下說明 Flutter 如何執行 route 之間的轉場。
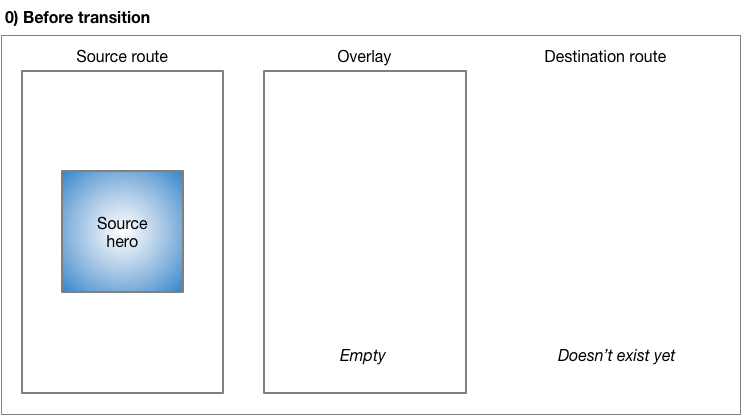
在轉場前,來源 hero 停留於來源 route 的 widget tree。目標 route 尚未建立,overlay 也是空的。
---
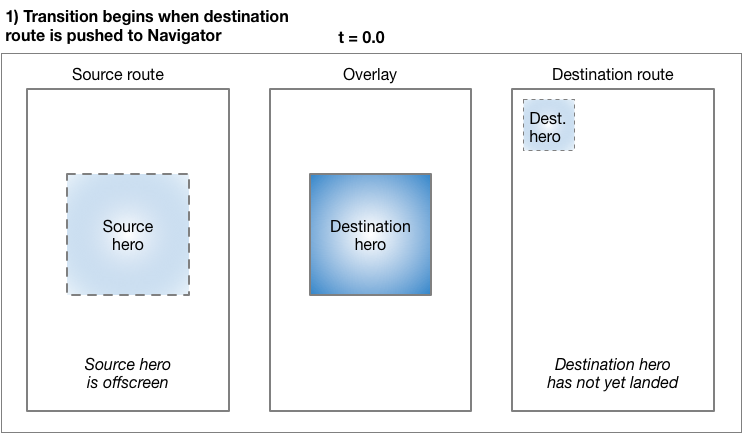
將 route 推入 `Navigator` 會觸發動畫。在 `t=0.0`,Flutter 執行下列動作:
* 依據 Material motion 規範,離線計算目標 hero 的路徑,使用曲線運動。Flutter 現在已知道 hero 的最終位置。
* 將目標 hero 放入 overlay,位置與尺寸與 _來源 hero_ 一致。將 hero 加入 overlay 會改變其 Z 軸順序,使其顯示於所有 route 之上。
* 將來源 hero 移出螢幕。
---
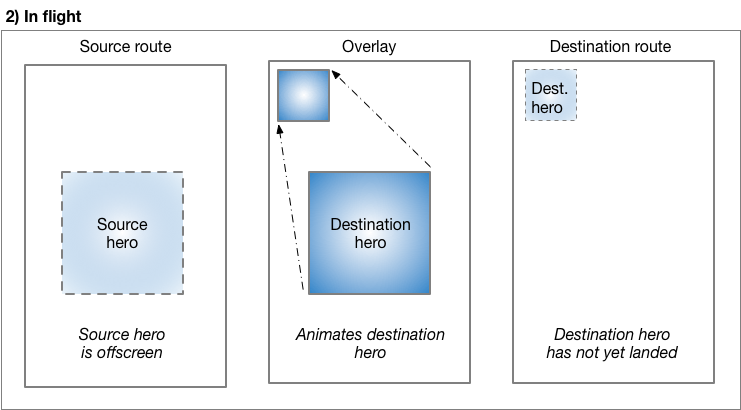
hero 飛行時,其矩形邊界會使用 [`Tween`][] 進行動畫,這是由 `Hero` 元件的 [`createRectTween`][] 屬性指定。預設情況下,Flutter 會使用 [`MaterialRectArcTween`][] 實例,該實例會讓矩形的對角線角落沿著曲線路徑動畫。(請參閱 [徑向 hero 動畫][Radial hero animations],了解使用不同 `Tween` 動畫的範例。)
---
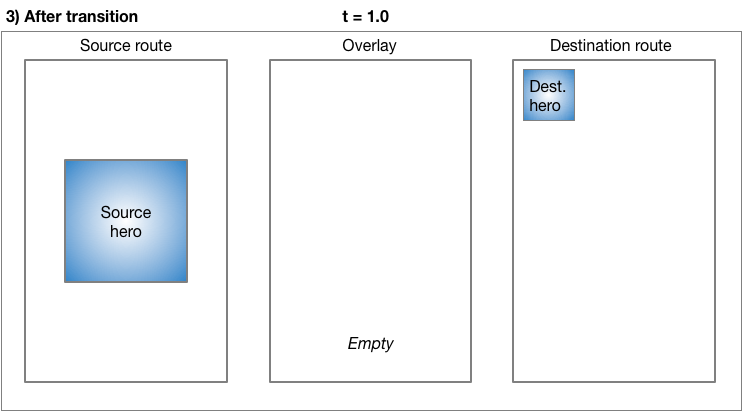
飛行結束時:
* Flutter 會將 hero 元件從 overlay 移到目標 route。此時 overlay 已清空。
* 目標 hero 會出現在目標 route 的最終位置。
* 來源 hero 會被還原至其 route。
---
彈出(pop)route 時,會執行相同流程,將 hero 動畫回來源 route 的尺寸與位置。
### 重要類別
本指南的範例會用到下列類別來實作 hero 動畫:
[`Hero`][]
: 負責從來源 route 飛到目標 route 的元件。為來源 route 與目標 route 各定義一個 `Hero`,並賦予相同的 tag。Flutter 會針對 tag 相同的 hero 配對執行動畫。
[`InkWell`][]
: 指定點擊 hero 時的行為。`InkWell` 元件的 `onTap()` 回呼(callback)會建立新 route,並將其推入 `Navigator` 堆疊。
[`Navigator`][]
: `Navigator` 管理一個 route 堆疊。將 route 推入或彈出 `Navigator` 堆疊會觸發動畫。
[`Route`][]
: 指定一個螢幕或頁面。大多數應用程式(除了最基本的)都會有多個 route。
## 標準 hero 動畫
:::secondary 重點整理
* 使用 [`MaterialPageRoute`][]、[`CupertinoPageRoute`][] 指定 route,或用 [`PageRouteBuilder`][] 建立自訂 route。本節範例使用 `MaterialPageRoute`。
* 透過將目標圖片包在 `SizedBox` 中,可改變動畫結束時圖片的尺寸。
* 透過將目標圖片放在版面配置元件(layout widget)中,可改變圖片的位置。本範例使用 `Container`。
:::
### 發生了什麼事?
在 Flutter 中,使用 `Hero` 元件實作圖片從一個 route 飛到另一個 route 的動畫非常直接。當使用 `MaterialPageRoute` 指定新 route 時,圖片會沿著 [Material Design 動態規範][Material Design motion spec] 所描述的曲線路徑飛行。
本節的完整程式碼與圖片位於 [標準 hero 動畫範例][standard hero animation example]。
若想自己體驗這個動畫,
請先 [設定並執行範例](#run-the-examples),
然後嘗試下列操作:
* 點擊首頁 route 的照片,會將圖片飛到新 route,並以不同的位置與縮放顯示同一張照片。
* 點擊圖片或使用裝置的返回手勢,即可返回前一個 route。
* 增加 [`timeDilation`][] 的值,即可進一步放慢轉場動畫。
### PhotoHero 類別
自訂的 `PhotoHero` 類別負責維護 hero,以及其尺寸、圖片和點擊時的行為。`PhotoHero` 會建立下列 widget tree:
程式碼如下:
```dart
import 'package:flutter/scheduler.dart' show timeDilation;
import 'package:material_ui/material_ui.dart';
class PhotoHero extends StatelessWidget {
const PhotoHero({
super.key,
required this.photo,
this.onTap,
required this.width,
});
final String photo;
final VoidCallback? onTap;
final double width;
@override
Widget build(BuildContext context) {
return SizedBox(
width: width,
child: Hero(
tag: photo,
child: Material(
color: Colors.transparent,
child: InkWell(
onTap: onTap,
child: Image.asset(photo, fit: BoxFit.contain),
),
),
),
);
}
}
```
關鍵資訊:
* 當 `HeroAnimation` 被指定為應用程式的 `home` 屬性時,起始 route 會由 `MaterialApp` 隱式推入。
* 一個 `InkWell` 包裹了圖片,讓你可以很輕鬆地在來源與目標 hero 上加入點擊手勢。
* 使用透明色定義 `Material` 元件,可以讓圖片在飛往目標時「跳脫」背景。
* `SizedBox` 指定了動畫開始與結束時 hero 的尺寸。
* 將 `Image` 元件的 `fit` 屬性設為 `BoxFit.contain`,可以確保圖片在轉場過程中盡可能放大,同時不改變其長寬比。
### HeroAnimation 類別
`HeroAnimation` 類別會建立來源與目標的 `PhotoHero` 元件,並設定轉場動畫。
程式碼如下:
```dart highlightLines=9,12-15,23,26-27,43
class HeroAnimation extends StatelessWidget {
const HeroAnimation({super.key});
@override
Widget build(BuildContext context) {
return Scaffold(
appBar: AppBar(title: const Text('Basic Hero Animation')),
body: Center(
child: PhotoHero(
photo: 'images/flippers.png',
width: 300,
onTap: () {
Navigator.of(context).push(
MaterialPageRoute(
builder: (context) {
return Scaffold(
appBar: AppBar(title: const Text('Flippers Page')),
body: Container(
// Set background to blue to emphasize that it's a new route.
color: Colors.lightBlueAccent,
padding: const EdgeInsets.all(16),
alignment: Alignment.topLeft,
child: PhotoHero(
photo: 'images/flippers.png',
width: 100,
onTap: () {
Navigator.of(context).pop();
},
),
),
);
},
),
);
},
),
),
);
}
}
void main() {
timeDilation = 5; // 1 means normal animation speed.
runApp(const MaterialApp(home: HeroAnimation()));
}
```
關鍵資訊:
* 當使用者點擊包含來源 hero 的 `InkWell` 時,程式碼會使用 `MaterialPageRoute` 建立目標 route。將目標 route 推入 `Navigator` 堆疊會觸發動畫。
* `Container` 會將 `PhotoHero` 定位在目標 route 左上角、`AppBar` 的下方。
* 目標 `PhotoHero` 的 `onTap()` 方法會彈出(pop)`Navigator` 堆疊,觸發動畫,讓 `Hero` 飛回原始 route。
* 除錯時可使用 `timeDilation` 屬性來減慢轉場速度。
---
## 徑向 hero 動畫
:::secondary 重點整理
* _徑向轉換_(radial transformation)會將圓形動畫變換為方形。
* 徑向 _hero_ 動畫會在 hero 從來源 route 飛到目標 route 的同時,執行徑向轉換。
* `MaterialRectCenterArcTween` 定義了 tween 動畫。
* 使用 `PageRouteBuilder` 建立目標 route。
:::
將 hero 從一個 route 飛到另一個 route,同時從圓形變換為矩形,是一個很棒的視覺效果,你可以透過 `Hero` 元件來實現。為了達成這個效果,程式碼會對兩個剪裁形狀(clip shapes):圓形與方形,進行交集動畫。在整個動畫過程中,圓形剪裁(以及圖片)會從 `minRadius` 縮放到 `maxRadius`,而方形剪裁則維持固定大小。與此同時,圖片會從來源 route 的位置飛到目標 route 的位置。若想看此轉場的視覺範例,請參考 Material motion 規範中的 [Radial transformation][]。
:::tip 專業小技巧
徑向 hero 動畫會將圓形與方形做交集。即使使用 `timeDilation` 減慢動畫,這個效果有時仍不易觀察,因此你可以考慮在開發時啟用 [`debugPaintSizeEnabled`][] 標誌。
:::
### 發生了什麼事?
下圖顯示了動畫開始(`t = 0.0`)與結束(`t = 1.0`)時被剪裁的圖片。
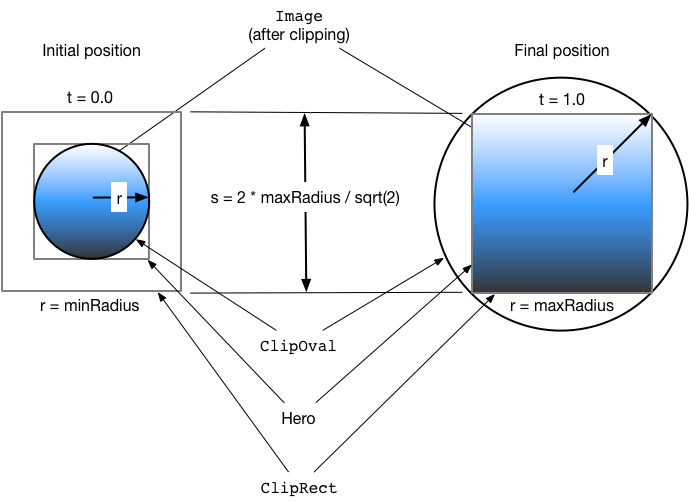
藍色漸層(代表圖片)顯示了剪裁形狀的交集區域。在轉場開始時,交集的結果是一個圓形剪裁([`ClipOval`][])。在轉換過程中,`ClipOval` 會從 `minRadius` 縮放到 `maxRadius`,而 [`ClipRect`][] 則維持固定大小。在轉場結束時,圓形與方形剪裁的交集會產生一個與 hero 元件同樣大小的矩形。換句話說,轉場結束後,圖片不再被剪裁。
本節的完整程式碼與圖片(包含本頁未顯示的 route 設定)
位於 [徑向 hero 動畫範例][radial hero animation example]。
若想自己體驗這個動畫,
請先 [設定並執行範例](#run-the-examples),
然後嘗試下列操作:
* 點擊三個圓形縮圖其中之一,將圖片動畫放大到新 route 中央的方形,並遮蔽原始 route。
* 點擊圖片或使用裝置的返回手勢,即可回到前一個 route。
* 增加 [`timeDilation`][] 的值,即可進一步減慢轉場速度。
### Photo 類別
`Photo` 類別會建立包含圖片的 widget tree:
```dart highlightLines=9,11-14
class Photo extends StatelessWidget {
const Photo({super.key, required this.photo, this.onTap});
final String photo;
final VoidCallback? onTap;
@override
Widget build(BuildContext context) {
return Material(
// Slightly opaque color appears where the image has transparency.
color: Theme.of(context).primaryColor.withValues(alpha: 0.25),
child: InkWell(
onTap: onTap,
child: Image.asset(photo, fit: BoxFit.contain),
),
);
}
}
```
關鍵資訊:
* `InkWell` 負責捕捉點擊(tap)手勢。呼叫的函式會將 `onTap()` 函式傳遞給 `Photo` 建構子。
* 在動畫過渡期間,`InkWell` 會在其第一個 `Material` 祖先上繪製其水波(splash)效果。
* `Material` 元件具有略帶透明的顏色,因此圖片中透明的部分會以顏色呈現。這確保了從圓形到方形的轉換過程,即使對於有透明區域的圖片,也能清楚可見。
* `Photo` 類別在其 widget tree 中不包含 `Hero`。為了讓動畫能正常運作,hero 會包裹 `RadialExpansion` 元件。
### RadialExpansion 類別
`RadialExpansion` 元件是本範例的核心,負責建立在動畫過渡期間裁切圖片的 widget tree。裁切後的形狀是由一個圓形裁切(在過渡期間會放大)與一個矩形裁切(在整個過程中維持固定大小)相交所產生。
為了達成這個目的,它會建立以下的 widget tree:
程式碼如下:
```dart highlightLines=3,11-13,16-17
class RadialExpansion extends StatelessWidget {
const RadialExpansion({super.key, required this.maxRadius, this.child})
: clipRectSize = 2 * (maxRadius / math.sqrt2);
final double maxRadius;
final double clipRectSize;
final Widget? child;
@override
Widget build(BuildContext context) {
return ClipOval(
child: Center(
child: SizedBox(
width: clipRectSize,
height: clipRectSize,
child: ClipRect(
child: child, // Photo
),
),
),
);
}
}
```
關鍵資訊:
* hero 會包裹 `RadialExpansion` 元件。
* 當 hero 飛行時,其尺寸會改變,並且因為它會限制其子元件的尺寸,所以 `RadialExpansion` 元件也會隨之調整尺寸以配合。
* `RadialExpansion` 動畫是由兩個重疊的裁切(clip)所產生。
* 此範例使用 [`MaterialRectCenterArcTween`][] 來定義補間插值(tweening interpolation)。hero 動畫的預設飛行路徑,會使用 hero 的角落來進行 tween 的插值。這種做法會影響 hero 在徑向轉換(radial transformation)期間的長寬比,因此新的飛行路徑會使用 `MaterialRectCenterArcTween`,以各 hero 的中心點來進行 tween 的插值。
程式碼如下:
```dart
static RectTween _createRectTween(Rect? begin, Rect? end) {
return MaterialRectCenterArcTween(begin: begin, end: end);
}
```
Hero 的飛行路徑仍然遵循一個弧線,但圖片的長寬比會保持不變。
---
## 執行範例
本指南中的每個範例都是一個完整的應用程式:
[標準 hero 動畫範例][standard hero animation example]與
[徑向 hero 動畫範例][radial hero animation example]。
若要自己執行這些範例:
1. [建立一個新的 Flutter 應用程式][Create a new Flutter app]。
1. 執行 `flutter pub add material_ui`,
將 [`material_ui`][] 套件加入為相依套件。
1. 將 `lib/main.dart` 替換為該範例的 `lib/main.dart` 檔案。
1. 將下列圖片下載到專案根目錄的 `images` 目錄中:
[`beachball.png`][]、[`binoculars.png`][]、
[`chair.png`][] 與 [`flippers.png`][]。
1. 在專案 `pubspec.yaml` 檔案現有的 `flutter` 區段中
加入 `assets` 項目,
將這些圖片宣告為 [資源(assets)][asset declarations]:
```yaml title="pubspec.yaml" highlightLines=3-4
flutter:
uses-material-design: true
assets:
- images/
```
1. 使用 `flutter run` 執行應用程式。
[Animations in Flutter tutorial]: /ui/animations/tutorial
[asset declarations]: /ui/assets/assets-and-images#specifying-assets
[`beachball.png`]: https://raw.githubusercontent.com/flutter/website/main/examples/animation/radial_hero_animation/images/beachball.png
[`binoculars.png`]: https://raw.githubusercontent.com/flutter/website/main/examples/animation/radial_hero_animation/images/binoculars.png
[Building Layouts in Flutter]: /ui/layout
[`chair.png`]: https://raw.githubusercontent.com/flutter/website/main/examples/animation/radial_hero_animation/images/chair.png
[`ClipOval`]: https://api.flutter.dev/flutter/widgets/ClipOval-class.html
[`ClipRect`]: https://api.flutter.dev/flutter/widgets/ClipRect-class.html
[Create a new Flutter app]: /reference/create-new-app
[`createRectTween`]: https://api.flutter.dev/flutter/widgets/CreateRectTween.html
[`CupertinoPageRoute`]: https://pub.dev/documentation/cupertino_ui/latest/cupertino_ui/CupertinoPageRoute-class.html
[`debugPaintSizeEnabled`]: /tools/devtools/inspector#debugging-layout-issues-visually
[`flippers.png`]: https://raw.githubusercontent.com/flutter/website/main/examples/animation/hero_animation/images/flippers.png
[`Hero`]: https://api.flutter.dev/flutter/widgets/Hero-class.html
[`InkWell`]: https://pub.dev/documentation/material_ui/latest/material_ui/InkWell-class.html
[Material Design motion spec]: https://m2.material.io/design/motion/understanding-motion.html#principles
[`material_ui`]: https://pub.dev/packages/material_ui
[`MaterialPageRoute`]: https://pub.dev/documentation/material_ui/latest/material_ui/MaterialPageRoute-class.html
[`MaterialRectArcTween`]: https://pub.dev/documentation/material_ui/latest/material_ui/MaterialRectArcTween-class.html
[`MaterialRectCenterArcTween`]: https://pub.dev/documentation/material_ui/latest/material_ui/MaterialRectCenterArcTween-class.html
[`Navigator`]: https://api.flutter.dev/flutter/widgets/Navigator-class.html
[`PageRouteBuilder`]: https://api.flutter.dev/flutter/widgets/PageRouteBuilder-class.html
[Radial hero animations]: #radial-hero-animations
[radial hero animation example]: https://github.com/flutter/website/tree/main/examples/animation/radial_hero_animation
[Radial transformation]: https://web.archive.org/web/20180223140424/https://material.io/guidelines/motion/transforming-material.html
[`RectTween`]: https://api.flutter.dev/flutter/animation/RectTween-class.html
[_Route_]: /cookbook/navigation/navigation-basics
[`Route`]: https://api.flutter.dev/flutter/widgets/Route-class.html
[standard hero animation example]: https://github.com/flutter/website/tree/main/examples/animation/hero_animation
[`timeDilation`]: https://api.flutter.dev/flutter/scheduler/timeDilation.html
[`Tween`]: https://api.flutter.dev/flutter/animation/Tween-class.html