# 插件作者適用的 Swift Package Manager 指南
> 如何為 iOS 和 macOS 插件新增 Swift Package Manager 相容性
:::note
自 3.44 版本起,Flutter 使用 [Swift Package Manager][]
來管理 iOS 和 macOS 的原生相依套件。
Flutter 持續以維護模式支援 CocoaPods,
但 CocoaPods 套件登錄庫將於
[2026 年 12 月 2 日起永久變為唯讀][cocoapods]。
:::
[cocoapods]: https://blog.cocoapods.org/CocoaPods-Specs-Repo/
[Swift Package Manager]: https://www.swift.org/documentation/package-manager/
如需了解如何開啟或關閉 SwiftPM,請參閱
[應用程式開發者適用的 Swift Package Manager 指南][for-app-devs]。
[for-app-devs]: /packages-and-plugins/swift-package-manager/for-app-developers
## 如何為現有的 Flutter 插件新增 Swift Package Manager 支援
本指南說明如何為已支援 CocoaPods 的插件新增 Swift Package Manager 支援,
以確保該插件可供所有 Flutter 專案使用。
Flutter 插件應在另行通知前**同時**支援 Swift Package Manager 和 CocoaPods。
Swift Package Manager 的採用將會是漸進式的。
自 Flutter 3.44 起,不支援 CocoaPods 的插件
無法在尚未遷移至 Swift Package Manager 的專案中使用。
不支援 Swift Package Manager 的插件
可能會對已完成遷移的專案造成問題。
請盡快遷移您的插件。
在本指南中,請將 `plugin_name` 替換為您的插件名稱。
以下範例使用 `ios`,請依實際情況替換為 `macos` 或 `darwin`。
1. 確認您使用的是 Flutter 3.44 或更新版本,此版本預設啟用 SwiftPM。
1. 首先在 `ios`、`macos` 及/或 `darwin` 目錄下建立一個子目錄。
將這個新目錄命名為平台套件的名稱。
- plugin_name/
- ios/
- ...
- **plugin_name/**
1. 在這個新目錄中,建立以下檔案/目錄:
- `Package.swift`(檔案)
- `Sources`(目錄)
- `Sources/plugin_name`(目錄)
您的插件結構應如下所示:
- plugin_name/
- ios/
- ...
- plugin_name/
- **Package.swift**
- **Sources/**
- **plugin_name/**
1. 在 `Package.swift` 檔案中使用以下範本:
```swift title="Package.swift"
// swift-tools-version: 5.9
// The swift-tools-version declares the minimum version of Swift required to build this package.
import PackageDescription
let package = Package(
// TODO: Update your plugin name.
name: "plugin_name",
platforms: [
// TODO: Update the platforms your plugin supports.
// If your plugin only supports iOS, remove `.macOS(...)`.
// If your plugin only supports macOS, remove `.iOS(...)`.
.iOS("13.0"),
.macOS("10.15")
],
products: [
// TODO: Update your library and target names.
// If the plugin name contains "_", replace with "-" for the library name.
.library(name: "plugin-name", targets: ["plugin_name"])
],
dependencies: [
.package(name: "FlutterFramework", path: "../FlutterFramework")
],
targets: [
.target(
// TODO: Update your target name.
name: "plugin_name",
dependencies: [
.product(name: "FlutterFramework", package: "FlutterFramework")
],
resources: [
// TODO: If your plugin requires a privacy manifest
// (e.g. if it uses any required reason APIs), update the PrivacyInfo.xcprivacy file
// to describe your plugin's privacy impact, and then uncomment this line.
// For more information, visit:
// https://developer.apple.com/documentation/bundleresources/privacy_manifest_files
// .process("PrivacyInfo.xcprivacy"),
// TODO: If you have other resources that need to be bundled with your plugin, refer to
// the following instructions to add them:
// https://developer.apple.com/documentation/xcode/bundling-resources-with-a-swift-package
]
)
]
)
```
1. 在 `Package.swift` 檔案中更新[支援的平台][supported platforms]。
```swift title="Package.swift"
platforms: [
// TODO: Update the platforms your plugin supports.
// If your plugin only supports iOS, remove `.macOS(...)`.
// If your plugin only supports macOS, remove `.iOS(...)`.
[!.iOS("13.0"),!]
[!.macOS("10.15")!]
],
```
[supported platforms]: https://developer.apple.com/documentation/packagedescription/supportedplatform
1. 在 `Package.swift` 檔案中更新套件、程式庫及目標名稱。
```swift title="Package.swift"
let package = Package(
// TODO: Update your plugin name.
name: [!"plugin_name"!],
platforms: [
.iOS("13.0"),
.macOS("10.15")
],
products: [
// TODO: Update your library and target names.
// If the plugin name contains "_", replace with "-" for the library name
.library(name: [!"plugin-name"!], targets: [[!"plugin_name"!]])
],
dependencies: [
.package(name: "FlutterFramework", path: "../FlutterFramework")
],
targets: [
.target(
// TODO: Update your target name.
name: [!"plugin_name"!],
dependencies: [
.product(name: "FlutterFramework", package: "FlutterFramework")
],
resources: [
// TODO: If your plugin requires a privacy manifest
// (e.g. if it uses any required reason APIs), update the PrivacyInfo.xcprivacy file
// to describe your plugin's privacy impact, and then uncomment this line.
// For more information, visit:
// https://developer.apple.com/documentation/bundleresources/privacy_manifest_files
// .process("PrivacyInfo.xcprivacy"),
// TODO: If you have other resources that need to be bundled with your plugin, refer to
// the following instructions to add them:
// https://developer.apple.com/documentation/xcode/bundling-resources-with-a-swift-package
]
)
]
)
```
:::note
若插件名稱包含 `_`,程式庫名稱必須改用 `-` 分隔的版本。
:::
1. 若您的插件有 [`PrivacyInfo.xcprivacy` 檔案][`PrivacyInfo.xcprivacy` file],請將其移至
`ios/plugin_name/Sources/plugin_name/PrivacyInfo.xcprivacy`,並在
`Package.swift` 檔案中取消對應資源的註解。
```swift title="Package.swift"
resources: [
// TODO: If your plugin requires a privacy manifest
// (e.g. if it uses any required reason APIs), update the PrivacyInfo.xcprivacy file
// to describe your plugin's privacy impact, and then uncomment this line.
// For more information, visit:
// https://developer.apple.com/documentation/bundleresources/privacy_manifest_files
[!.process("PrivacyInfo.xcprivacy"),!]
// TODO: If you have other resources that need to be bundled with your plugin, refer to
// the following instructions to add them:
// https://developer.apple.com/documentation/xcode/bundling-resources-with-a-swift-package
],
```
1. 將 `ios/Assets` 中的資源檔移至
`ios/plugin_name/Sources/plugin_name`(或其子目錄)。
如有必要,將資源檔加入 `Package.swift` 檔案。
更多操作說明請參考
[使用 Swift 套件捆綁資源][Bundling resources with a Swift package]。
1. 將 `ios/Classes` 中的所有檔案移至 `ios/plugin_name/Sources/plugin_name`。
1. 將 `FlutterFramework` 新增為相依套件。
更新 `Package.swift` 以包含 `FlutterFramework`:
```swift title="Package.swift"
dependencies: [
[!.package(name: "FlutterFramework", path: "../FlutterFramework")!]
],
targets: [
.target(
// TODO: Update your target name.
name: "plugin_name",
dependencies: [
[!.product(name: "FlutterFramework", package: "FlutterFramework")!]
],
)
]
```
1. `ios/Assets`、`ios/Resources` 和 `ios/Classes` 目錄現在應該是空的,可以刪除。
1. 若您的插件使用 [Pigeon][],請更新 Pigeon 輸入檔案。
```dart title="pigeons/messages.dart" diff
kotlinOptions: KotlinOptions(),
javaOut: 'android/app/src/main/java/io/flutter/plugins/Messages.java',
javaOptions: JavaOptions(),
- swiftOut: 'ios/Classes/messages.g.swift',
+ swiftOut: 'ios/plugin_name/Sources/plugin_name/messages.g.swift',
swiftOptions: SwiftOptions(),
```
1. 依需求更新 `Package.swift` 檔案中的自訂設定。
1. 在 Xcode 中,開啟 `ios/plugin_name/` 目錄。
1. 在 Xcode 中,開啟您的 `Package.swift` 檔案。
確認 Xcode 對此檔案不產生任何警告或錯誤。
:::tip
若 Xcode 未顯示任何檔案,請退出 Xcode(**Xcode > Quit Xcode**)後重新開啟。
若 Xcode 在您修改後未更新,請嘗試點選
**File > Packages > Reset Package Caches**。
:::
1. 若您的 `ios/plugin_name.podspec` 檔案有 [CocoaPods `dependency`][],
請在 `Package.swift` 檔案中加入對應的 [Swift Package Manager 相依套件][Swift Package Manager dependencies]。
1. 若您的套件必須明確指定為 `static` 或 `dynamic` 連結
([Apple 不建議此做法][not recommended by Apple]),請更新 [Product][] 以定義類型:
```swift title="Package.swift"
products: [
.library(name: "plugin-name", type: .static, targets: ["plugin_name"])
],
```
1. 進行其他自訂設定。如需更多關於如何撰寫 `Package.swift` 檔案的資訊,
請參考 [`PackageDescription`][]。
:::tip
若您在 `Package.swift` 中新增目標,請使用唯一名稱,
以避免與其他套件的目標產生衝突。
:::
1. 更新 `ios/plugin_name.podspec` 以指向新路徑。
```ruby title="ios/plugin_name.podspec" diff
- s.source_files = 'Classes/**/*.swift'
- s.resource_bundles = {'plugin_name_privacy' => ['Resources/PrivacyInfo.xcprivacy']}
+ s.source_files = 'plugin_name/Sources/plugin_name/**/*.swift'
+ s.resource_bundles = {'plugin_name_privacy' => ['plugin_name/Sources/plugin_name/PrivacyInfo.xcprivacy']}
```
1. 更新從 bundle 載入資源的方式,改用 [`Bundle.module`][]。
```swift
#if SWIFT_PACKAGE
let settingsURL = Bundle.module.url(forResource: "image", withExtension: "jpg")
#else
let settingsURL = Bundle(for: Self.self).url(forResource: "image", withExtension: "jpg")
#endif
```
:::note
`Bundle.module` 只有在
[`Package.swift` 檔案中定義了資源][Bundling resources] 或
[Xcode 自動包含資源][Xcode resource detection] 時才有效。
否則,使用 `Bundle.module` 會產生錯誤。
:::
1. 若您的 `.gitignore` 尚未包含 `.build/` 和 `.swiftpm/` 目錄,
請更新 `.gitignore` 加入以下內容:
```text title=".gitignore"
.build/
.swiftpm/
```
將插件的變更提交至您的版本控制系統。
1. 確認插件仍可在 CocoaPods 下正常運作。
1. 關閉 Swift Package Manager。
```sh
flutter config --no-enable-swift-package-manager
```
1. 切換至插件的範例應用程式目錄。
```sh
cd path/to/plugin/example/
```
1. 確認插件的範例應用程式可以建置並執行。
```sh
flutter run
```
1. 切換至插件的頂層目錄。
```sh
cd path/to/plugin/
```
1. 執行 CocoaPods 驗證 lint。
```sh
pod lib lint ios/plugin_name.podspec --configuration=Debug --skip-tests --use-modular-headers --use-libraries
```
```sh
pod lib lint ios/plugin_name.podspec --configuration=Debug --skip-tests --use-modular-headers
```
1. 確認插件可在 Swift Package Manager 下正常運作。
1. 開啟 Swift Package Manager。
```sh
flutter config --enable-swift-package-manager
```
1. 切換至插件的範例應用程式目錄。
```sh
cd path/to/plugin/example/
```
1. 確認插件的範例應用程式可以建置並執行。
```sh
flutter run
```
:::note
使用 Flutter CLI 在開啟 Swift Package Manager 功能的情況下執行插件的範例應用程式,
會將專案遷移以新增 Swift Package Manager 整合。
這會將範例應用程式的 Flutter SDK 最低需求提升至 3.24 版或更新版本。
若您需要使用較舊的 Flutter SDK 版本執行範例應用程式,
請勿將遷移變更提交至版本控制系統。
如有需要,您可以隨時
[復原 Swift Package Manager 遷移][removeSPM]。
:::
1. 在 Xcode 中,開啟插件的範例應用程式。
確認左側**專案導覽器**(Project Navigator)中顯示了 **Package Dependencies**。
1. 確認測試通過。
* **若您的插件有原生單元測試(XCTest),請確保您也
[更新了插件範例應用程式中的單元測試][update unit tests in the plugin's example app]。**
* 請依照[測試插件][testing plugins]的操作說明進行。
[`PrivacyInfo.xcprivacy` file]: https://developer.apple.com/documentation/bundleresources/privacy_manifest_files
[Pigeon]: https://pub.dev/packages/pigeon
[CocoaPods `dependency`]: https://guides.cocoapods.org/syntax/podspec.html#dependency
[Swift Package Manager dependencies]: https://developer.apple.com/documentation/packagedescription/package/dependency
[not recommended by Apple]: https://developer.apple.com/documentation/packagedescription/product/library(name:type:targets:)
[Product]: https://developer.apple.com/documentation/packagedescription/product
[`Bundle.module`]: https://developer.apple.com/documentation/xcode/bundling-resources-with-a-swift-package#Access-a-resource-in-code
[Bundling resources]: https://developer.apple.com/documentation/xcode/bundling-resources-with-a-swift-package#Explicitly-declare-or-exclude-resources
[Xcode resource detection]: https://developer.apple.com/documentation/xcode/bundling-resources-with-a-swift-package#:~:text=Xcode%20detects%20common%20resource%20types%20for%20Apple%20platforms%20and%20treats%20them%20as%20a%20resource%20automatically
[removeSPM]: /packages-and-plugins/swift-package-manager/for-app-developers#how-to-remove-swift-package-manager-integration
[update unit tests in the plugin's example app]: /packages-and-plugins/swift-package-manager/for-plugin-authors/#how-to-update-unit-tests-in-a-plugins-example-app
[testing plugins]: /testing/testing-plugins
[Bundling resources with a Swift package]: https://developer.apple.com/documentation/xcode/bundling-resources-with-a-swift-package
[`PackageDescription`]: https://developer.apple.com/documentation/packagedescription
在整份指南中,請將 `plugin_name` 替換為你的插件名稱。
以下範例使用 `ios`,請依實際情況替換為 `macos` 或 `darwin`。
1. 確認你目前執行的是 Flutter 3.44 或更新版本。此版本預設啟用 SwiftPM。
1. 首先,在 `ios`、`macos` 和/或 `darwin` 目錄下建立一個子目錄。
將這個新目錄命名為平台套件的名稱。
- plugin_name/
- ios/
- ...
- **plugin_name/**
1. 在這個新目錄中,建立以下檔案/目錄:
- `Package.swift`(檔案)
- `Sources`(目錄)
- `Sources/plugin_name`(目錄)
- `Sources/plugin_name/include`(目錄)
- `Sources/plugin_name/include/plugin_name`(目錄)
- `Sources/plugin_name/include/plugin_name/.gitkeep`(檔案)
- 此檔案確保該目錄會被提交。
若目錄中已新增其他檔案,可移除 `.gitkeep` 檔案。
你的插件結構應如下所示:
- plugin_name/
- ios/
- ...
- plugin_name/
- **Package.swift**
- **Sources/plugin_name/include/plugin_name/**
- **.gitkeep/**
1. 在 `Package.swift` 檔案中使用以下範本:
```swift title="Package.swift"
// swift-tools-version: 5.9
// The swift-tools-version declares the minimum version of Swift required to build this package.
import PackageDescription
let package = Package(
// TODO: Update your plugin name.
name: "plugin_name",
platforms: [
// TODO: Update the platforms your plugin supports.
// If your plugin only supports iOS, remove `.macOS(...)`.
// If your plugin only supports macOS, remove `.iOS(...)`.
.iOS("13.0"),
.macOS("10.15")
],
products: [
// TODO: Update your library and target names.
// If the plugin name contains "_", replace with "-" for the library name
.library(name: "plugin-name", targets: ["plugin_name"])
],
dependencies: [
.package(name: "FlutterFramework", path: "../FlutterFramework")
],
targets: [
.target(
// TODO: Update your target name.
name: "plugin_name",
dependencies: [
.product(name: "FlutterFramework", package: "FlutterFramework")
],
resources: [
// TODO: If your plugin requires a privacy manifest
// (in other words, if it uses any required reason APIs),
// update the PrivacyInfo.xcprivacy file
// to describe your plugin's privacy impact, and then uncomment this line.
// For more information, visit:
// https://developer.apple.com/documentation/bundleresources/privacy_manifest_files
// .process("PrivacyInfo.xcprivacy"),
// TODO: If you have other resources that need to be bundled with your plugin, refer to
// the following instructions to add them:
// https://developer.apple.com/documentation/xcode/bundling-resources-with-a-swift-package
],
cSettings: [
// TODO: Update your plugin name.
.headerSearchPath("include/plugin_name")
]
)
]
)
```
1. 更新 `Package.swift` 檔案中的[支援平台][supported platforms]。
```swift title="Package.swift"
platforms: [
// TODO: Update the platforms your plugin supports.
// If your plugin only supports iOS, remove `.macOS(...)`.
// If your plugin only supports macOS, remove `.iOS(...)`.
[!.iOS("13.0"),!]
[!.macOS("10.15")!]
],
```
[supported platforms]: https://developer.apple.com/documentation/packagedescription/supportedplatform
1. 更新 `Package.swift` 檔案中的套件、程式庫與目標名稱。
```swift title="Package.swift"
let package = Package(
// TODO: Update your plugin name.
name: [!"plugin_name"!],
platforms: [
.iOS("13.0"),
.macOS("10.15")
],
products: [
// TODO: Update your library and target names.
// If the plugin name contains "_", replace with "-" for the library name
.library(name: [!"plugin-name"!], targets: [[!"plugin_name"!]])
],
dependencies: [
.package(name: "FlutterFramework", path: "../FlutterFramework")
],
targets: [
.target(
// TODO: Update your target name.
name: [!"plugin_name"!],
dependencies: [
.product(name: "FlutterFramework", package: "FlutterFramework")
],
resources: [
// TODO: If your plugin requires a privacy manifest
// (for example, if it uses any required reason APIs),
// update the PrivacyInfo.xcprivacy file
// to describe your plugin's privacy impact, and then uncomment this line.
// For more information, visit:
// https://developer.apple.com/documentation/bundleresources/privacy_manifest_files
// .process("PrivacyInfo.xcprivacy"),
// TODO: If you have other resources that need to be bundled with your plugin, refer to
// the following instructions to add them:
// https://developer.apple.com/documentation/xcode/bundling-resources-with-a-swift-package
],
cSettings: [
// TODO: Update your plugin name.
.headerSearchPath("include/[!plugin_name!]")
]
)
]
)
```
:::note
若插件名稱包含 `_`,程式庫名稱必須改用 `-` 分隔。
:::
1. 若你的插件有 [`PrivacyInfo.xcprivacy` 檔案][`PrivacyInfo.xcprivacy` file],
請將其移至 `ios/plugin_name/Sources/plugin_name/PrivacyInfo.xcprivacy`,
並取消 `Package.swift` 檔案中對應資源的註解。
```swift title="Package.swift"
resources: [
// TODO: If your plugin requires a privacy manifest
// (for example, if it uses any required reason APIs),
// update the PrivacyInfo.xcprivacy file
// to describe your plugin's privacy impact, and then uncomment this line.
// For more information, visit:
// https://developer.apple.com/documentation/bundleresources/privacy_manifest_files
[!.process("PrivacyInfo.xcprivacy"),!]
// TODO: If you have other resources that need to be bundled with your plugin, refer to
// the following instructions to add them:
// https://developer.apple.com/documentation/xcode/bundling-resources-with-a-swift-package
],
```
1. 將 `ios/Assets` 中的資源檔移至
`ios/plugin_name/Sources/plugin_name`(或其子目錄)。
若適用,請將資源檔加入 `Package.swift` 檔案。
更多操作說明請參閱
[https://developer.apple.com/documentation/xcode/bundling-resources-with-a-swift-package](https://developer.apple.com/documentation/xcode/bundling-resources-with-a-swift-package)。
1. 將 `ios/Classes` 中的所有公開標頭移至
`ios/plugin_name/Sources/plugin_name/include/plugin_name`。
* 若不確定哪些標頭是公開的,請查看 `podspec` 檔案的
[`public_header_files`][] 屬性。
若未指定此屬性,則所有標頭均為公開。
建議你考慮是否真的需要將所有標頭設為公開。
* 在 `pubspec.yaml` 中定義的 `pluginClass` 必須為公開,
且須位於此目錄中。
1. 處理 `modulemap`。
若你的插件沒有 `modulemap`,請跳過此步驟。
若你使用 `modulemap` 讓 CocoaPods 建立 Test 子模組,
可考慮在 Swift Package Manager 中將其移除。
請注意,這會讓所有公開標頭都可透過模組存取。
若要在 Swift Package Manager 中移除 `modulemap` 但保留 CocoaPods 的設定,
請在插件的 `Package.swift` 檔案中排除 `modulemap` 和 umbrella header。
以下範例假設 `modulemap` 和 umbrella header 位於
`ios/plugin_name/Sources/plugin_name/include` 目錄中。
```swift title="Package.swift" diff
.target(
name: "plugin_name",
dependencies: [],
+ exclude: ["include/cocoapods_plugin_name.modulemap", "include/plugin_name-umbrella.h"],
```
若你希望單元測試同時相容 CocoaPods 和 Swift Package Manager,
可嘗試以下做法:
```objc title="Tests/TestFile.m" diff
@import plugin_name;
- @import plugin_name.Test;
+ #if __has_include()
+ @import plugin_name.Test;
+ #endif
```
若要在 Swift 套件中使用自訂 `modulemap`,
請參閱 [Swift Package Manager 的說明文件][Swift Package Manager's documentation]。
1. 將 `ios/Classes` 中所有剩餘的檔案移至
`ios/plugin_name/Sources/plugin_name`。
1. `ios/Assets`、`ios/Resources` 和 `ios/Classes` 目錄現在應為空,
可以刪除。
1. 將 `FlutterFramework` 加入為相依套件。
更新 `Package.swift` 以包含 `FlutterFramework`:
```swift title="Package.swift"
dependencies: [
[!.package(name: "FlutterFramework", path: "../FlutterFramework")!]
],
targets: [
.target(
// TODO: Update your target name.
name: "plugin_name",
dependencies: [
[!.product(name: "FlutterFramework", package: "FlutterFramework")!]
]
)
]
```
1. 若標頭檔案不再與實作檔案位於同一目錄,
請更新你的 import 陳述式。
舉例來說,假設有以下遷移情境:
* 遷移前:
```plaintext
ios/Classes/
├── PublicHeaderFile.h
└── ImplementationFile.m
```
* 遷移後:
```plaintext highlightLines=2
ios/plugin_name/Sources/plugin_name/
└── include/plugin_name/
└── PublicHeaderFile.h
└── ImplementationFile.m
```
在此範例中,`ImplementationFile.m` 中的 import 陳述式應更新為:
```objc title="Sources/plugin_name/ImplementationFile.m" diff
- #import "PublicHeaderFile.h"
+ #import "./include/plugin_name/PublicHeaderFile.h"
```
1. 若你的插件使用 [Pigeon][],請更新 Pigeon 輸入檔案。
```dart title="pigeons/messages.dart" diff
javaOptions: JavaOptions(),
- objcHeaderOut: 'ios/Classes/messages.g.h',
- objcSourceOut: 'ios/Classes/messages.g.m',
+ objcHeaderOut: 'ios/plugin_name/Sources/plugin_name/messages.g.h',
+ objcSourceOut: 'ios/plugin_name/Sources/plugin_name/messages.g.m',
copyrightHeader: 'pigeons/copyright.txt',
```
若 `objcHeaderOut` 檔案不再與 `objcSourceOut` 位於同一目錄,
可透過 `ObjcOptions.headerIncludePath` 修改 `#import`:
```dart title="pigeons/messages.dart" diff
javaOptions: JavaOptions(),
- objcHeaderOut: 'ios/Classes/messages.g.h',
- objcSourceOut: 'ios/Classes/messages.g.m',
+ objcHeaderOut: 'ios/plugin_name/Sources/plugin_name/include/plugin_name/messages.g.h',
+ objcSourceOut: 'ios/plugin_name/Sources/plugin_name/messages.g.m',
+ objcOptions: ObjcOptions(
+ headerIncludePath: './include/plugin_name/messages.g.h',
+ ),
copyrightHeader: 'pigeons/copyright.txt',
```
執行 Pigeon 以依最新設定重新產生程式碼。
1. 依需求更新 `Package.swift` 檔案中的自訂設定。
1. 在 Xcode 中開啟 `ios/plugin_name/` 目錄。
1. 在 Xcode 中開啟 `Package.swift` 檔案。
確認 Xcode 對此檔案不會產生任何警告或錯誤。
:::tip
若 Xcode 沒有顯示任何檔案,請退出 Xcode(**Xcode > Quit Xcode**)後重新開啟。
若 Xcode 在你修改後沒有更新,請嘗試點擊
**File > Packages > Reset Package Caches**。
:::
1. 若你的 `ios/plugin_name.podspec` 檔案有 [CocoaPods `dependency`][],
請將對應的 [Swift Package Manager dependencies][] 加入 `Package.swift` 檔案。
1. 若套件必須明確指定連結方式為 `static` 或 `dynamic`
([Apple 不建議此做法][not recommended by Apple]),請更新 [Product][] 以定義類型:
```swift title="Package.swift"
products: [
.library(name: "plugin-name", type: .static, targets: ["plugin_name"])
],
```
1. 進行其他自訂設定。如需了解如何撰寫 `Package.swift` 檔案的詳細資訊,請參閱
[https://developer.apple.com/documentation/packagedescription](https://developer.apple.com/documentation/packagedescription)。
:::tip
若你在 `Package.swift` 檔案中新增目標,請使用唯一名稱,
以避免與其他套件的目標發生衝突。
:::
1. 更新 `ios/plugin_name.podspec` 以指向新路徑。
```ruby title="ios/plugin_name.podspec" diff
- s.source_files = 'Classes/**/*.{h,m}'
- s.public_header_files = 'Classes/**/*.h'
- s.module_map = 'Classes/cocoapods_plugin_name.modulemap'
- s.resource_bundles = {'plugin_name_privacy' => ['Resources/PrivacyInfo.xcprivacy']}
+ s.source_files = 'plugin_name/Sources/plugin_name/**/*.{h,m}'
+ s.public_header_files = 'plugin_name/Sources/plugin_name/include/**/*.h'
+ s.module_map = 'plugin_name/Sources/plugin_name/include/cocoapods_plugin_name.modulemap'
+ s.resource_bundles = {'plugin_name_privacy' => ['plugin_name/Sources/plugin_name/PrivacyInfo.xcprivacy']}
```
1. 更新從 bundle 載入資源的方式,改用 `SWIFTPM_MODULE_BUNDLE`:
```objc
#if SWIFT_PACKAGE
NSBundle *bundle = SWIFTPM_MODULE_BUNDLE;
#else
NSBundle *bundle = [NSBundle bundleForClass:[self class]];
#endif
NSURL *imageURL = [bundle URLForResource:@"image" withExtension:@"jpg"];
```
:::note
`SWIFTPM_MODULE_BUNDLE` 僅在有實際資源時才能使用(無論是
[在 `Package.swift` 檔案中明確定義][Bundling resources],還是
[由 Xcode 自動偵測][Xcode resource detection])。
否則使用 `SWIFTPM_MODULE_BUNDLE` 將會產生錯誤。
:::
1. 若 `ios/plugin_name/Sources/plugin_name/include` 目錄中
只包含 `.gitkeep`,請更新 `.gitignore` 加入以下內容:
```text title=".gitignore"
!.gitkeep
```
執行 `flutter pub publish --dry-run` 以確認 `include` 目錄
會被發布。
1. 將插件的變更提交至版本控制系統。
1. 驗證插件仍可與 CocoaPods 正常運作。
1. 關閉 Swift Package Manager:
```sh
flutter config --no-enable-swift-package-manager
```
1. 切換至插件的範例應用程式目錄。
```sh
cd path/to/plugin/example/
```
1. 確認插件的範例應用程式可正常建置與執行。
```sh
flutter run
```
1. 切換至插件的頂層目錄。
```sh
cd path/to/plugin/
```
1. 執行 CocoaPods 驗證 lint:
```sh
pod lib lint ios/plugin_name.podspec --configuration=Debug --skip-tests --use-modular-headers --use-libraries
```
```sh
pod lib lint ios/plugin_name.podspec --configuration=Debug --skip-tests --use-modular-headers
```
1. 驗證插件可與 Swift Package Manager 正常運作。
1. 開啟 Swift Package Manager:
```sh
flutter config --enable-swift-package-manager
```
1. 切換至插件的範例應用程式目錄。
```sh
cd path/to/plugin/example/
```
1. 確認插件的範例應用程式可正常建置與執行。
```sh
flutter run
```
:::note
使用 Flutter CLI 在開啟 Swift Package Manager 功能的情況下執行插件的範例應用程式,
會將專案遷移以加入 Swift Package Manager 整合。
這會將範例應用程式的 Flutter SDK 最低版本需求提升至 3.24 或更高版本。
若你希望使用較舊的 Flutter SDK 版本執行範例應用程式,
請勿將遷移的變更提交至版本控制系統。
如有需要,你隨時可以
[復原 Swift Package Manager 遷移][removeSPM]。
:::
1. 在 Xcode 中開啟插件的範例應用程式。
確認左側 **Project Navigator** 中顯示 **Package Dependencies**。
1. 驗證測試通過。
* **若你的插件有原生單元測試(XCTest),請務必同時
[更新插件範例應用程式中的單元測試][update unit tests in the plugin's example app]。**
* 依照[測試插件][testing plugins]的說明操作。
[`PrivacyInfo.xcprivacy` file]: https://developer.apple.com/documentation/bundleresources/privacy_manifest_files
[`public_header_files`]: https://guides.cocoapods.org/syntax/podspec.html#public_header_files
[Swift Package Manager's documentation]: https://github.com/apple/swift-package-manager/blob/main/Documentation/Usage.md#creating-c-language-targets
[Pigeon]: https://pub.dev/packages/pigeon
[CocoaPods `dependency`]: https://guides.cocoapods.org/syntax/podspec.html#dependency
[Swift Package Manager dependencies]: https://developer.apple.com/documentation/packagedescription/package/dependency
[not recommended by Apple]: https://developer.apple.com/documentation/packagedescription/product/library(name:type:targets:)
[Product]: https://developer.apple.com/documentation/packagedescription/product
[Bundling resources]: https://developer.apple.com/documentation/xcode/bundling-resources-with-a-swift-package#Explicitly-declare-or-exclude-resources
[Xcode resource detection]: https://developer.apple.com/documentation/xcode/bundling-resources-with-a-swift-package#:~:text=Xcode%20detects%20common%20resource%20types%20for%20Apple%20platforms%20and%20treats%20them%20as%20a%20resource%20automatically
[removeSPM]: /packages-and-plugins/swift-package-manager/for-app-developers#how-to-remove-swift-package-manager-integration
[update unit tests in the plugin's example app]: /packages-and-plugins/swift-package-manager/for-plugin-authors/#how-to-update-unit-tests-in-a-plugins-example-app
[testing plugins]: https://docs.flutter.dev/testing/testing-plugins
## (可選,但建議)將插件作為本機套件新增至範例應用程式
若您的插件包含範例應用程式,
建議將插件作為本機套件新增至範例應用程式中。
雖然這並非必要,但在範例應用程式中編輯插件原始碼時,
可提供更好的 Xcode 支援。
請參閱 [issue #179032](https://github.com/flutter/flutter/issues/179032)。
### 將插件新增為本機套件
1. 在終端機中切換至 `my_plugin` 目錄。
1. 在 Xcode 中,執行以下指令以開啟範例應用程式的工作區
(視需要將 `ios` 替換為 `macos`):
```bash
open example/ios/Runner.xcworkspace
```
1. 右鍵點擊 **Flutter** > **Add Files to "Runner"**。
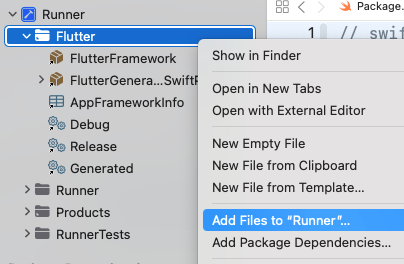
1. 選取 `my_plugin/ios/my_plugin`
(或視需要選 `macos` 或 `darwin`)。
1. 確認已選取 "Reference files in place"
(這應為預設選項),然後點擊 **Finish**。
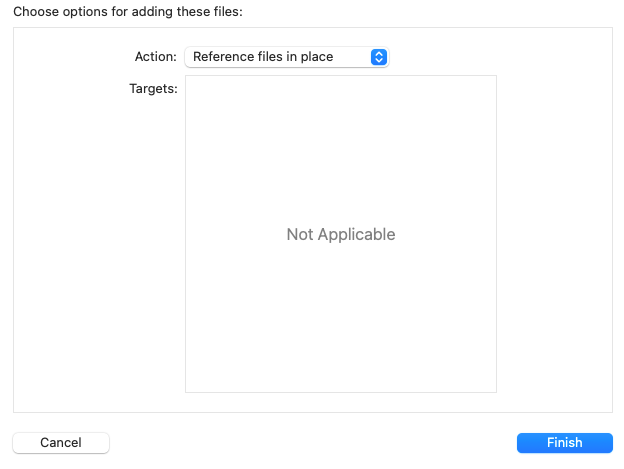
這會將插件新增為本機套件,
但它是以絕對路徑參照,
這在散佈時並不理想。
若要將其改為相對路徑,請依照以下說明操作。
### 改為相對路徑
1. 從 File Inspector 複製插件的「Full Path」。

1. 在終端機中執行:
`open -a Xcode example/ios/Runner.xcodeproj/project.pbxproj`
1. 找到以下內容:
```text
path = [COPIED FULL PATH]; sourceTree = ""
```
例如:
```text
path = /Users/username/path/to/my_plugin/ios/my_plugin; sourceTree = ""
```
1. 並將其替換為相對路徑:
```text
path = ../../ios/my_plugin; sourceTree = ""
```
(視需要將 `ios` 調整為 `macos` 或 `darwin`)。
## 如何更新插件範例應用程式中的單元測試
若您的插件含有原生 XCTests,
且以下任一條件成立,
您可能需要更新這些測試以配合 Swift Package Manager:
* 您在測試中使用了 CocoaPod 相依套件。
* 您在插件的 `Package.swift` 檔案中明確將其設定為 `type: .dynamic`。
若要更新單元測試:
1. 在 Xcode 中開啟 `example/ios/Runner.xcworkspace`。
1. 若您在測試中使用了 CocoaPod 相依套件(例如 `OCMock`),
請將其從 `Podfile` 檔案中移除。
```ruby title="ios/Podfile" diff
target 'RunnerTests' do
inherit! :search_paths
- pod 'OCMock', '3.5'
end
```
接著在終端機中,於 `plugin_name_ios/example/ios`
目錄下執行 `pod install`。
1. 在專案中切換至 **Package Dependencies**。
1. 點擊 **+** 按鈕,並在右上角的搜尋列中搜尋
僅供測試使用的相依套件並加以新增。
:::note
OCMock 使用了不安全的建置旗標,只能透過指定 commit 的方式使用。
`fe1661a3efed11831a6452f4b1a0c5e6ddc08c3d` 是 3.9.3 版本對應的 commit。
:::
1. 確認相依套件已新增至 `RunnerTests` 目標 (Target)。
1. 點擊 **Add Package** 按鈕。
1. 若您已在插件的 `Package.swift` 檔案中明確將函式庫類型設定為 `.dynamic`
([Apple 不建議此做法][library type recommendations]),
您還需要將其作為相依套件新增至 `RunnerTests` 目標。
1. 確認 `RunnerTests` 的 **Build Phases** 中包含 **Link Binary With Libraries**
建置階段:
若該建置階段尚不存在,請建立一個。
點擊 按鈕,
然後點擊 **New Link Binary With Libraries Phase**。
1. 在專案中切換至 **Package Dependencies**。
1. 點擊 按鈕。
1. 在開啟的對話框中,點擊 **Add Local...** 按鈕。
1. 切換至 `plugin_name/plugin_name_ios/ios/plugin_name_ios` 並點擊
**Add Package** 按鈕。
1. 確認已將其新增至 `RunnerTests` 目標,然後點擊
**Add Package** 按鈕。
1. 確認測試通過:**Product > Test**。
[library type recommendations]: https://developer.apple.com/documentation/packagedescription/product/library(name:type:targets:)