# 各層之間的溝通
> 如何實作依賴注入以實現 MVVM 各層之間的溝通。
除了為架構中的每個元件(Component)定義明確的職責之外,
同時也必須考慮這些元件之間如何溝通。
這不僅包括規範元件之間溝通的規則,
也涵蓋了元件之間實際溝通的技術實作方式。
一個應用程式的架構應該能夠回答以下問題:
* 哪些元件允許與哪些其他元件溝通
(包含相同型別的元件)?
* 這些元件彼此之間會暴露哪些輸出?
* 各層之間是如何「串接」在一起的?
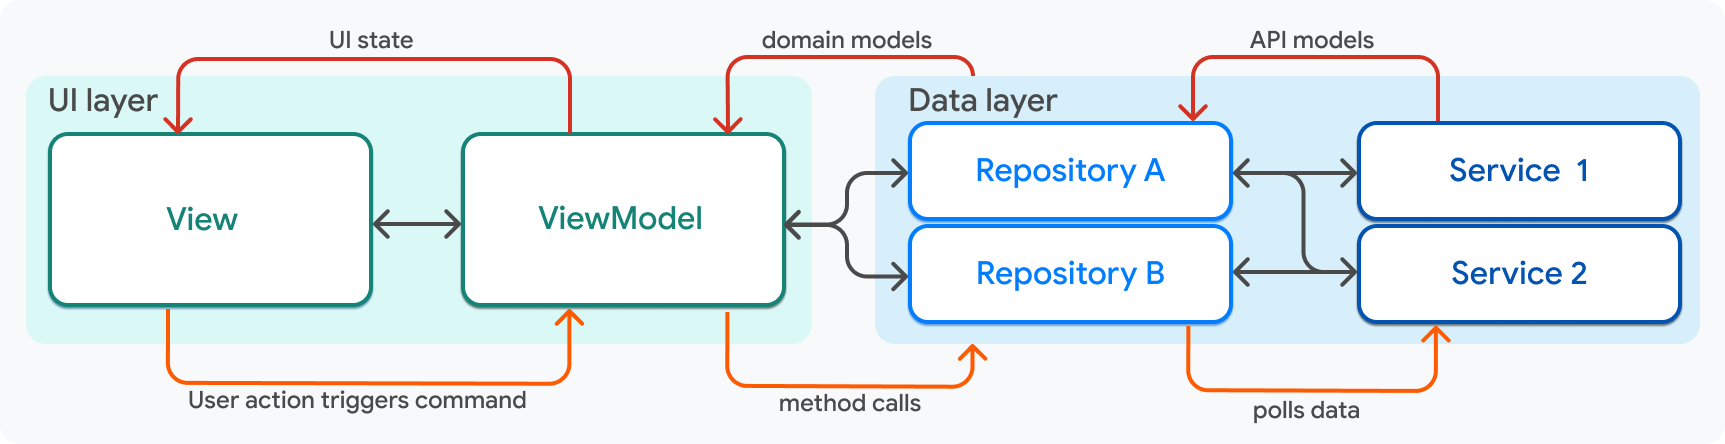
以此圖為指引,溝通規則如下:
| 元件 | 溝通規則 |
|-------------|--------------------------------------------------------------------------------------------------------------------------------------------------------------------------------------------------------------------------------------------------------|
| View | - View 只知道唯一一個 ViewModel,且永遠不會知道其他層或元件的存在。建立時,Flutter 會將 ViewModel 作為參數傳遞給 View,讓 View 可以存取 ViewModel 的資料與命令回呼。
|
| ViewModel | - 一個 ViewModel 僅屬於唯一一個 View,View 可以看到 ViewModel 的資料,但 ViewModel 不需要知道 View 的存在。
- ViewModel 可以知道一個或多個 Repository,這些 Repository 會在 ViewModel 的建構子中傳入。
|
| Repository | - Repository 可以知道多個 Service,這些 Service 會作為參數傳入 Repository 的建構子。
- Repository 可以被多個 ViewModel 使用,但它不需要知道這些 ViewModel 的存在。
|
| Service | - Service 可以被多個 Repository 使用,但它不需要知道 Repository(或其他任何物件)的存在。
|
{:.table .table-striped}
## 依賴注入(Dependency injection)
本指南已展示這些不同元件如何透過輸入與輸出彼此溝通。
在每一種情境下,兩層之間的溝通都是透過將一個元件
作為參數傳入建構子(由需要消費其資料的元件),
例如將 `Service` 傳入 `Repository.`
```dart
class MyRepository {
MyRepository({required MyService myService})
: _myService = myService;
late final MyService _myService;
}
```
然而,目前還缺少一個重要的部分:物件的建立。在應用程式中,`MyService` 實例究竟是在何處被建立,才能傳遞給 `MyRepository` 呢?
這個問題的答案涉及一種稱為 [依賴注入(dependency injection)][dependency injection] 的設計模式。
在 Compass 應用程式中,*依賴注入(dependency injection)* 是透過 [`package:provider`][`package:provider`] 來處理的。根據 Google 團隊在建構 Flutter 應用程式的經驗,建議使用 `package:provider` 來實作依賴注入。
服務(services)和資料儲存庫(repositories)會以 `Provider` 物件的形式,暴露在 Flutter 應用程式元件樹(widget tree)的最上層。
```dart title=dependencies.dart
runApp(
MultiProvider(
providers: [
Provider(create: (context) => AuthApiClient()),
Provider(create: (context) => ApiClient()),
Provider(create: (context) => SharedPreferencesService()),
ChangeNotifierProvider(
create: (context) => AuthRepositoryRemote(
authApiClient: context.read(),
apiClient: context.read(),
sharedPreferencesService: context.read(),
) as AuthRepository,
),
Provider(create: (context) =>
DestinationRepositoryRemote(
apiClient: context.read(),
) as DestinationRepository,
),
Provider(create: (context) =>
ContinentRepositoryRemote(
apiClient: context.read(),
) as ContinentRepository,
),
// In the Compass app, additional service and repository providers live here.
],
child: const MainApp(),
),
);
```
Services 之所以被公開,是為了能夠立即透過 `provider` 的 `BuildContext.read` 方法注入到 repositories 中,如前述程式碼片段所示。
接著,repositories 會被公開,以便在需要時注入到 view models 中。
在 widget tree 稍微下層的位置,對應整個螢幕的 view models 會在 [`package:go_router`][`package:go_router`] 設定中建立,此時同樣使用 provider 來注入所需的 repositories。
```dart title=router.dart
// This code was modified for demo purposes.
GoRouter router(
AuthRepository authRepository,
) =>
GoRouter(
initialLocation: Routes.home,
debugLogDiagnostics: true,
redirect: _redirect,
refreshListenable: authRepository,
routes: [
GoRoute(
path: Routes.login,
builder: (context, state) {
return LoginScreen(
viewModel: LoginViewModel(
authRepository: context.read(),
),
);
},
),
GoRoute(
path: Routes.home,
builder: (context, state) {
final viewModel = HomeViewModel(
bookingRepository: context.read(),
);
return HomeScreen(viewModel: viewModel);
},
routes: [
// ...
],
),
],
);
```
在 view model 或 repository 中,被注入的元件應該設為 private(私有)。
例如,`HomeViewModel` 類別會像這樣:
```dart title=home_viewmodel.dart
class HomeViewModel extends ChangeNotifier {
HomeViewModel({
required BookingRepository bookingRepository,
required UserRepository userRepository,
}) : _bookingRepository = bookingRepository,
_userRepository = userRepository;
final BookingRepository _bookingRepository;
final UserRepository _userRepository;
// ...
}
```
私有方法可防止具有 view model 存取權限的 view,直接呼叫 repository 上的方法。
以上就是 Compass 應用程式的程式碼導覽。本頁僅介紹了與架構相關的程式碼,並未涵蓋全部內容。大多數工具程式碼、元件(Widgets)程式碼,以及 UI 樣式設定都未提及。請瀏覽 [Compass app repository][Compass app repository],以取得依循這些原則所打造的完整且健全的 Flutter 應用程式範例。
[`package:provider`]: https://pub.dev/packages/provider
[`package:go_router`]: https://pub.dev/packages/go_router
[Compass app repository]: https://github.com/flutter/samples/tree/main/compass_app
[dependency injection]: https://en.wikipedia.org/wiki/Dependency_injection
## 意見回饋
由於本網站的這個章節仍在持續演進中,
我們[歡迎您的意見回饋][welcome your feedback]!
[welcome your feedback]: https://google.qualtrics.com/jfe/form/SV_4T0XuR9Ts29acw6?page="case-study/dependency-injection"